No matching chapters. Try another search.
ShowMotion 1.2 User Manual
Operator and show-programming guide · English · 27 October 2026
This guide covers the ShowMotion desktop application's core workflows and the additions in version 1.2. Control names follow the English interface. Hardware-dependent controls appear only when the required devices, drivers and licensed features are available. The media gallery accompanying this guide uses actual application captures; no simulated interface is presented as a screenshot.
No fixed input, output or layer limits. ShowMotion does not impose a fixed count on inputs, outputs or layers. Practical capacity depends on your Mac’s processing power and the connections and I/O cards available to it.
Use this guide in the order that matches your job:
• First show: read application architecture, first show, then Screens and layers. Prepare in Preview before taking the picture live.
• Program a performance: start with Grid or Timeline, then follow the nested composition recipes.
• Prepare the system: work through media and conversion, live inputs, audio and outputs.
• Operate on show day: use the checklist and shortcut reference. Keep the offline HTML manual with its videos and training files available beside your project.
Contents
• Application architecture: Engine, Electron and Web Remote
• 1. Understand the show model
• 4. Switch live with Program and Preview
• 5. Prepare media and playback
• 8. Route screens, groups and layers
• 10. Create graphics and web content
• 12. Build a stage and LED layout
• 16. Configure outputs and streaming
• 17. Monitor and operate the show
• 18. Save and reopen your work
Application architecture: Engine, Electron and Web Remote
ShowMotion separates the computer that runs the show from the interface used to control it. The Engine renders and plays the show on an Apple Silicon Mac. Electron is the desktop control application. Web Remote brings the control interface to another computer through a browser, including a Windows computer. Several operators can connect to one Engine, and the desktop application can select between several reachable Engines.
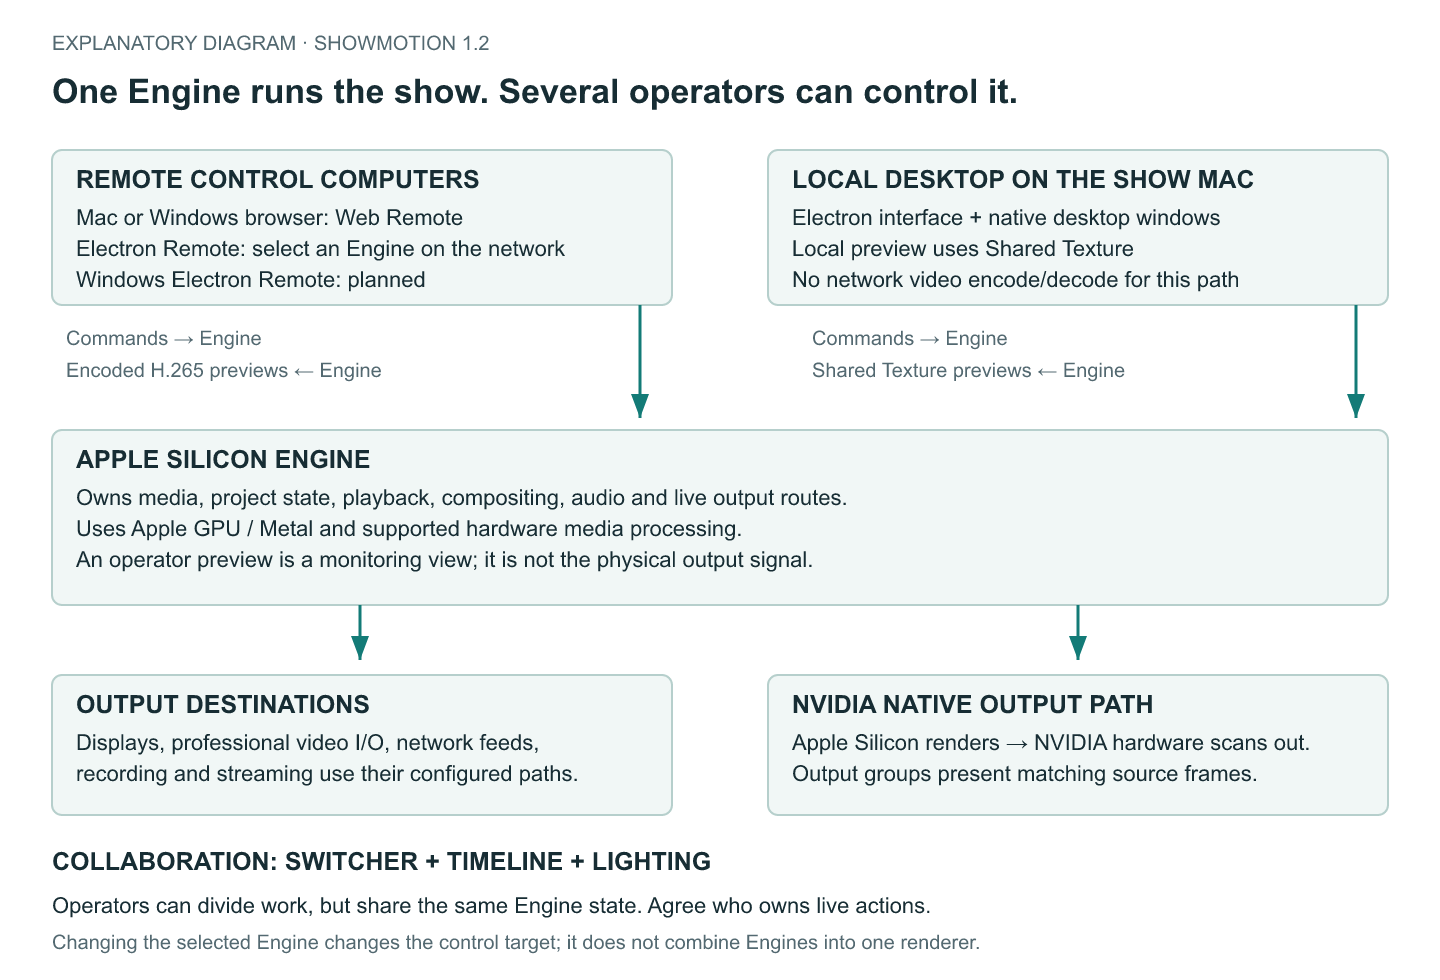
This separation lets you put the show computer near the outputs while operating from front of house, preparing content from another desk or giving a lighting operator their own control surface. The location of the interface does not change where the show is processed.
The Engine: the computer that runs the show
The Engine owns the live show state. It loads media, decodes video, renders layers and effects, plays Timelines and Grids, handles audio and supplies configured outputs. Media storage, capture devices, output connections and relevant macOS permissions belong to the Engine computer.
For example, a Windows laptop controlling an Engine does not become the video playback computer. Its browser sends commands and receives state and preview images. The Apple Silicon Mac continues to decode the video and generate the mapped output. Similarly, a remote browser's local files are not automatically available in the Engine's media library.
A Screen is an internal composition; an output is a destination for that composition or part of it. The Engine renders the output independently of the editor window's size. Zooming a viewport, moving a panel or minimizing a preview does not redefine the output mapping. A low-resolution remote preview is also not evidence that the physical output has changed resolution.
Why the Engine is Apple Silicon only
The Engine is designed around Apple Silicon and the native macOS graphics and media stack. Metal provides the GPU rendering path; supported media paths use Apple's hardware decoding facilities; local preview sharing uses macOS graphics surfaces. Apple Silicon combines CPU, GPU and media-processing hardware in a unified-memory architecture, giving ShowMotion a tightly integrated platform for moving decoded images into GPU composition and output.
For an operator, the benefit is a focused playback platform with native integration rather than a requirement to match several unrelated rendering backends. Hardware-assisted decoding and GPU processing can leave more capacity for composition, effects and outputs. They do not make every file equally cheap to play: codec, resolution, frame rate, simultaneous layers, effects, storage throughput and output configuration still determine the load.
Apple Silicon only describes the Engine, not every operator's computer. A Windows machine can operate Web Remote without running the Engine itself. A Windows Electron remote application is planned; it should not be treated as an available Windows Engine or as a shipping desktop client in this manual.
Input, output and layer capacity
ShowMotion does not impose fixed limits on the number of inputs, outputs or layers. Your Mac and connected hardware determine the practical capacity of a show. Resolution, frame rate, codec, effects and simultaneous playback affect processing and memory requirements; storage, network and connection bandwidth affect how much media can move through the system. Capture and output cards provide their own supported channel counts and formats.
Size the show computer around the actual show. Test the intended number of simultaneous clips, compositions, effects and outputs together. A single-file playback test cannot establish the capacity of a complete production. Keep enough headroom for transitions, overlapping clips and the additional work created by monitoring and recording.
Electron: desktop integration and Engine selection
Electron packages the shared control interface as a desktop application and integrates it with the local operating system. In the normal local setup it starts the bundled Engine and adds dedicated windows, desktop menus and native local preview handling. The controls are closely related to Web Remote because both use the same WebUI; their access to native desktop capabilities differs.
The desktop application also works as a remote control surface for Engines elsewhere on the network. Open Show Engines in the application menu. The Showmotion Engines panel lists reachable Engines and provides Refresh and a manual IP/URL field. Choose the intended Engine or enter its address and select Connect. The default discovery port is 3000; a manual address is useful when discovery does not find the intended host.
Selecting another Engine changes which show the interface controls. It does not copy the current project or media to that machine, combine the Engines' rendering capacity, or synchronize their playback. Treat each Engine as a separate show system with its own state, resources and outputs. Check the selected host and loaded project before issuing a live command. Switching targets may also reorganize detached workspace windows as the application reconnects.
A practical multi-Engine arrangement is one Engine for the main stage and another for a separate room. An operator can select the appropriate Engine from the desktop application to inspect or operate it. If both rooms need continuous attention, assign a dedicated control surface and operator to each rather than relying on frequent target switching.
Web Remote: control from macOS or Windows
Start ShowMotion on the Engine computer, then open its reachable WebUI address in a compatible browser on the control computer. On the Engine computer itself, the default local address is http://127.0.0.1:3000. From a different computer, use the Engine's network address, for example http://192.168.1.50:3000, with the address and port appropriate to your installation. 127.0.0.1 always means the computer running the browser.
The Windows browser controls the Apple Silicon Engine over the network. This is why the shortcut reference includes platform-aware keyboard operation: the keyboard belongs to the control computer. Use the documented modifier for that platform; many editing commands accept Command on macOS and Ctrl on Windows. Desktop application menu commands are not automatically available in Web Remote. Focus the intended workspace first. A browser or operating-system shortcut can take precedence, and typing in a text field is different from invoking a workspace command.
After connecting, verify the Engine identity, loaded project and connection state. Make a harmless Preview change and check that the other interface sees the expected state. Test preview decoding on the actual browser and computer before relying on it during a show; successful command connection alone does not prove that video previews decode correctly.
Local Shared Texture and remote H.265 previews
On the show computer, the local Electron application can display native Shared Texture previews. The Engine and desktop interface exchange GPU image surfaces on the same Mac. This avoids the video encode, network transfer and decode stages required by a streamed preview. It is the preferred local path for responsive visual editing, while the amount of displayed detail can adapt to viewport size and zoom.
A remote computer cannot share the Engine Mac's local GPU surfaces. Remote preview uses a compressed video path, including H.265/HEVC for the atlas preview. The Engine encodes preview images, the network transports them, and the remote device decodes and displays them. Browser, operating system and graphics hardware must support the selected preview path; available fallback behavior depends on the client and configuration.
This adds preview delay. Its size depends on encoding, network conditions, decoding and display scheduling, so there is no single latency figure that applies to every setup. H.265 reduces the bandwidth needed for a useful preview, but compression and decoding are additional work. A fast control connection can coexist with a delayed preview: command response and preview arrival are different measurements.
For example, after pressing TAKE remotely, the Engine may already have changed its physical output while the browser is still showing an earlier preview frame. Do not repeatedly press TAKE just because that picture has not caught up. Use a monitor of the actual output when judging precise live timing or synchronization. Remote preview is an operating aid, not a replacement for output confidence monitoring.
Use a reliable wired network for critical operation where possible. If the remote picture stutters, compare it with the local Electron view and an actual output monitor. Smooth output with a delayed browser picture points toward the monitoring path; a problem visible at the output needs investigation on the Engine, media or output side. Adding more clients and visible previews can also add monitoring and network load, so rehearse the intended operator setup.
Collaborative operation: one show, several workstations
Multiple clients can work with the same Engine. Each operator can open the workspace relevant to their role, but the show objects and live actions are shared. Different panel layouts do not create independent copies of the project. A second operator's Timeline edit, lighting command or output change can affect the show running on the Engine.
Useful divisions of work include:
| Operator | Responsibility | Coordination point |
|---|---|---|
| Show caller / video operator | Prepare Switcher Preview and perform TAKE or CUT | Own live switching and announce handovers |
| Timeline programmer | Build the next sequence, edit clips and prepare cue timing | Confirm whether the Timeline is currently playing or routed into Program |
| Lighting designer | Prepare fixture looks, presets and Stage Designer visualization | Coordinate when a look becomes a live lighting command |
| Lighting operator | Run agreed lighting cues during the show | Avoid competing with Timeline-driven lighting cues |
| Media operator | Prepare and convert incoming content | Agree before replacing media used by an active layer |
For a conference, one operator might switch cameras and slides while a colleague prepares the next speaker's Timeline. A third can design lighting looks and check them in Stage Designer. For a performance, the Timeline operator can manage programmed video and lighting cues while the Switcher operator handles live camera composition. In a multi-room installation, separate teams can connect to separate Engines; that is a different arrangement from several people sharing one Engine.
Agree ownership by workspace and by live object. A Timeline being edited may also be a layer in the Switcher's Program composition. A lighting preset may be called both manually and by a Timeline. These are shared dependencies even when the operators are looking at different workspaces. Prepare inactive material where possible, then explicitly hand it over for use.
Use clear names for Screens, Timelines, Grids and lighting presets. Announce actions such as “opening sequence is ready” or “lighting control handed to Timeline.” Avoid simultaneous edits to the same clip or parameter, and agree who may save or load projects and change outputs. This workflow should not be understood as automatic edit locking, conflict merging or per-operator isolation.
Connection and confidence checks
Before the show, check the Engine host, project, media availability and outputs; connect every planned control surface; verify keyboard focus and preview behavior; and agree who owns live actions. Test the collaboration setup under the expected playback load.
If a remote interface disconnects, first check the Engine and the receiving output rather than assuming playback stopped. A failed remote connection and an Engine failure are different events. Reconnect to the intended host and verify current state before sending another command. Conversely, do not assume that quitting the local desktop application is equivalent to closing a remote browser: the desktop application manages the bundled Engine lifecycle.
1. Understand the show model
ShowMotion combines media playback, live video switching, timed sequences, interactive clip launching, output mapping and lighting in one show environment.
| Element | Purpose | Example |
|---|---|---|
| Source | Supplies content | Video, image, audio, PDF, camera, NDI, generator |
| Layer | Places one source in a composition | Background, presenter, title |
| Screen | Holds a Program and Preview composition | Main LED wall, confidence monitor |
| Grid | Launches clips and looks nonlinearly | Walk-in looks and presentation cues |
| Timeline | Programs content and actions over time | Opening sequence or timecode show |
| Output | Sends a composition or region to a destination | Display, SDI, network, recording |
| Stage | Visualizes physical placement and mapping | LED panels, fixtures, stage geometry |
A Screen is an internal composition, not a physical connector. Choose which Screen reaches each device in Output Settings. A Timeline or Grid can be a source inside another composition. This lets you combine a programmed background with live cameras and independent titles.
PGM (Program) is the live state. PVW (Preview) prepares the next state. Changes made directly to PGM can be visible immediately on connected outputs. Build and check the next look in PVW, then use TAKE or CUT.
Choose the right workflow
• Use Switcher when an operator decides when to change looks.
• Use Grid when clips, groups or complete columns must be recalled independently.
• Use Timeline when timing, animation and cue order must be repeatable.
• Combine them when one method covers only part of the show.
2. Start your first show
Set resolution and frame rate
1. Open Preferences > Screen Settings.
2. Choose the Screen and set its resolution to the intended content canvas.
3. Set the global composition frame rate to match your media and destination where possible.
4. Apply the composition settings.
Different Screens can have different resolutions. Composition FPS controls the rendering cadence; a Timeline's timecode rate controls timecode interpretation. They are separate settings.
Mixed frame rates can create uneven motion even when the renderer meets its target. For example, 25 fps media in a 50 fps composition repeats each image evenly, while 25 fps media in a 60 fps composition needs an uneven cadence.
Import, preview and take
1. Open Media and import a video through the file picker or drag-and-drop.
2. Open Switcher and select your Screen.
3. Drag the video onto PVW.
4. Select its layer and adjust size and position in the Inspector.
5. Check the playback mode, start behavior, trim and audio.
6. Choose a transition and duration.
7. Press TAKE to transition to PGM, or CUT for an immediate change.
Exercise: a simple 1920 × 1080 show
Prepare one short video, a still image and a title. Use media whose frame rate matches your intended test output. Set the main Screen to 1920 × 1080 and choose the corresponding global FPS. Put the still on PVW, size it to fill the canvas, then add Text above it with the words “ShowMotion rehearsal.” Take that look to PGM.
Copy PGM back to PVW. Replace the background with the video while retaining the title. Set the video's start policy deliberately and choose a short fade. Take the new look and check the video's first frame, the title's layer order and the ending behavior. You have now tested source import, layering, Preview preparation, live switching and playback policy before adding routing complexity.
If nothing changes after TAKE, check the selected Screen and whether PGM and PVW already contain identical content. If the title disappears, inspect layer order and opacity. If the video starts at an unexpected time, revisit its start/restart settings rather than changing the transition duration.
Connect an output
1. Open Output Settings and add an output.
2. Give it a recognizable name and choose its type.
3. Select your Screen and the PGM bus as the source.
4. Check the source region, destination region and output canvas.
5. Select the device or network destination and matching video mode.
6. Enable the output and verify the image at the actual destination.
For a rehearsal, use a local display or a recording before enabling a public stream or show output.
3. Arrange your workspace
The source library normally sits on the left, the active workspace in the center and the Inspector on the right. Workspaces include Switcher, Lighting, Timeline, Grid and Multiviewer.
In 1.2 you can rearrange workspace tabs and panels, adjust their sizes and save layouts for different tasks. Use workspace controls such as Move earlier, Move later, Hide workspace and New window. A detached workspace can return with Dock.
A useful programming layout keeps the Timeline and Inspector together. A live layout can put Switcher on the main monitor and Operator or Multiviewer on another display. Save clearly named layouts so the operating position can be restored before the show.
Use viewport Zoom, Pan and Fit to inspect a composition. These controls change your editing view; they do not resize the composition or output. Local GPU previews adapt to the visible viewport and zoom within source and resource limits. Judge final image quality on the output as well as in the editor.
4. Switch live with Program and Preview
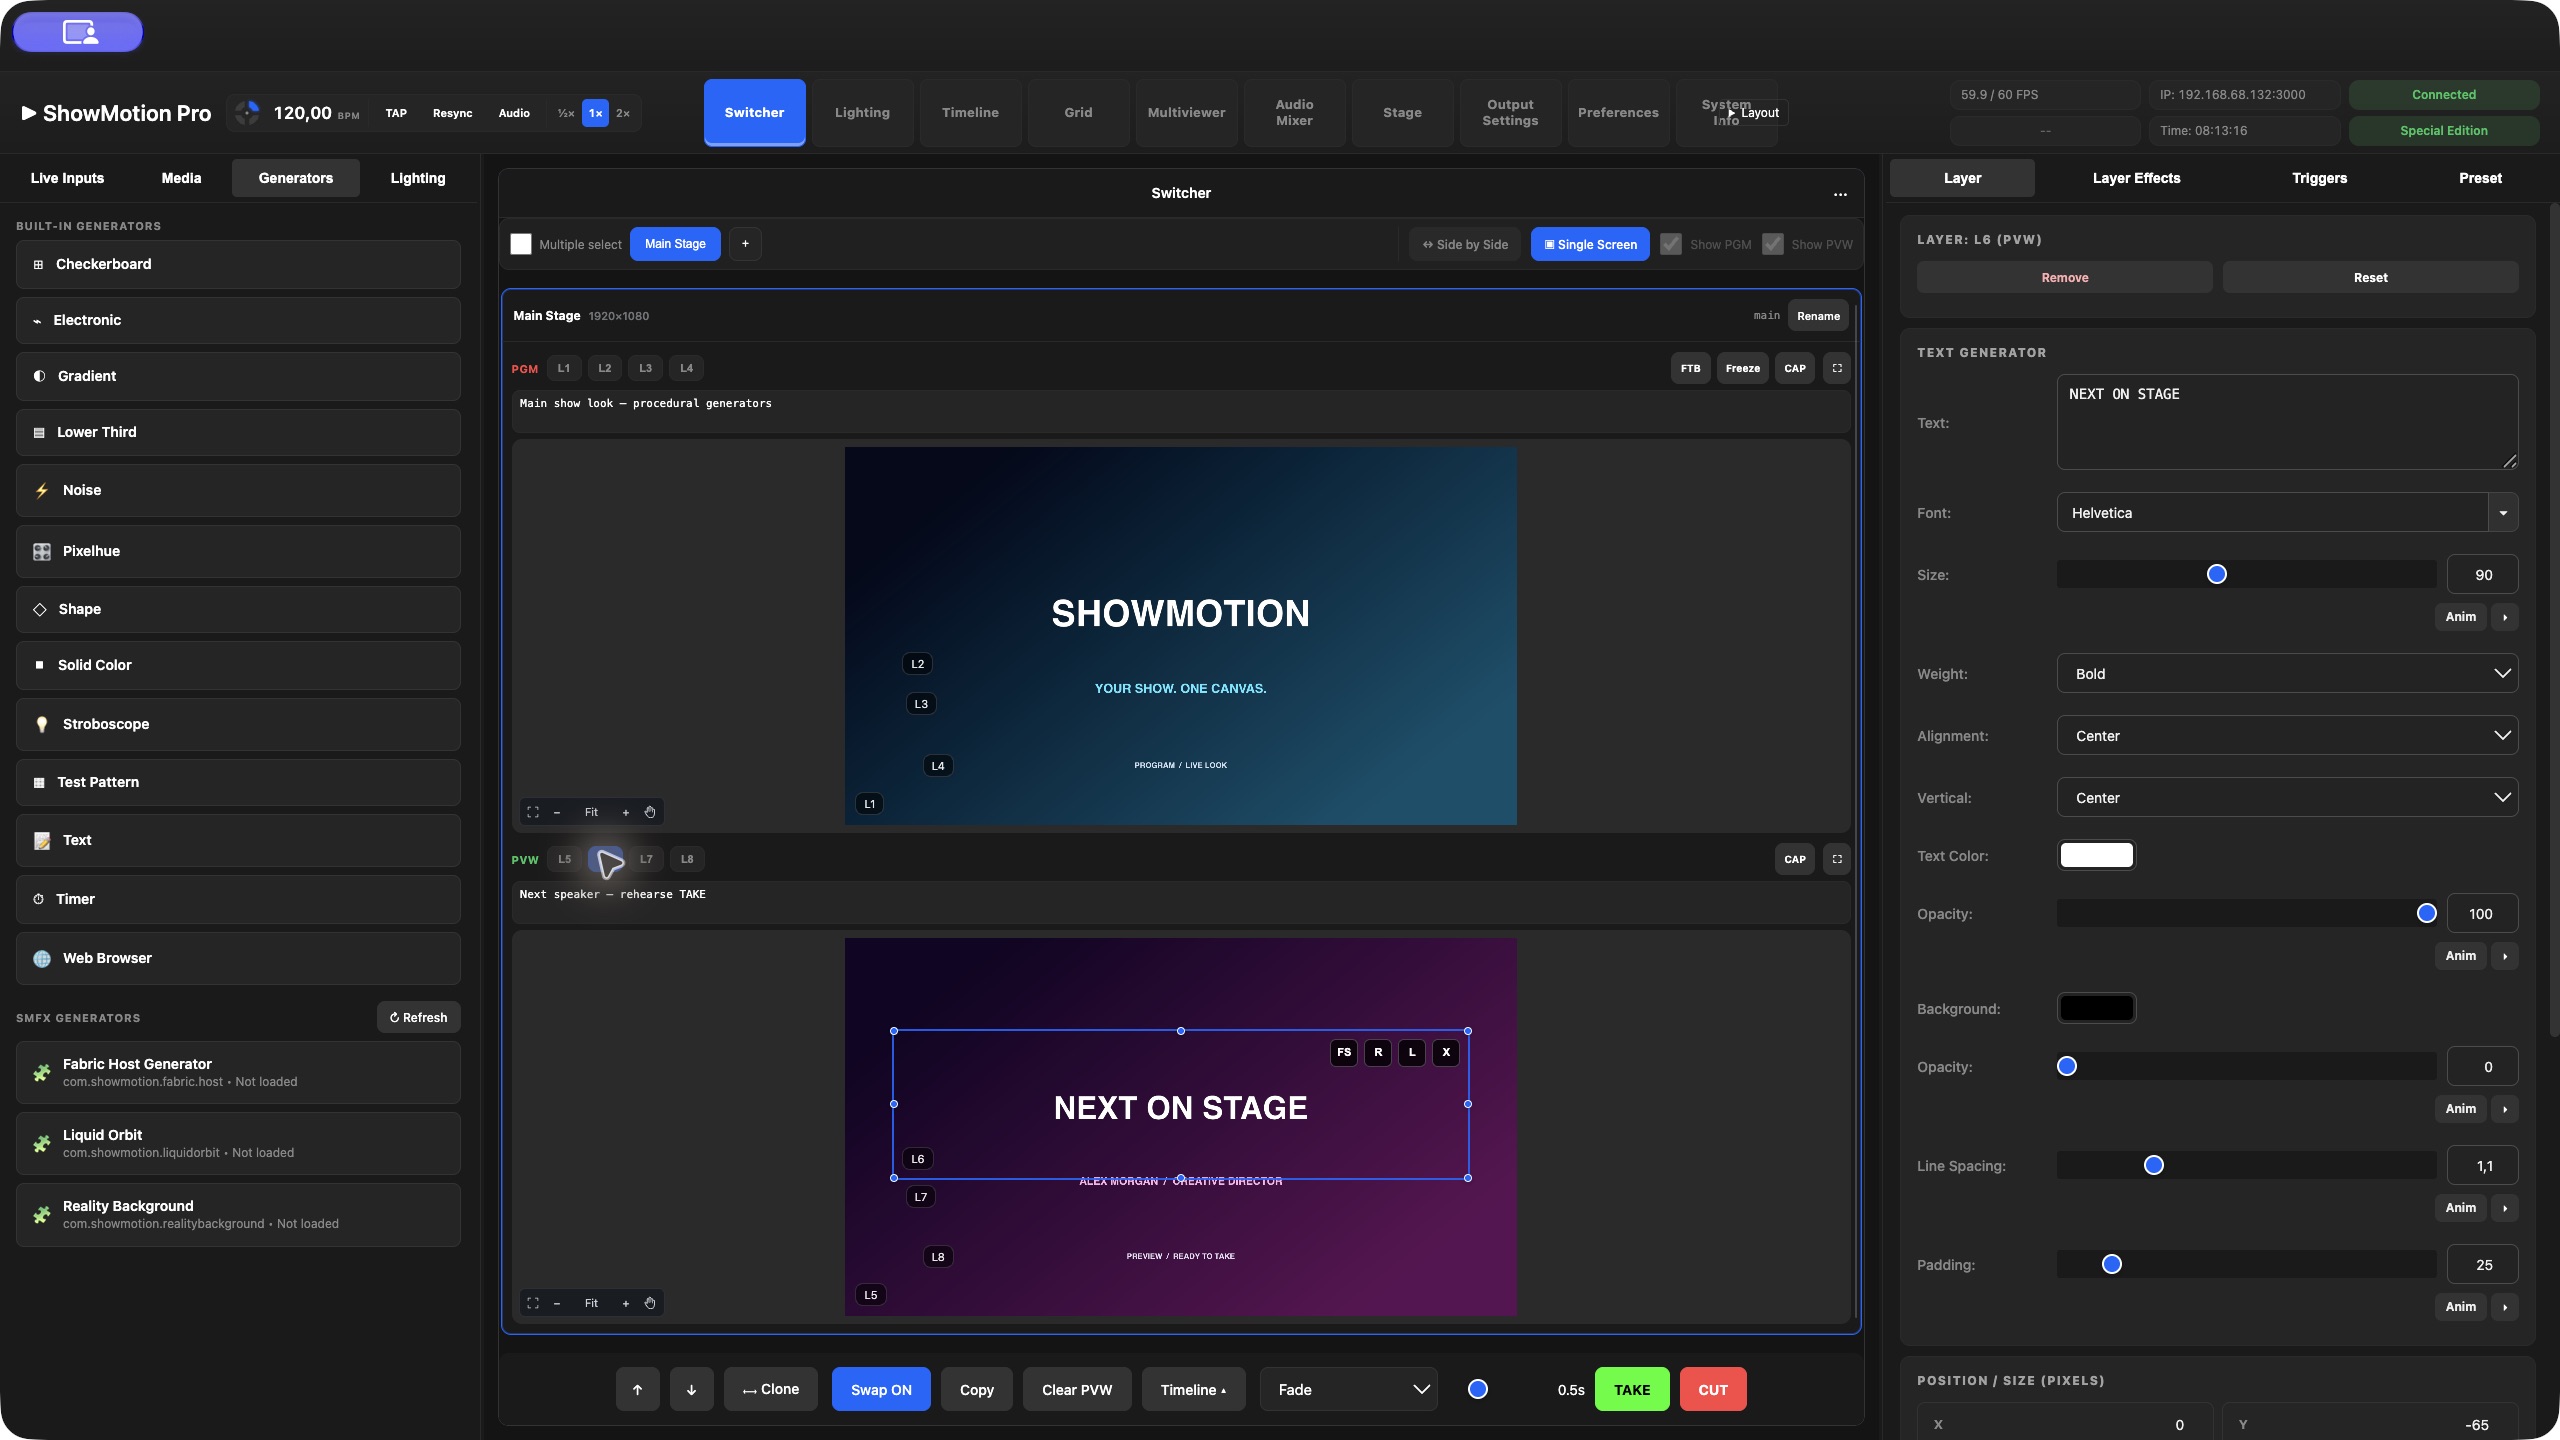
Build Screens and layer compositions
A Screen is a canvas inside ShowMotion. It has its own Program (PGM) and Preview (PVW) compositions. It does not automatically mean a monitor, a projector or an LED processor. You can send one Screen to several outputs, or use different Screens for the main wall and a confidence monitor. Create and compose the Screens first; choose their destinations in Output Settings afterwards.
A source supplies the content. A layer places that content on a Screen, with its own position, size, opacity and effects. Importing a video into Media makes it available; dragging it onto PVW creates the layer that displays it. This distinction is useful when the same media appears in several looks.
Create a second Screen
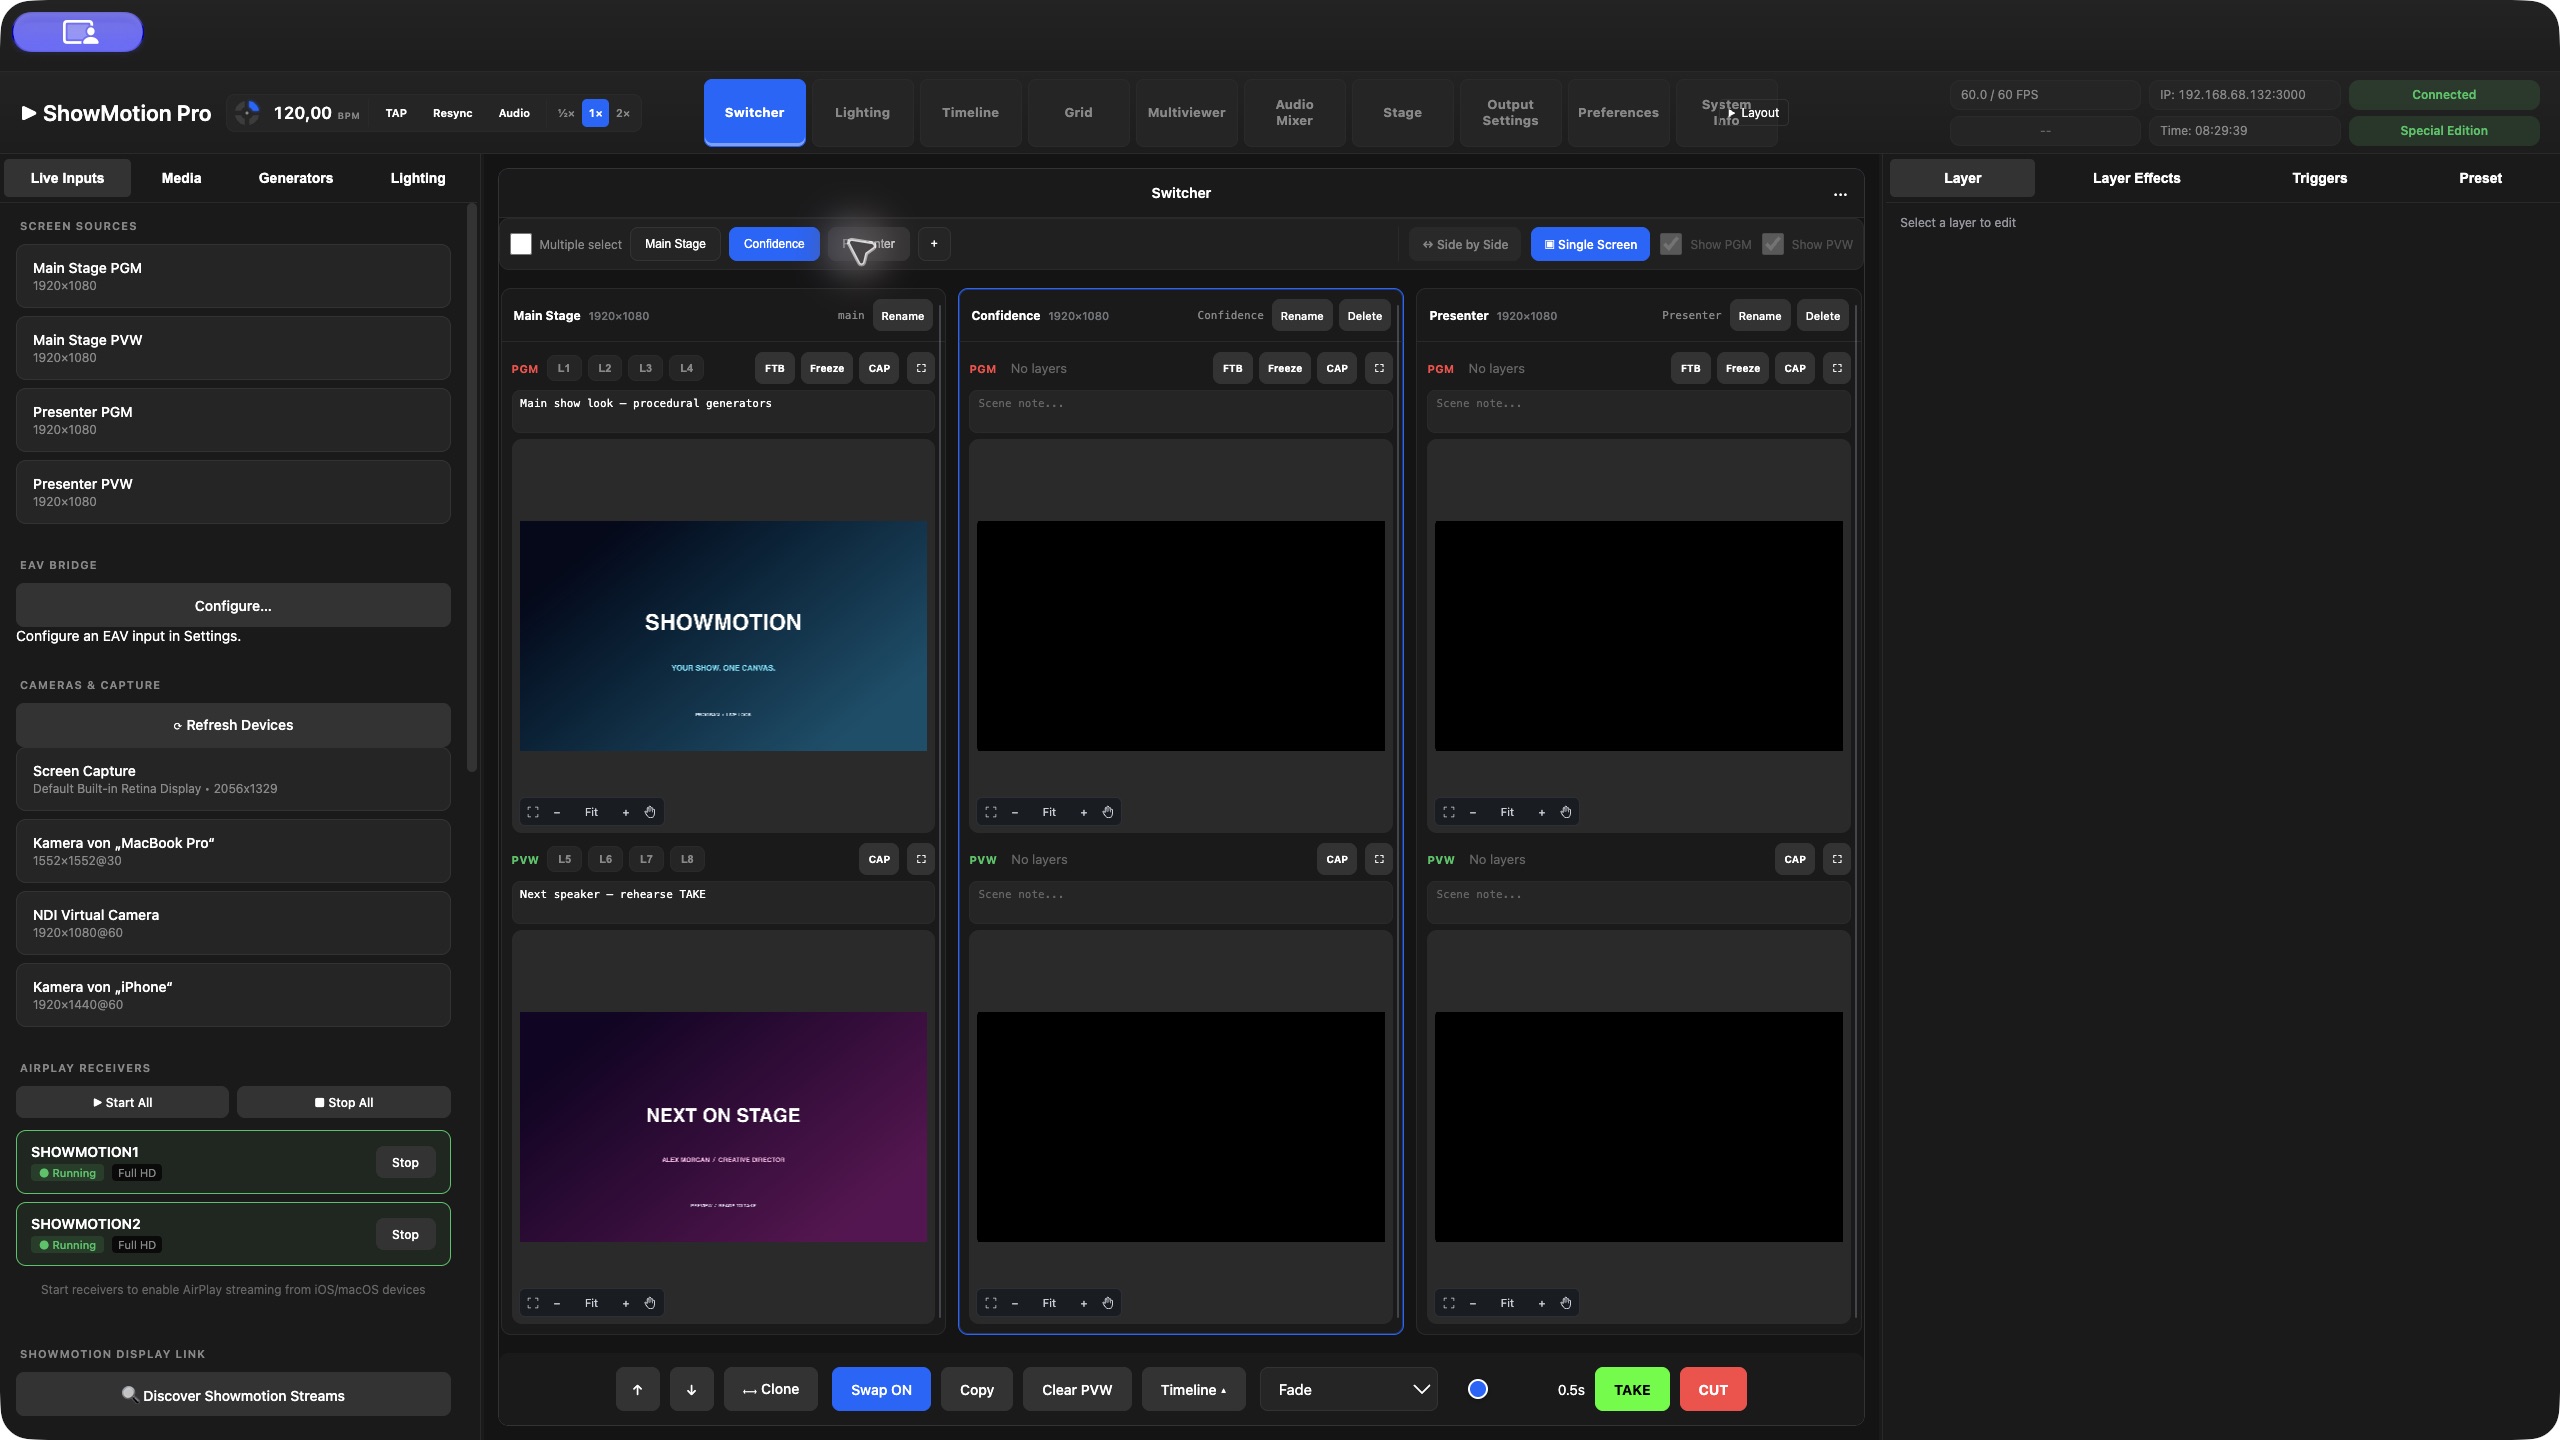
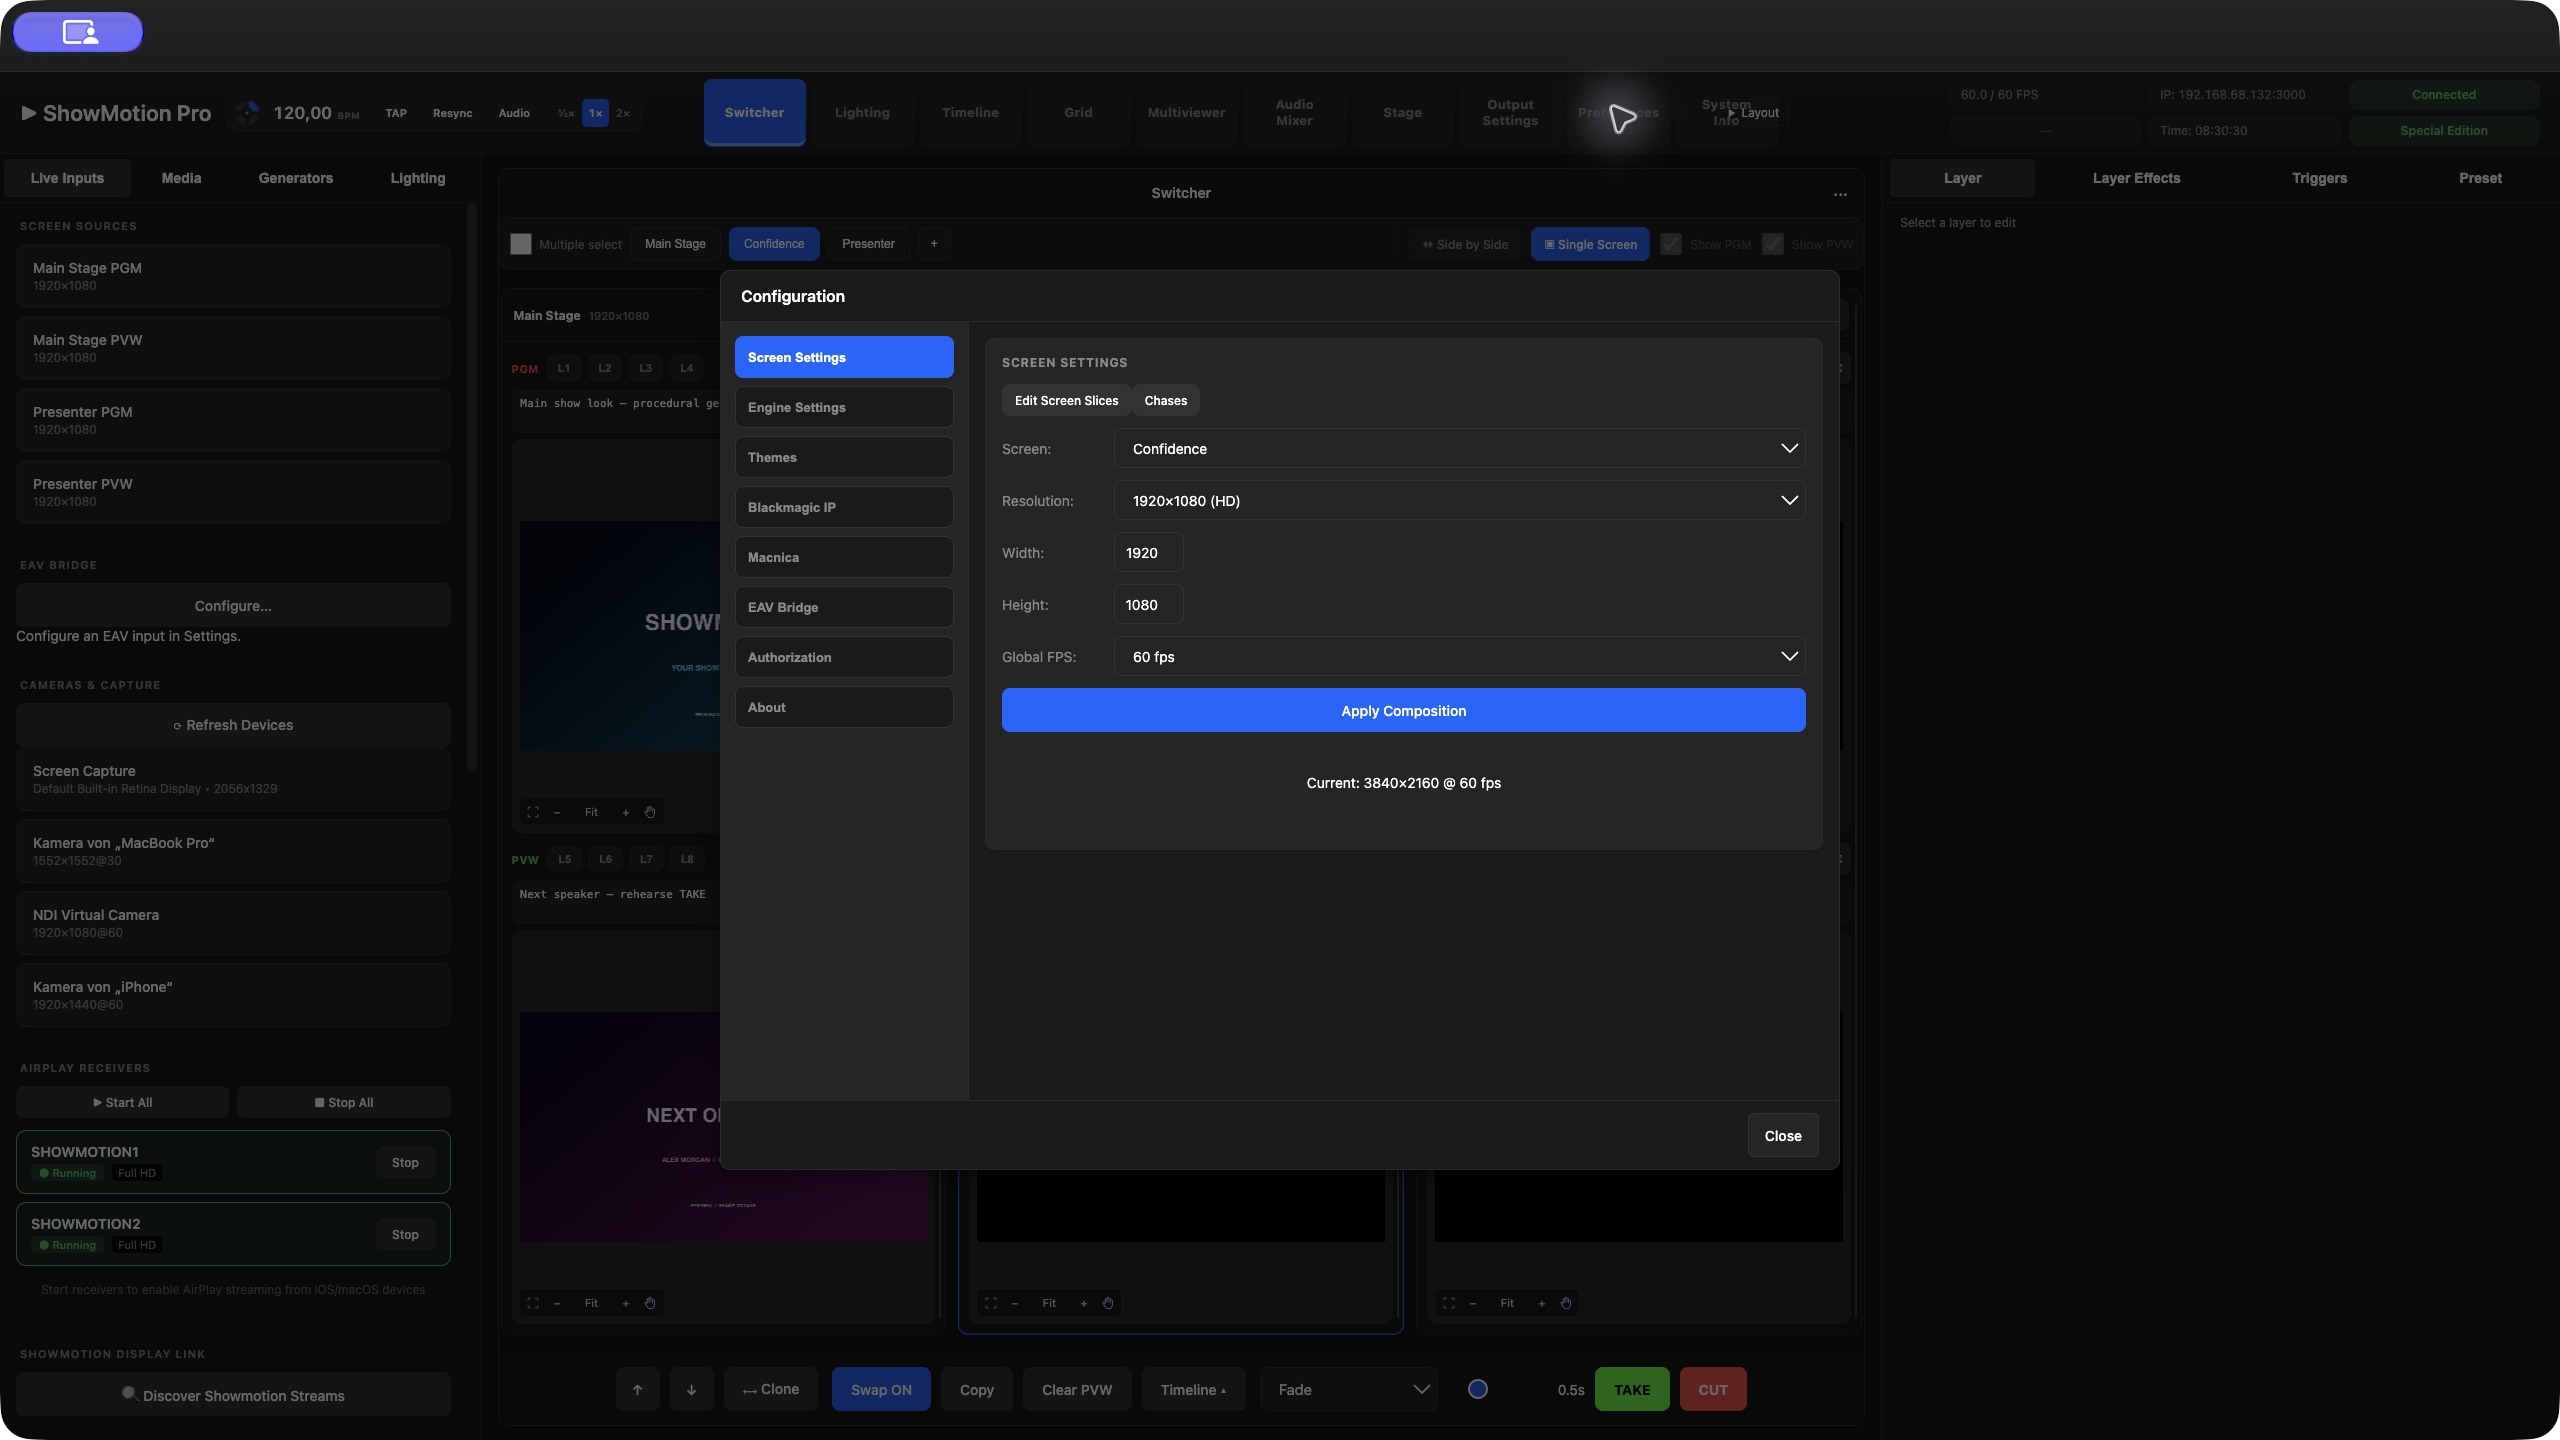
Goal: add an independent confidence-monitor composition while keeping the main Screen intact.
1. Open Switcher and find the Screen tabs above the composition area.
2. Click + at the end of the Screen tabs.
3. Look for the new Screen tab. Creating the Screen keeps the previously selected Screen active.
4. Click the new tab to work on it. Check that its PGM/PVW views and layer lists belong to the new Screen before adding content.
5. Double-click its tab. In Rename Screen ID, enter Confidence and confirm.
6. Open Preferences > Screen Settings. In Screen, select Confidence.
7. Choose 1920×1080 (HD) under Resolution. For an unusual LED canvas, choose Custom and enter Width and Height instead.
8. Review Global FPS, then click Apply Composition. Global FPS applies to the composition engine; it is not an independent frame rate for this one Screen.
9. Close Preferences and select Confidence in Switcher again. Verify its displayed dimensions before composing it.
Expected result: a separate Screen with its own empty PGM/PVW compositions, ready to receive layers. Adding it does not create or enable an output.
Avoid this mistake: clicking + and immediately dragging a source without selecting the new tab adds the source to the previously selected Screen.
Rename or remove a Screen
Double-click a Screen tab to rename it. The built-in main Screen is special: renaming it changes its display name, while its internal identity remains main. For additional Screens, the dialog changes the Screen ID. Use simple names such as Confidence or Side-Wall; spaces are converted to hyphens and unsupported punctuation is removed. IDs must be unique. main and internal prefixes such as multiviewer_, __timeline_ and __grid_ are reserved.
To remove an additional Screen, right-click its tab and read Delete Screen before confirming. All layers on that Screen are removed. The built-in main Screen cannot be deleted this way. Check any outputs and routes that used the removed Screen before continuing the show.
Add a source by drag-and-drop
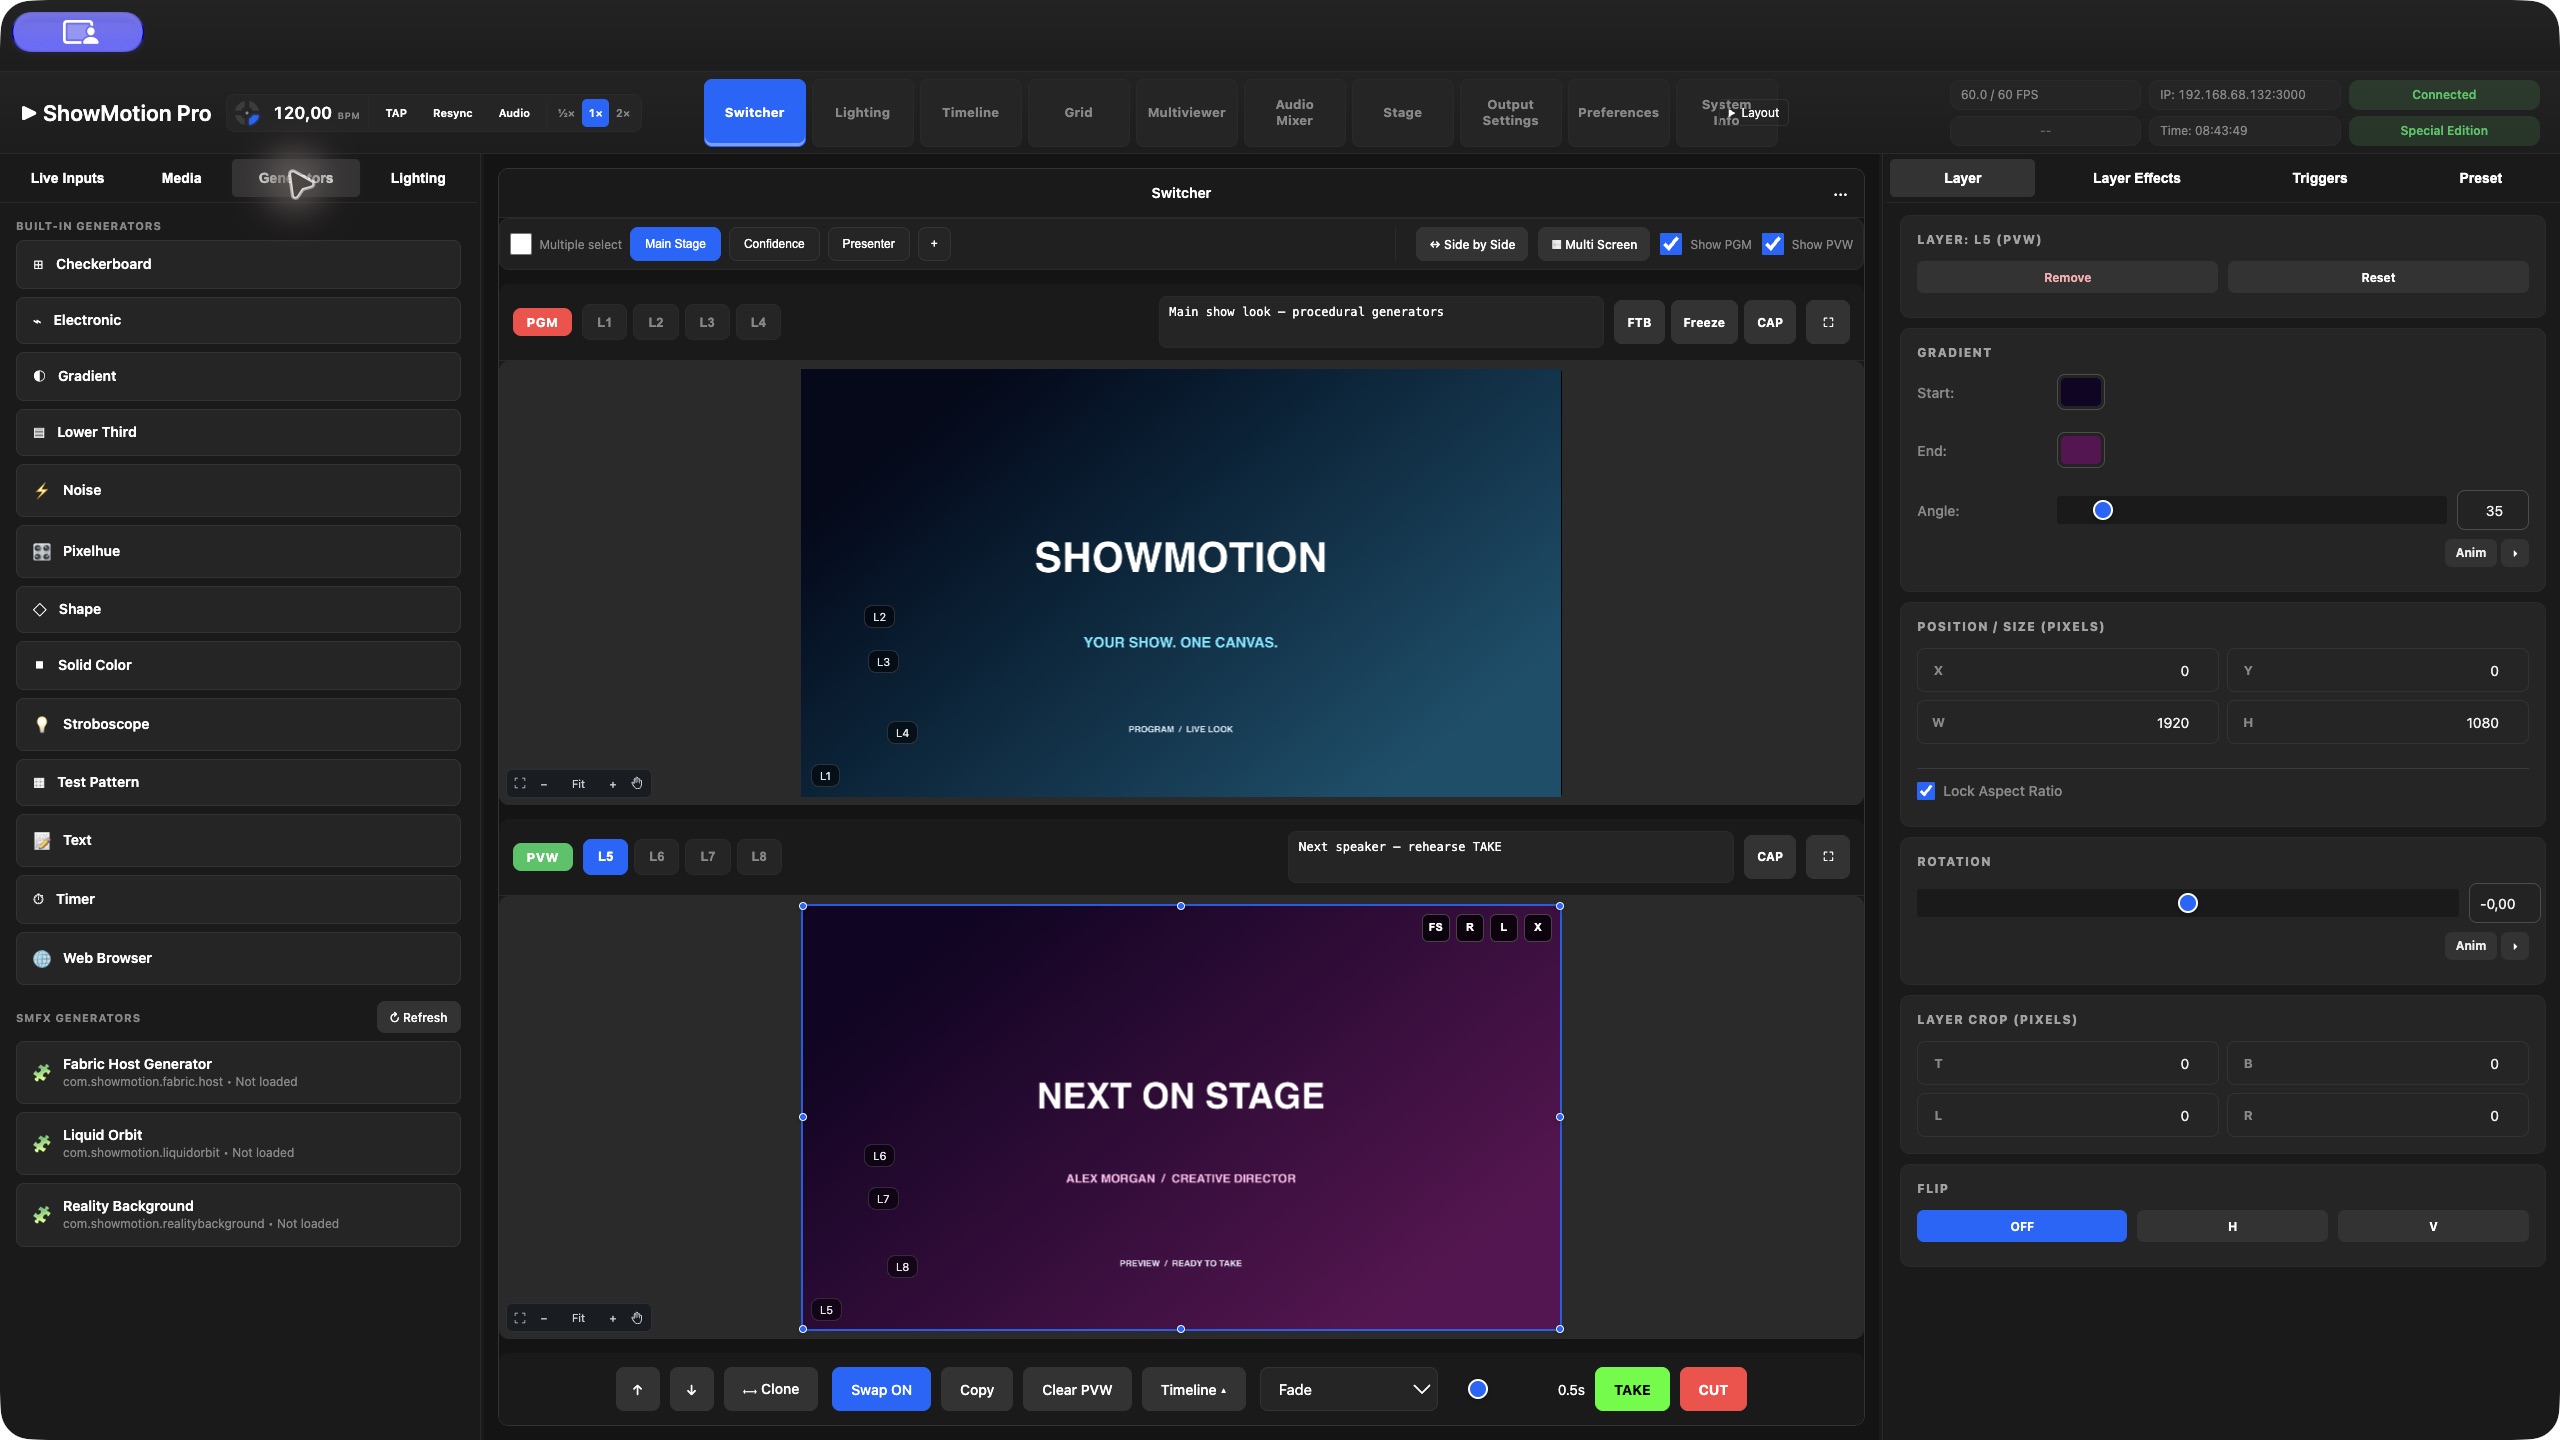
Goal: build a background and a title in Preview.
1. Select the intended Screen in Switcher.
2. Open Media and locate an imported still image or video. Alternatively, open Generators for procedural content or Live Inputs for an available capture/network source.
3. Drag the source into the PVW canvas and release. Drop into the image area, rather than onto an existing layer button.
4. Check that a new L… button appears under PVW. Click that button to select the new layer precisely.
5. Open the Inspector's Layer tab. Confirm the header shows the expected layer and PVW.
6. Set the layer's transform and source-specific controls. For video, also check its playback mode, start behavior and audio.
7. Open Generators, drag Text onto PVW and enter a short title in its text controls.
8. Select the title layer and move it above the background using ↑ — Move Selected Layer Up if necessary.
9. Check PVW. Only when the composition is ready, use TAKE or CUT.
Expected result: two independently selectable layers in PVW. PGM changes when you take the prepared composition live. Dragging into PGM instead edits the live composition directly.
Add, replace and reorder are different operations
| Gesture | Result | Best use |
|---|---|---|
| Drag a source into the PVW canvas | Create another layer | Add a title, logo or picture-in-picture |
Drop a source directly onto an existing L… button | Replace that layer's source | Change the video occupying an established frame |
| Hold Option on Mac or Alt on Windows while dragging a source over an existing canvas layer | Replace the highlighted target layer's source | Replace visually when its target outline is clear |
Drag one L… button onto another on the same Screen and bus | Exchange the two layers' stacking positions | Swap a foreground and background layer |
| Select a layer and click ↑ or ↓ in the transport bar | Move the layer one position through the stack | Make a controlled one-step order change |
Replacement is intended to retain the existing layer placement rather than build a new layer. Check the framing when replacing media with a different aspect ratio, and recheck source-specific playback settings. If the layer count increased, you added a layer instead of replacing one. Undo and repeat with the destination L… button clearly targeted.
The layer buttons are ordered from the bottom of the stack to the top. A later button represents content drawn above earlier layers. The numbers in layer IDs identify layers; they are not a reliable substitute for checking the current stack after reordering.
Select and transform a layer accurately
1. Click the layer's L… button under PVW. This is especially helpful when overlapping pictures make canvas selection ambiguous.
2. In Layer, inspect X, Y, W and H. X and Y are pixel offsets from the center of the composition: X = 0, Y = 0 centers the layer. Positive X moves right; positive Y moves down.
3. Keep Lock Aspect Ratio enabled to preserve the source proportions while resizing. Enter W/H or use the handles to size the layer.
4. Drag the layer in the viewport to position it. Hold Shift during a move to snap to available canvas/layer alignment targets; watch the guides.
5. For precise placement, click out of any text or number field, then use the arrow keys to nudge the selected layer by one composition pixel. Shift + arrow moves it by ten pixels.
6. Adjust Rotation only if required. Use Flip > H or V to flip the image itself.
7. To remove unwanted edges, adjust Layer crop (pixels) using T, B, L and R. Cropping hides part of the layer; changing W/H changes its size.
8. If you lose the layer outside the visible canvas, select its L… button and use Reset. This restores a centered, aspect-preserving fit and resets the crop. Reapply intentional cropping afterwards.
The small canvas controls provide FS (Fullscreen), R (Reset Transform), L/UL (Lock/Unlock Layer) and X (Delete Layer). Fullscreen fills the composition; with aspect ratio locked, an image of a different shape can extend beyond the canvas. Reset fits the whole source inside it. The transform lock protects placement during editing; it does not remove the layer from the composition.
Older projects can show Source crop (legacy). Use the available Convert to layer crop or Reset as layer crop action before treating those crop values as the new layer-space controls.
View versus content: viewport Fit, zoom and pan change the editing view. They do not alter layer W/H or output resolution. Use Fit to Canvas to recover an overview after close inspection.
Duplicate a layer or create a symmetrical layout
For a normal duplicate:
1. Select the source layer in PVW.
2. Press Command+C on Mac or Ctrl+C on Windows.
3. Keep a PVW layer selected as the destination bus, then press Command+V / Ctrl+V.
4. Select the new layer and adjust its position. Paste offsets the copy by 24 pixels per successive paste so it does not sit exactly on top of the original.
Paste uses the selected bus; if no bus is selected it can fall back to the copied layer's bus. Before a cross-Screen paste, select a layer in the intended destination PVW and verify the result there. Copy/paste duplicates the layer setup; it is not a promise that every underlying source has an independent playback engine.
For a symmetrical pair:
1. Put a layer left of center; for example X = −480, Y = 0 on a 1920×1080 canvas.
2. Select it and click ⟷ Clone.
3. The new layer appears at the opposite horizontal position, X = +480, with the same Y position.
4. Inspect the result and change the second source if each side needs different content.
Clone mirrors placement, not the pixels of the source. To mirror the image itself, use Flip > H. A centered layer cloned this way remains centered and can overlap the original completely.
Remove one layer or clear Preview
To remove one layer, select its L… button and click Remove in Layer, click its canvas X, or press Delete/Backspace while Switcher has focus. Confirm the selected bus first: removing a PGM layer affects the live composition.
Use Clear PVW to remove all layers from Preview on the current Screen. Use Copy when you want to begin from the current PGM composition instead. Copy is a whole-bus operation; Command+C / Ctrl+C copies the selected layer.
Practice: two Screens and a three-layer look
1. Set the main Screen to 1920×1080 and create Confidence at the same resolution.
2. On the main Screen, drag a background source into PVW, then a second visual source and a Text generator.
3. Make the second visual source 640×360 with aspect lock enabled. Set X = −480 and Y = 0.
4. Put the title above the visual sources using the layer-order controls.
5. Replace the small visual source by dropping another media item on its L… button. Confirm that the composition still contains three layers.
6. Select that small layer and click ⟷ Clone. You should now have four layers and a symmetrical pair.
7. Delete the extra clone to return to three layers. Nudge the remaining small layer ten pixels with Shift+arrow, then undo that move.
8. Take the look to PGM. Switch to Confidence and build a different Preview composition there.
9. Return to the main Screen and verify its content is still present. Configure output destinations only after both compositions are checked.
Build and adjust a look
Drag sources into PVW. Each becomes a layer. Arrange the layer order to put backgrounds behind cameras, graphics and overlays. Select a layer to edit its transform, playback and effects.
Use Copy to copy the current PGM composition into PVW before making a small change. This avoids reconstructing the entire live look. Layer tools also support cloning, reordering and removal.
Take the next look
• TAKE: transfer PVW using the selected transition and duration.
• CUT: transfer PVW immediately.
• Swap ON: exchange the two states when switching.
• Swap OFF: copy PVW to PGM without exchanging the previous live state back into PVW.
Choose the intended Screen before switching. When using multiple-screen selection, confirm which Screens participate in the take.
FTB fades to black; Freeze holds a frame. Know their state before diagnosing a black or apparently stalled image. CAP captures the viewport image and Fullscreen enlarges the monitoring view.
Save scenes and rehearse triggers
Store reusable compositions as presets. When recalling a preset, choose whether it loads into PVW or PGM and whether a transition is used.
Scene triggers add timed actions, opacity fades and slide animations to scene entrances and exits. Build the action sequence, set its timing, and rehearse it in Preview. Check the complete entrance, steady state and exit before going live. If a scene contains video, also check whether the media restarts or continues when triggered.
Exercise: a presenter with a title and independent background
1. On PVW, add a background image or video and make it fill the Screen.
2. Add a camera or another video above it. Reduce its size to leave room for the background and title.
3. Add a Lower Third as the top layer. Enter the presenter's name and role.
4. Select each layer in turn and confirm that its Inspector changes to the intended source.
5. Save the look as a preset and take it to PGM.
6. Copy PGM to PVW, change only the title text, and inspect the new name before taking again.
7. Recall the saved preset to check that the original look can be recovered.
The key distinction is between selecting a layer and selecting a bus. Editing a layer on PGM affects the live composition; editing its PVW counterpart prepares a future state. A copied layer can have its own playback state, so verify timing rather than assuming that two visually identical source references are synchronized.
A predictable transition procedure
Decide whether the whole scene changes or only one element needs to animate. Use TAKE for the scene handover. Use scene entrance/exit actions when a title or other layer needs a timed animation. Rehearse the combined timing: a long exit action plus a scene transition may produce a result different from either action alone.
For each reusable scene, document its start state, transition, intended duration and exit state. If the next look must be ready immediately after a take, check Swap behavior and rebuild or recall PVW accordingly. Do not assume that PVW automatically contains the next scene in the running order.
5. Prepare media and playback
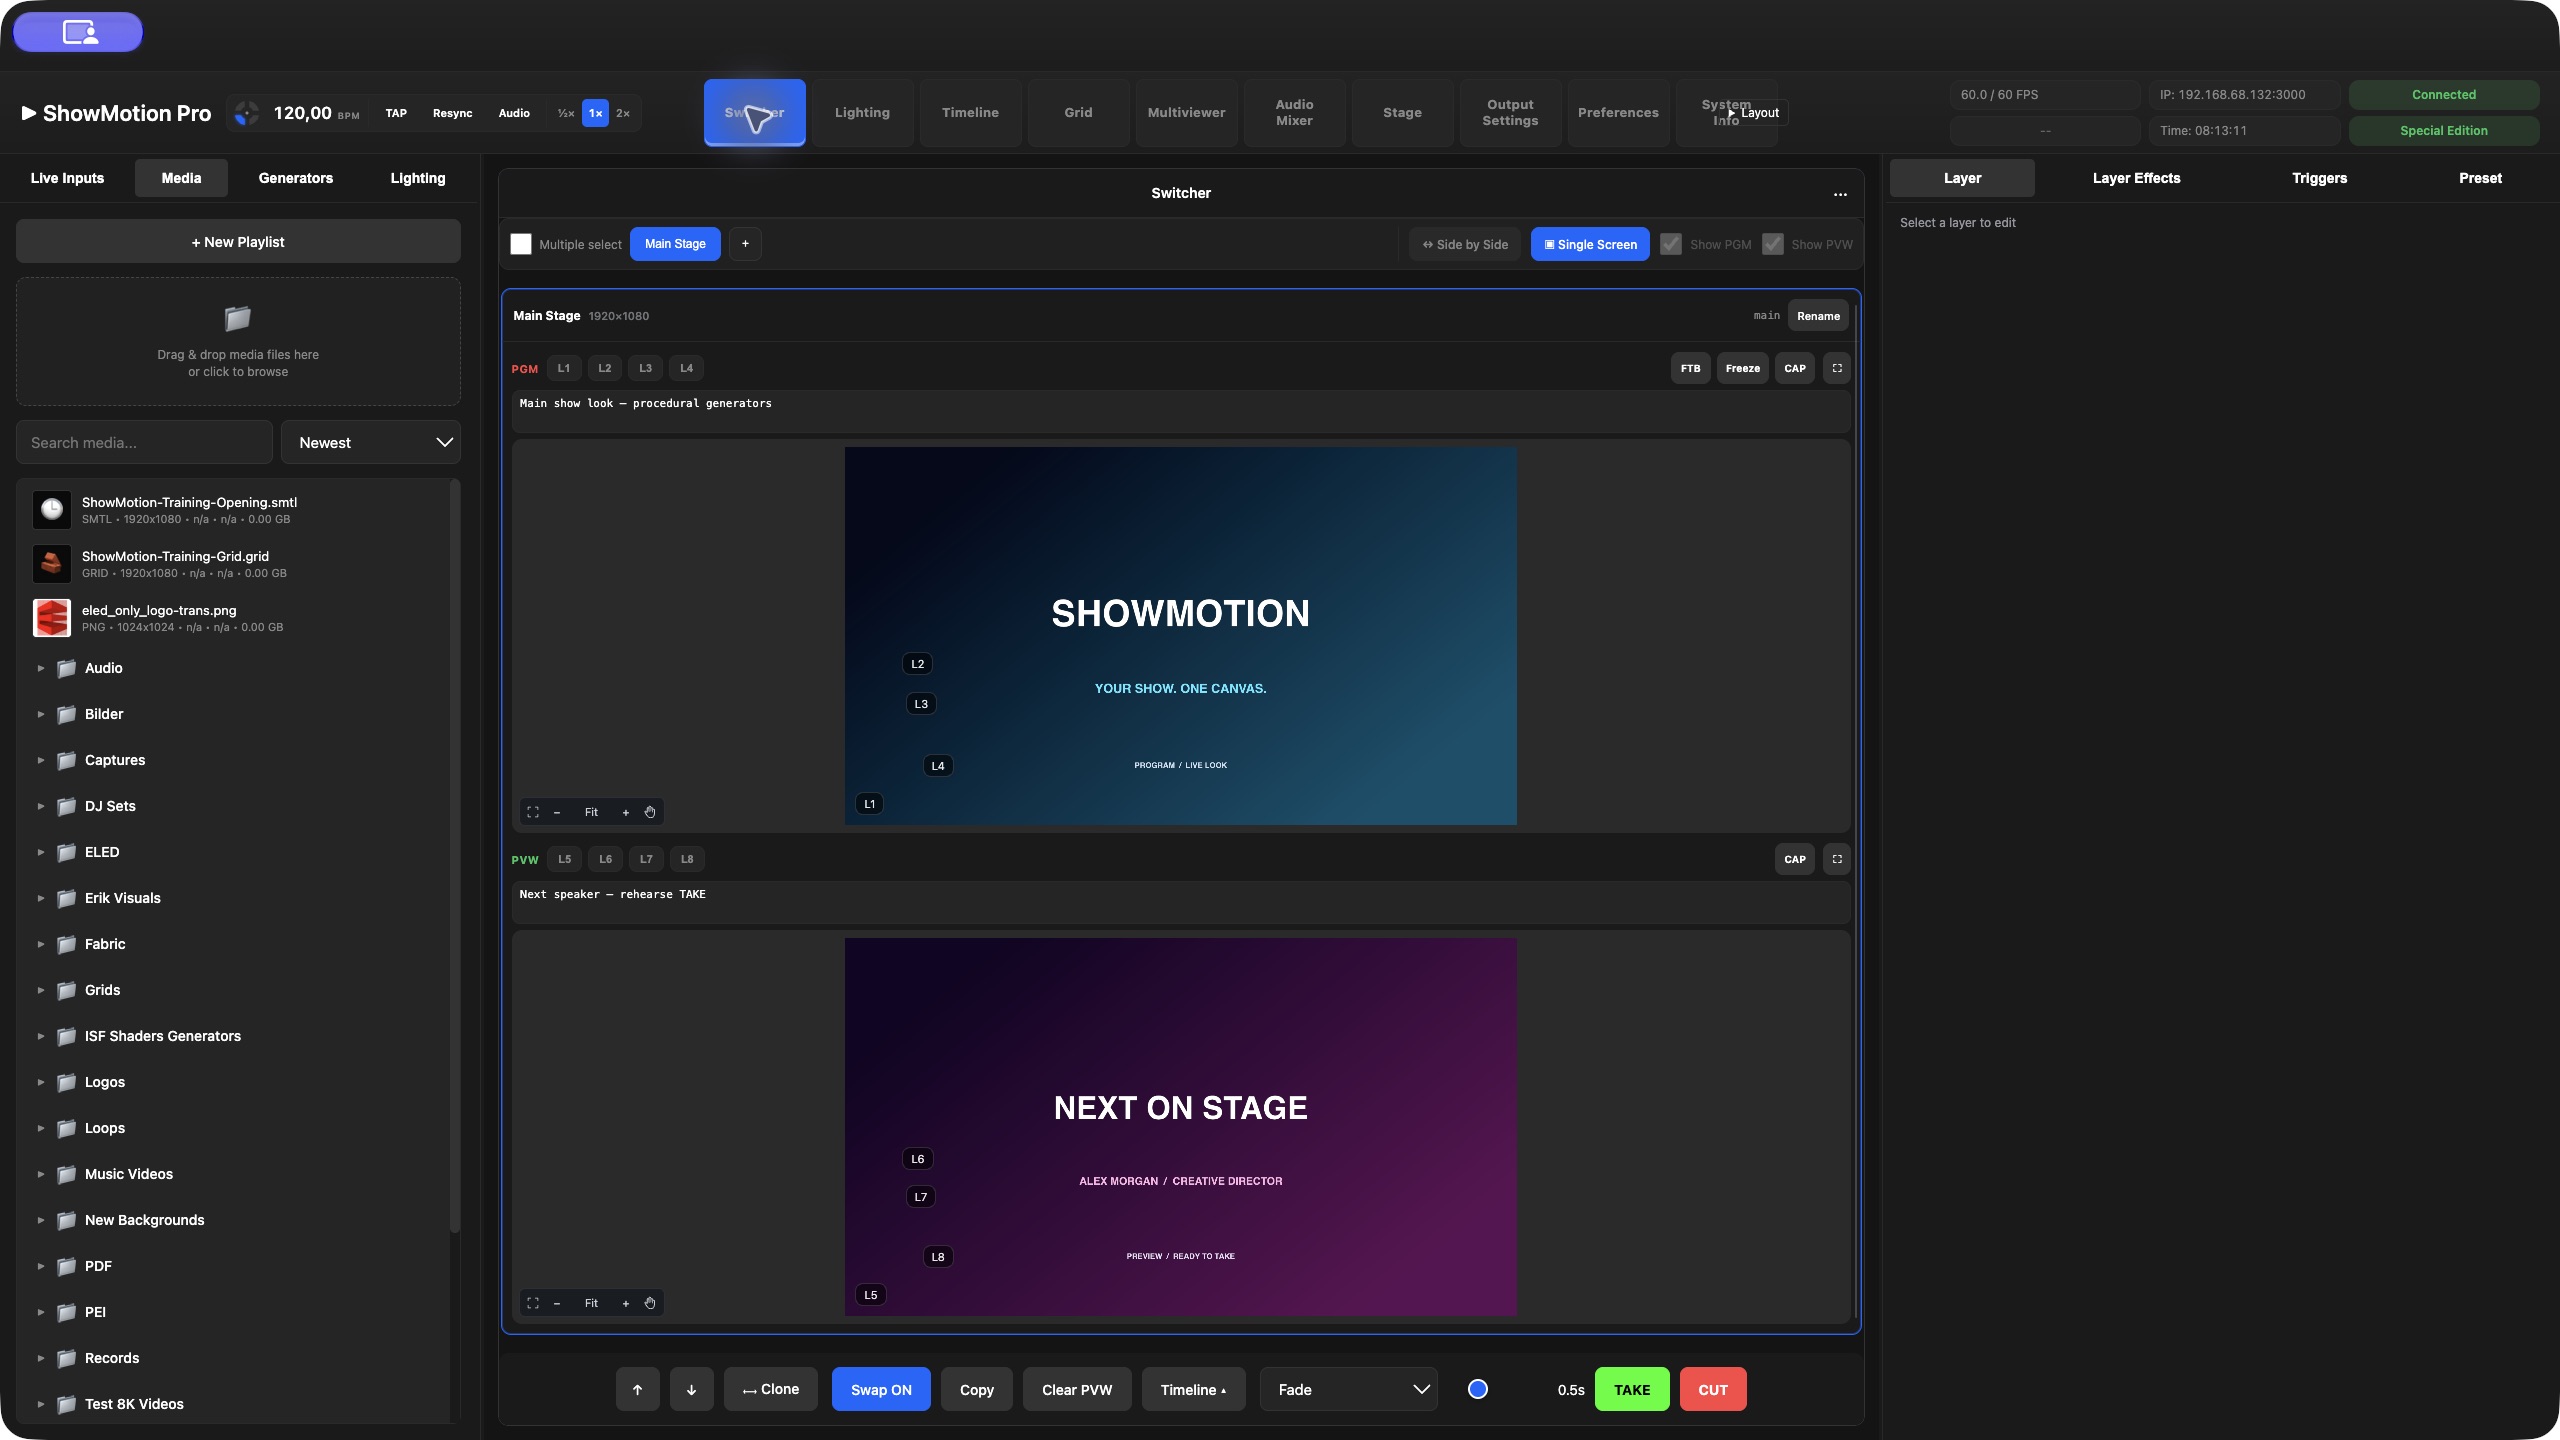
Manage your library
Use the Media browser to import, search, sort and organize material. Keep names meaningful: a clip named Opening_Main_60fps is easier to identify during operation than a camera filename. Before removing an item, check its use in scenes, Grids, Timelines and presets.
File browser controls and media types
The import picker accepts video, audio, images, PDF and ShowMotion-related document types including .smtl, .smpl, .grid and .fabric. Audio selections explicitly include WAV, MP3, AAC and M4A. A file extension accepted by the picker is not a guarantee that every codec or plugin payload inside that file is playable on every installation.
Video workflows include formats such as ProRes and the release's DXV, NotchLC and ShowMotion-codec paths. The installed decoder, platform and file contents determine actual playback. Validate unusually encoded files with a complete preview and a representative show load.
Use Search media... to filter the library. The sort menu includes Newest, Name A-Z, Name Z-A, Size (Largest), Size (Smallest), Length (Longest) and Length (Shortest). Folder controls include New Folder, Rename and Delete. Media cards can expose metadata such as codec, resolution, FPS and duration; use those values to catch mismatched content before programming.
Organize the library by operating purpose: Opening, Speakers, Walk-in, Holding and Emergency are easier to scan during a show than one very large unsorted collection. A sensible folder structure complements scene names; it does not replace them.
The library recognizes the following file extensions. An extension identifies a container or file type; successful playback still depends on the actual codec and file contents. Test the delivered files on the show system.
| Media family | Recognized extensions | Operator notes |
|---|---|---|
| Video | MP4, MOV, AVI, MKV, WEBM, M4V, MXF, PRORES, H264, H265, HEVC, DXV | Import, check the thumbnail and playback, then set the layer's trim, speed, looping and start policy. MOV/MP4 do not guarantee a particular codec. |
| Still image | JPG, JPEG, PNG, GIF, BMP, WEBP, TIFF, TIF | Use for backgrounds, logos and overlays. Check transparency and dimensions; recognition of GIF does not imply every animated GIF behavior. |
| Audio | MP3, WAV, AIF, AIFF, M4A, AAC, FLAC, OGG, OPUS, CAF | Add to supported workspaces, set level/playback behavior and verify the mixer route to the intended destination. |
| Select the imported PDF layer for manual page navigation or an automatic interval. Set the transition and Loop, Hold or Clear at the end. Separate instances can show different pages. Check fonts and rendering. |
The media converter offers ProRes Proxy, LT, 422, HQ, 4444 and 4444 XQ, plus HAP, HAP Alpha and HAP Q. Alpha-capable conversions require an appropriate source; converting opaque footage does not create transparency. The ShowMotion codec is a separate real-time playback option described in the codec chapter. Keep original media and confirm converted file quality, dimensions, frame rate and transparency before replacing show assets.
Import versus place versus convert
Import makes a file available to the media library. Place creates a source instance in a Screen, Grid or Timeline. Convert generates a different media representation for playback. These are separate tasks. Importing a file does not put it on air, and converting a file does not prove every existing use has changed to the new version.
After conversion, compare a representative frame, total duration and audio with the original. For alpha media, place a colored background underneath the converted file; a black viewport alone cannot distinguish transparency from a black image. For looping content, check several end-to-start boundaries rather than only the middle of the clip.
Set playback behavior
Select a video layer or clip and review:
• In and out points;
• speed and playback direction;
• looping, bouncing, holding or clearing at the end;
• automatic, manual or TAKE/CUT-based start behavior;
• restart behavior when recalled;
• audio level and mute state.
Hold retains the final frame. Clear removes the completed source. Test these choices on the destination bus; a clip that is correct in isolation can still leave an unwanted frame in a live composition.
Video Loop Fade
Use the adjustable loop fade to soften the transition between a video's ending and beginning. Start with a short fade, play several full loops and increase only as needed. A crossfade blends two images; it cannot make strongly different camera positions or subject motion match perfectly.
ShowMotion Codec & Converter
Conversion makes a new playback file. It does not place that file on a Screen, and it does not automatically replace all the existing layers that use the original. Keep preparation and show playback as separate steps: convert, inspect, place, then rehearse.
ShowMotion provides two conversion workflows. The Media browser offers quick preset conversion inside the show interface. The separate Showmotion Converter application provides a queue with destination, size, frame-rate and audio controls. Their menus differ; a setting documented for the standalone Converter is not necessarily present in the Media browser.
Quick conversion in the Media browser
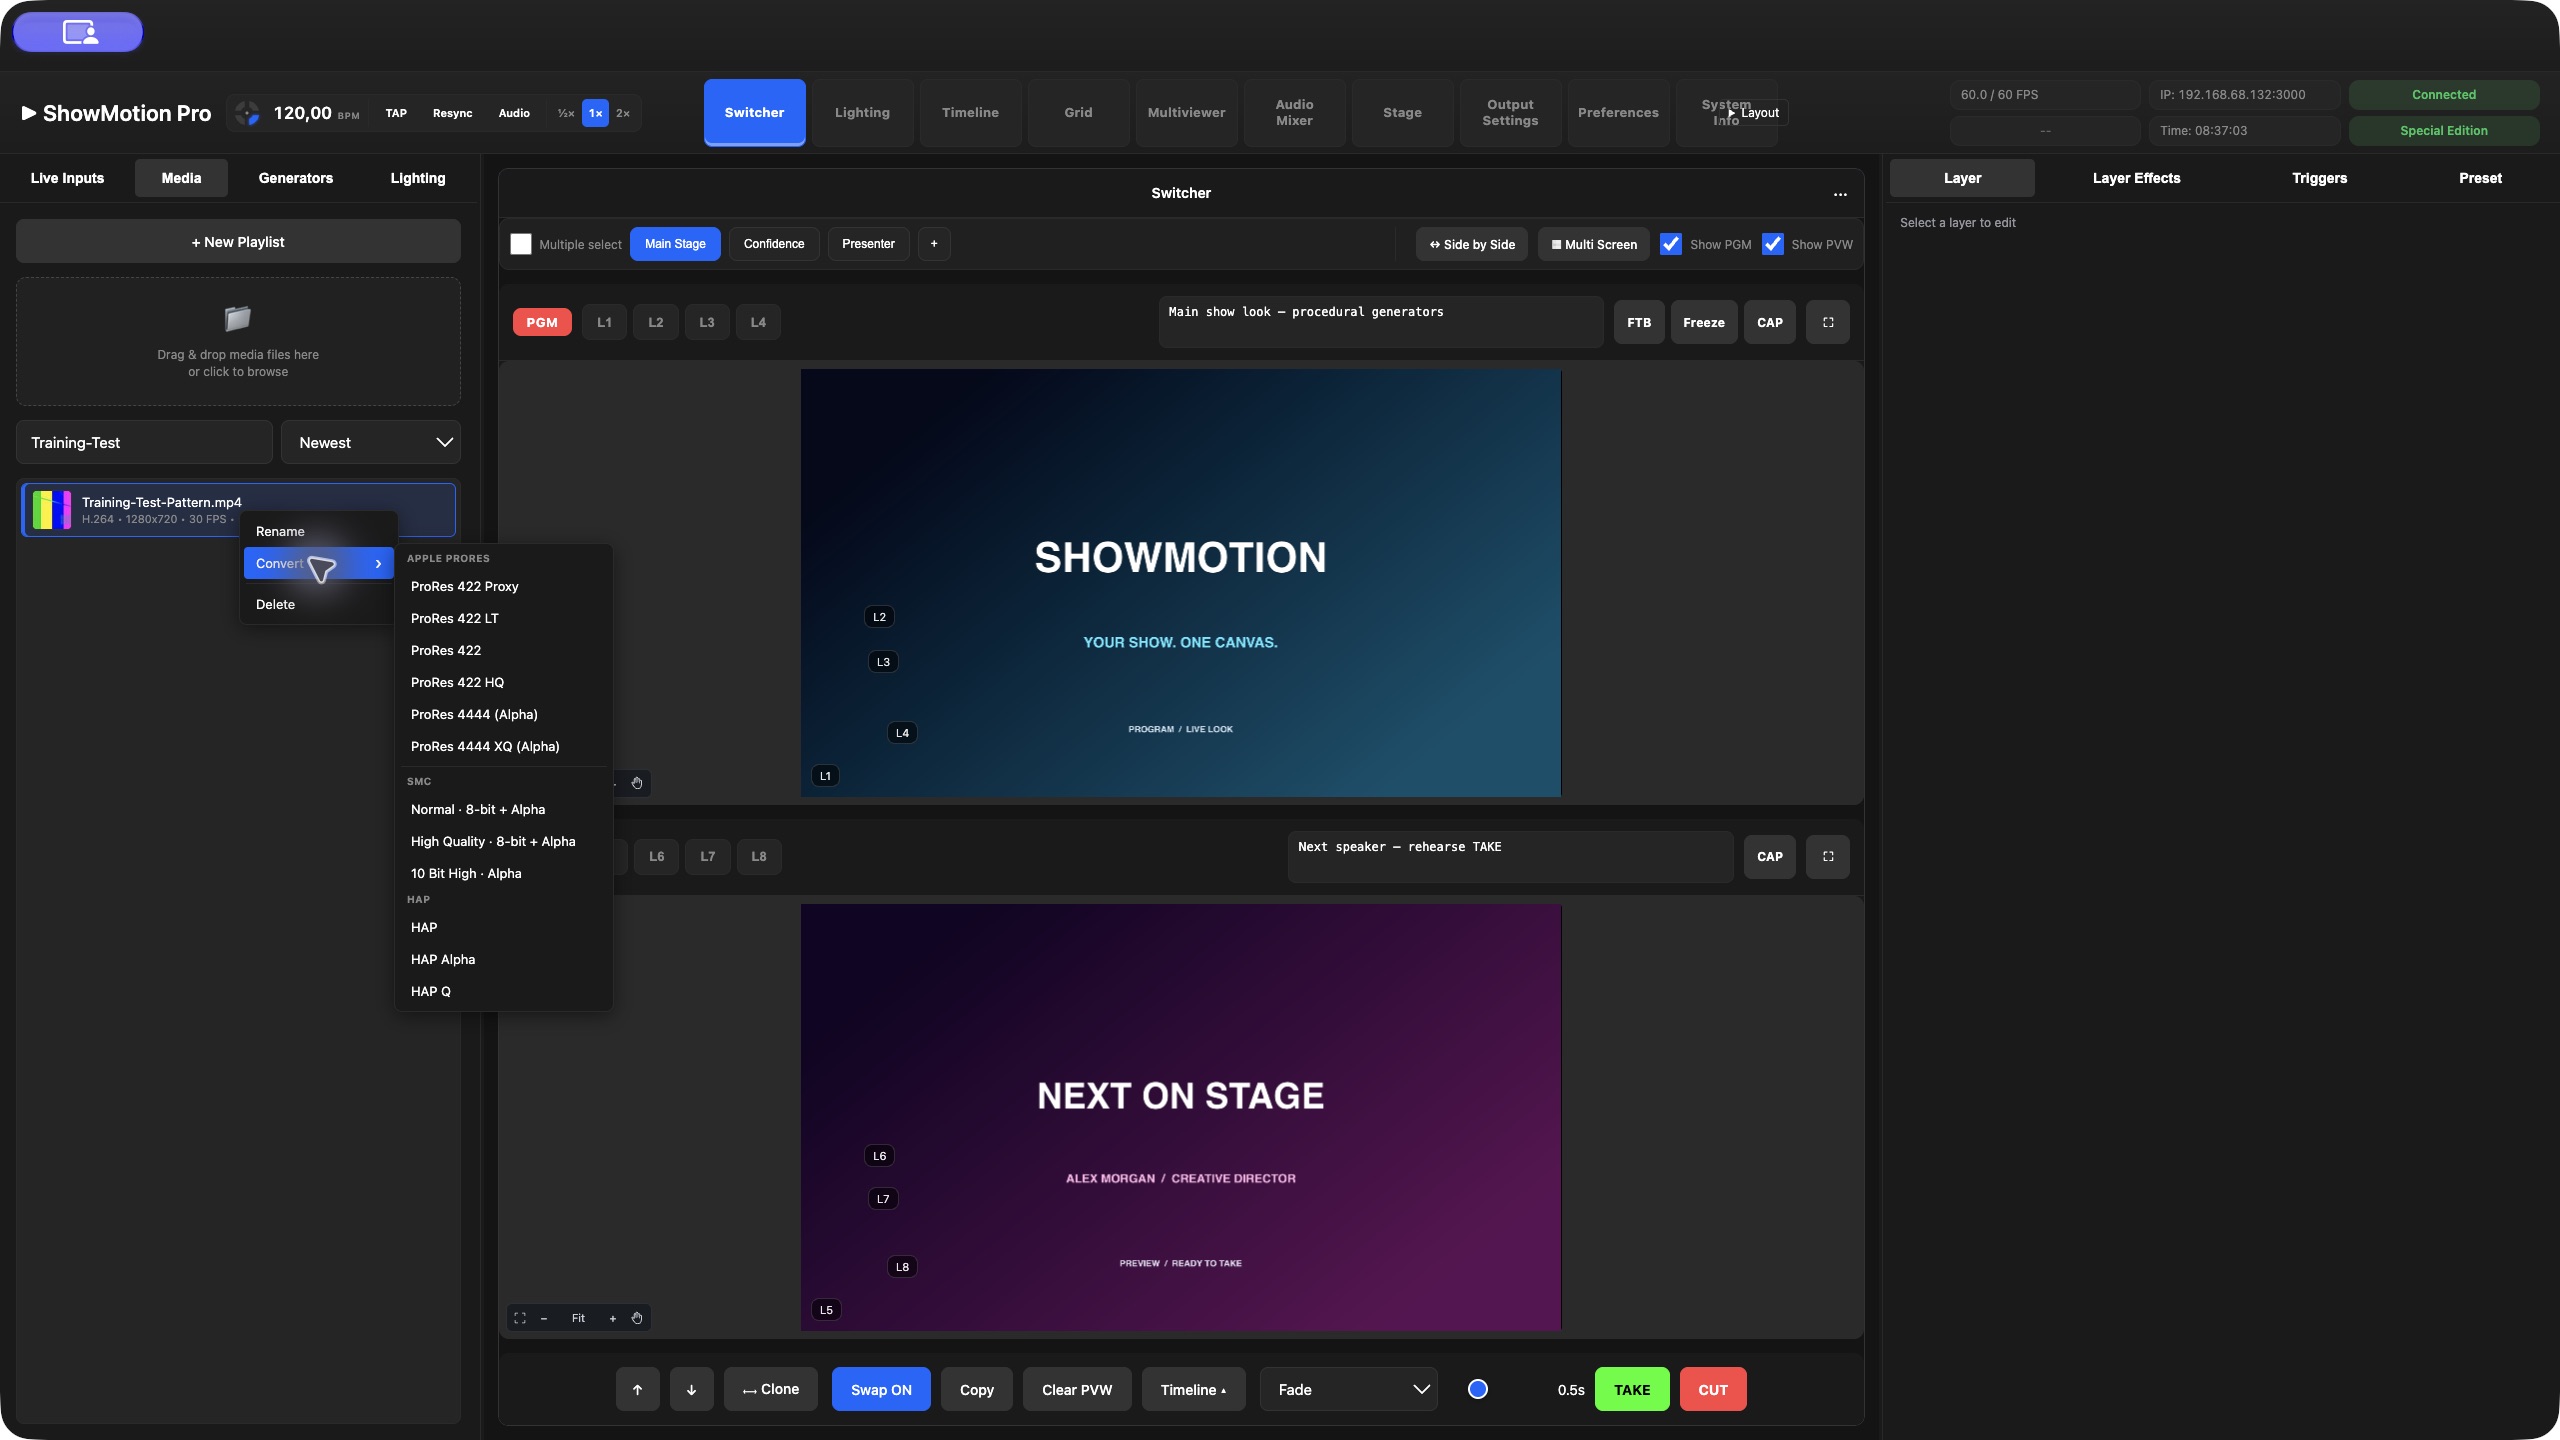
1. Open Media and locate the source video. Finish importing it before starting conversion.
2. Select the file, then right-click and open Convert. Multiple selected videos or images can be processed as a batch.
3. Choose the required profile. Read the confirmation: it identifies the target profile, whether alpha is supported, and whether incompatible selected items will be skipped.
4. Confirm to begin, or cancel this confirmation to leave the source alone.
5. Watch the progress overlay on the media tile. A batch runs sequentially; queued files wait while the current file converts. Do not treat a high percentage as a finished file: wait for completion and the library refresh.
6. Find the new, suffixed MOV in the same media folder. The original remains present. A unique filename is used if the proposed output name already exists.
7. Preview the converted result. Check duration, motion, audio and transparency, then drag this new file into a test layer. Existing source instances continue to use their original media until you replace them.
The integrated converter supports videos and images; an image produces a single-frame movie, not an animated still sequence. A failed file is reported, and the batch can continue with other selected items. The integrated workflow does not expose the standalone application's Stop queue button. Closing a panel should not be used as a cancellation method.
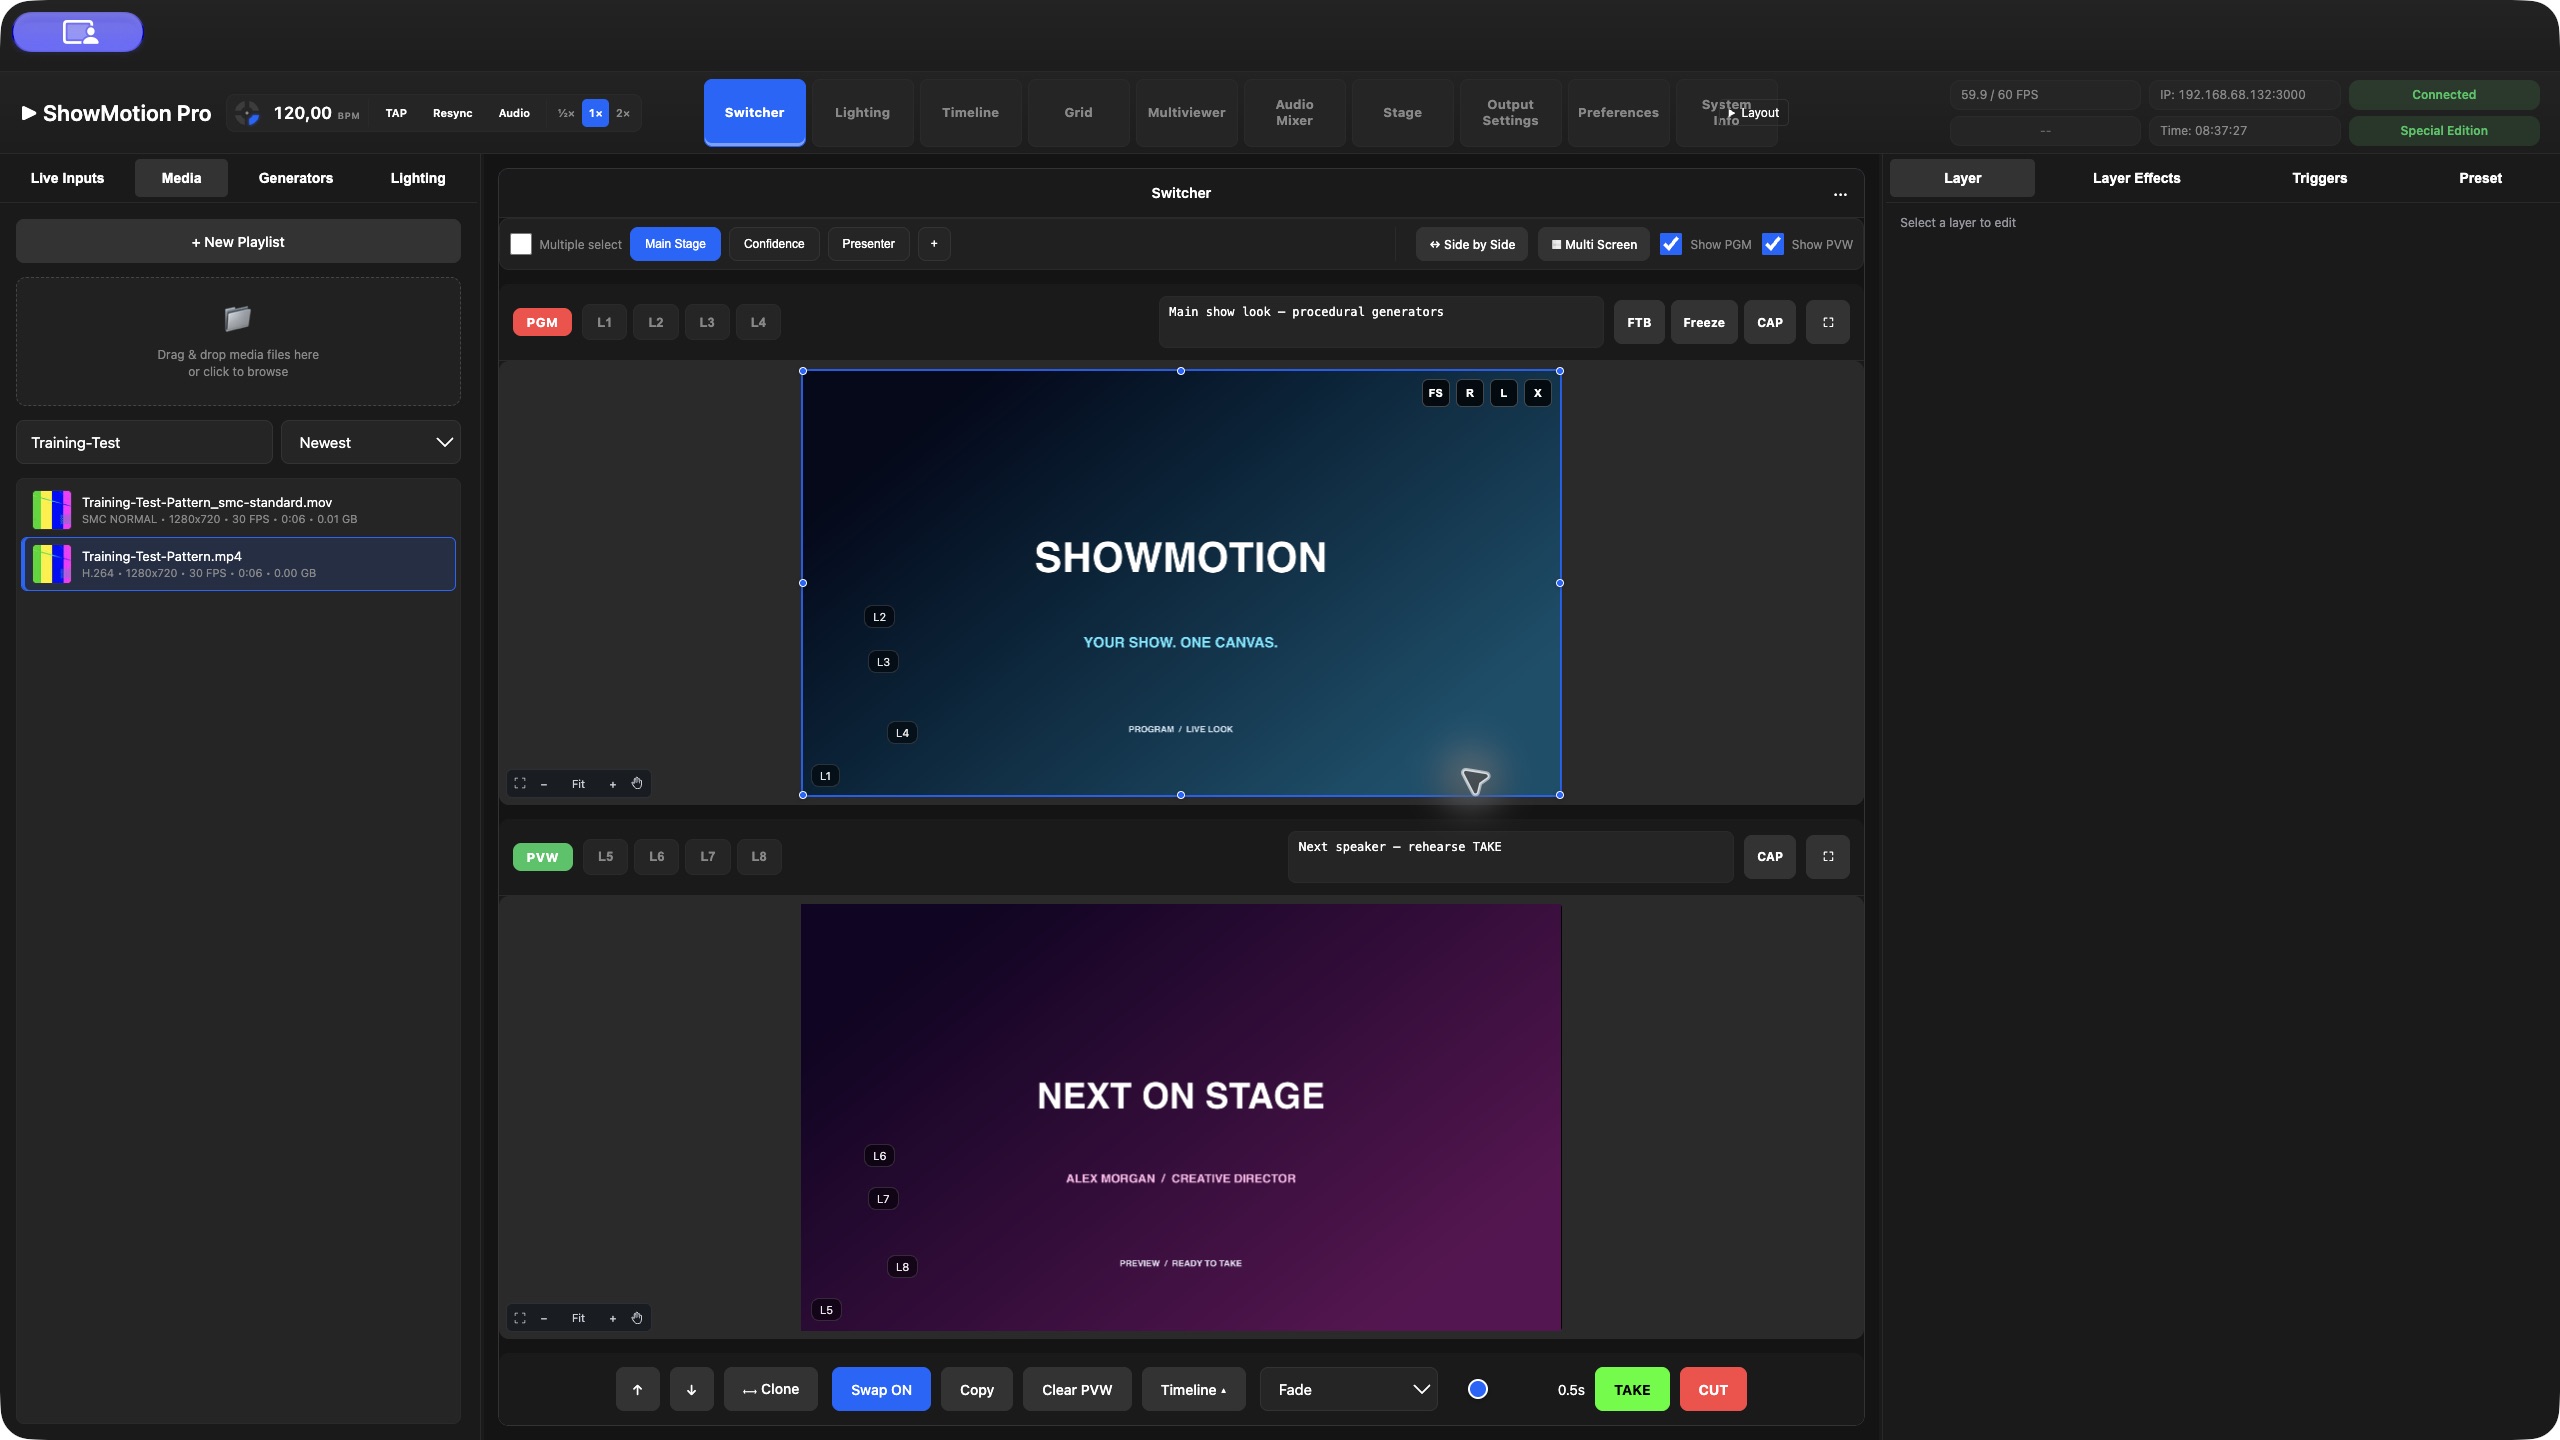
Choose a conversion profile
| Profile in the integrated menu | When to choose it | Transparency |
|---|---|---|
| SMC: Normal · 8-bit + Alpha | A ShowMotion playback version using the standard SMC profile | Supported |
| SMC: High Quality · 8-bit + Alpha | A higher-quality SMC option for demanding image detail | Supported |
| SMC: 10 Bit High · Alpha | A 10-bit SMC workflow when the source and pipeline benefit from it | Supported |
| ProRes 422 Proxy / LT / 422 / HQ | A ProRes version at the desired profile; inspect the result before choosing a lighter profile for final output | Not supported |
| ProRes 4444 / 4444 XQ (Alpha) | ProRes material that needs transparency | Supported |
| HAP | An RGB HAP playback version | Not supported |
| HAP Alpha | HAP material with transparency | Supported |
| HAP Q | The alternative HAP Q profile | Not supported in this integrated option |
SMC stores its custom video codec in a QuickTime MOV container and uses ASTC texture compression. A .mov extension alone does not mean another application can decode SMC. Use a compatible decoder, or convert to a format the receiving application supports. Converting an 8-bit source to a 10-bit profile does not recover detail that the source never contained. An alpha-capable profile preserves existing transparency; it does not remove a photographed background.
The quick converter does not show a separate audio codec chooser. Its ProRes and HAP video paths convert available audio to 16-bit PCM; still-image conversions have no audio. Use the separate Converter when you need explicit audio export choices.
A controlled batch in Showmotion Converter
1. Launch Showmotion Converter and choose Add videos…, or drop videos into its list.
2. Select the file or batch to configure. When settings differ, the sidebar says Mixed settings: displayed values come from the first file, and a change applies to the selected files.
3. Under PROFILE, select Format, then the required profile. SMC choices are SMC 8 Bit Normal, SMC 8 Bit High and SMC 10 Bit High. The separate application also offers HAP, DXV, NotchLC, ProRes, H.264 and HEVC profiles.
4. Under VIDEO, leave Source size enabled to retain the dimensions, or disable it and enter Width and Height. Keep Frame rate > Same as source unless you intentionally need a different frame rate. Check aspect ratio when entering custom dimensions.
5. Enable Preserve alpha when offered and required. The interface explicitly says No alpha in this format for profiles without that capability.
6. Under Audio, either disable audio or choose Copy source, AAC, Apple Lossless or Linear PCM. Transcoding choices expose sample rate; AAC also exposes bitrate, while the lossless/PCM choices expose bit depth. The interface specifies mono/stereo for these conversions and recommends Copy source for surround.
7. Review OUTPUT · QUICKTIME MOV, including the filename and folder. Set Filename suffix, then use Choose folder for selected… or Choose folder for entire batch… as appropriate.
8. Choose Convert selected (n), or Start queue when no files are selected. Follow each file in Queue, where status, percentage and elapsed seconds are shown.
9. Use Stop to stop the running queue when necessary. A cancelled job can be restarted with Queue again. Failed jobs show an explanation; correct the cause before retrying.
10. After Done, choose View result to inspect the conversion, or Finder to locate it. Import the resulting file into ShowMotion and test it in the intended composition.
An SMC source must use another target format in this application; selecting another SMC profile does not offer an SMC-to-SMC conversion. Dimension requirements are visible in the sidebar: HAP requires width and height divisible by four; DXV requires width divisible by sixteen and height by four, with a minimum height of eight. The NotchLC export described here is native SDR RGB, without alpha, and requires dimensions divisible by four. These constraints matter when designing an unusual LED-wall canvas.
Exercise: prepare a transparent title
Start with a short title animation that already contains alpha. Convert it to an alpha-capable SMC or ProRes profile. Place the result above a bright color layer and then above a dark color layer. Inspect fine edges while it plays, and listen to any embedded audio. If you see a solid rectangle, first confirm the source actually contains alpha and the selected profile preserves it. Background removal is a separate effects task.
Running the integrated Media conversion alone does not install a system-wide decoder. The standalone Converter package can provide separate media-extension setup; availability and installation are distinct from converting a file. The 1.2 release notes describe 32 simultaneous 8K60 streams on M5 Max in an isolated GPU/memory benchmark, not a guaranteed full-show capacity. Qualify your actual media, storage, effects and outputs.
Playlist Generator
1. In Media, select the intended videos, audio files or images, or begin with an empty playlist.
2. Choose + New Playlist.
3. Set its name and the end behavior: Repeat playlist, Hold last frame or Clear.
4. Arrange entries in order and enable the entries you want to play.
5. Set sizing, in point, duration, fade in and fade out for each entry.
6. Use Play, Pause and Stop to rehearse the sequence.
7. Choose Create Playlist or Save Changes.
Entry fades affect picture and audio within the entry; a fade time of zero is a cut. Use Edit Playlist from the playlist source to return to its sequence. Confirm the complete running order after changing durations or trim points.
6. Build a Grid show
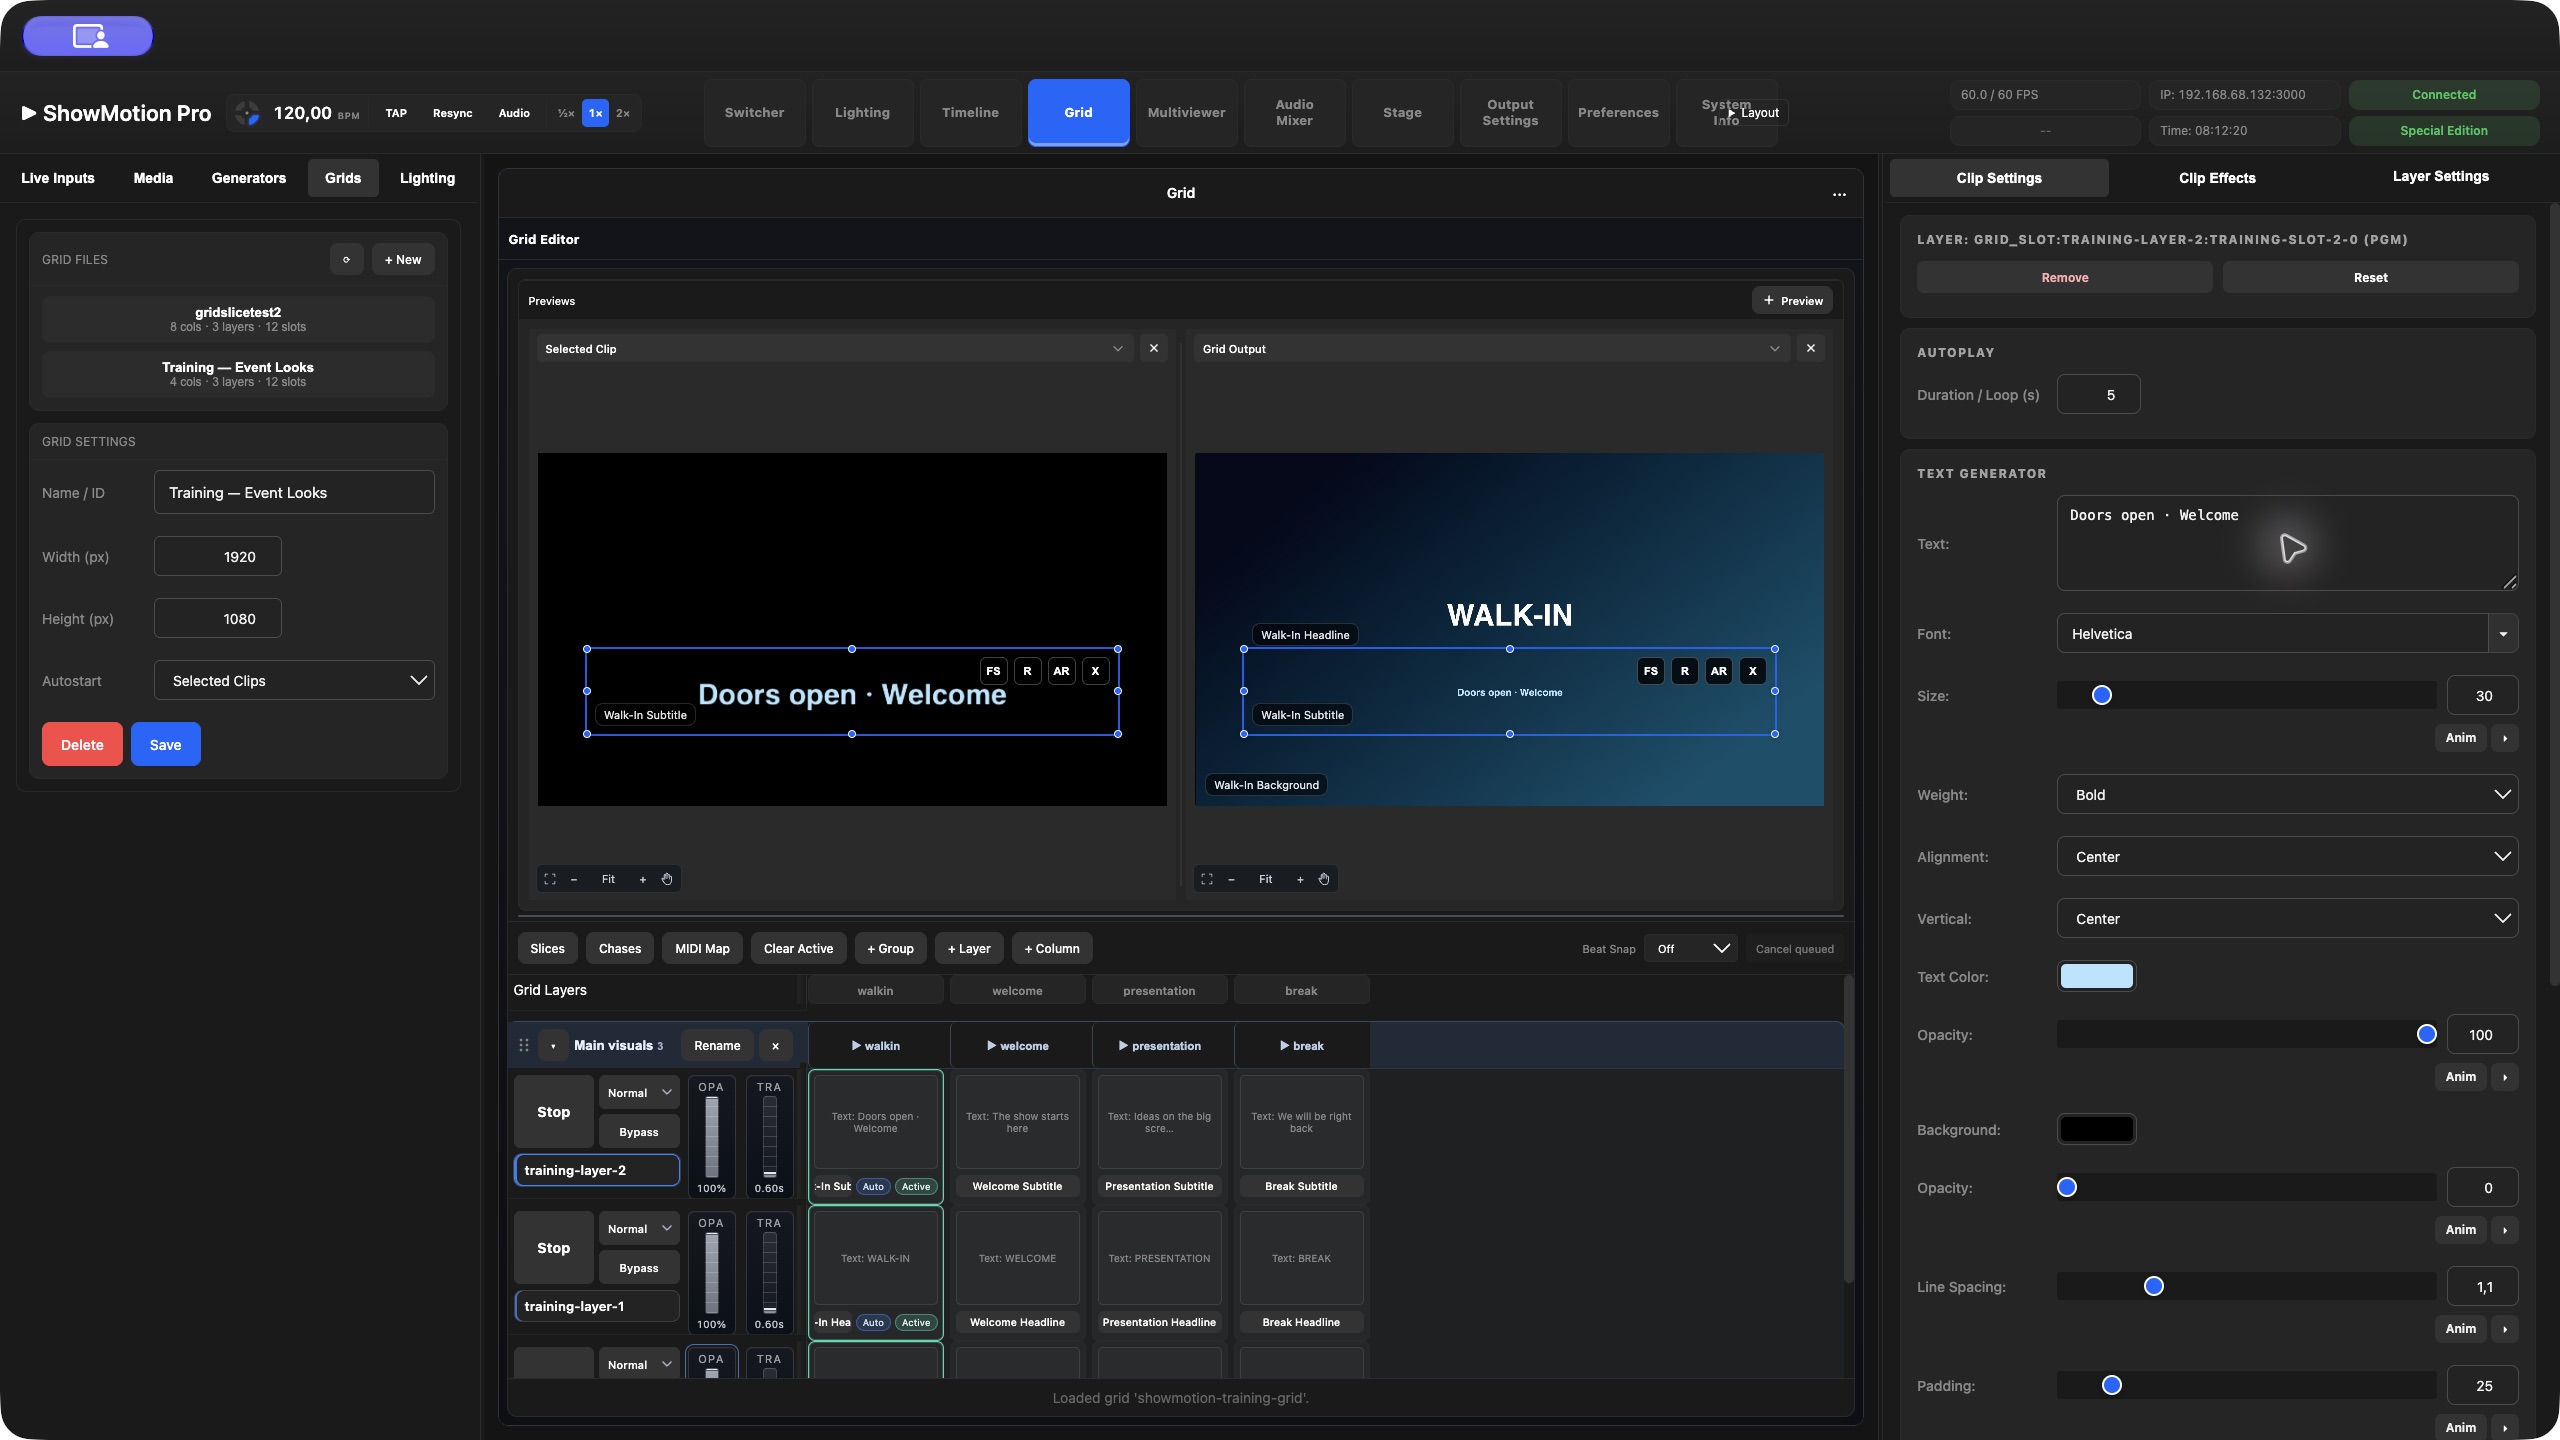
A Grid is a matrix of layers (rows), columns (looks) and slots (cells).
1. Create a Grid and set its name and resolution.
2. Add layers for functions such as Background, Camera, Title and Audio.
3. Add a column for each show look.
4. Drag sources into slots.
5. Configure layer transitions and each slot's playback behavior.
6. Save and rehearse individual slots and whole columns.
A populated slot launches its content on its layer. Empty slots can stop the corresponding layer; test the intended stop behavior before operating the show. Column launches recall multiple slots together.
Groups and routing
For complete step-by-step examples, see Reuse compositions, including group-only routes and a Timeline launched from a Grid slot.
Group related layers, for example the content for one display or one department. Launch columns within a group when that group should change without recalling the entire Grid. Route the complete Grid, a specific group or one layer to a Switcher scene or output region.
Give groups names that describe their destinations. Verify the selection at both the source and destination after changing group membership.
Autopilot and schedules
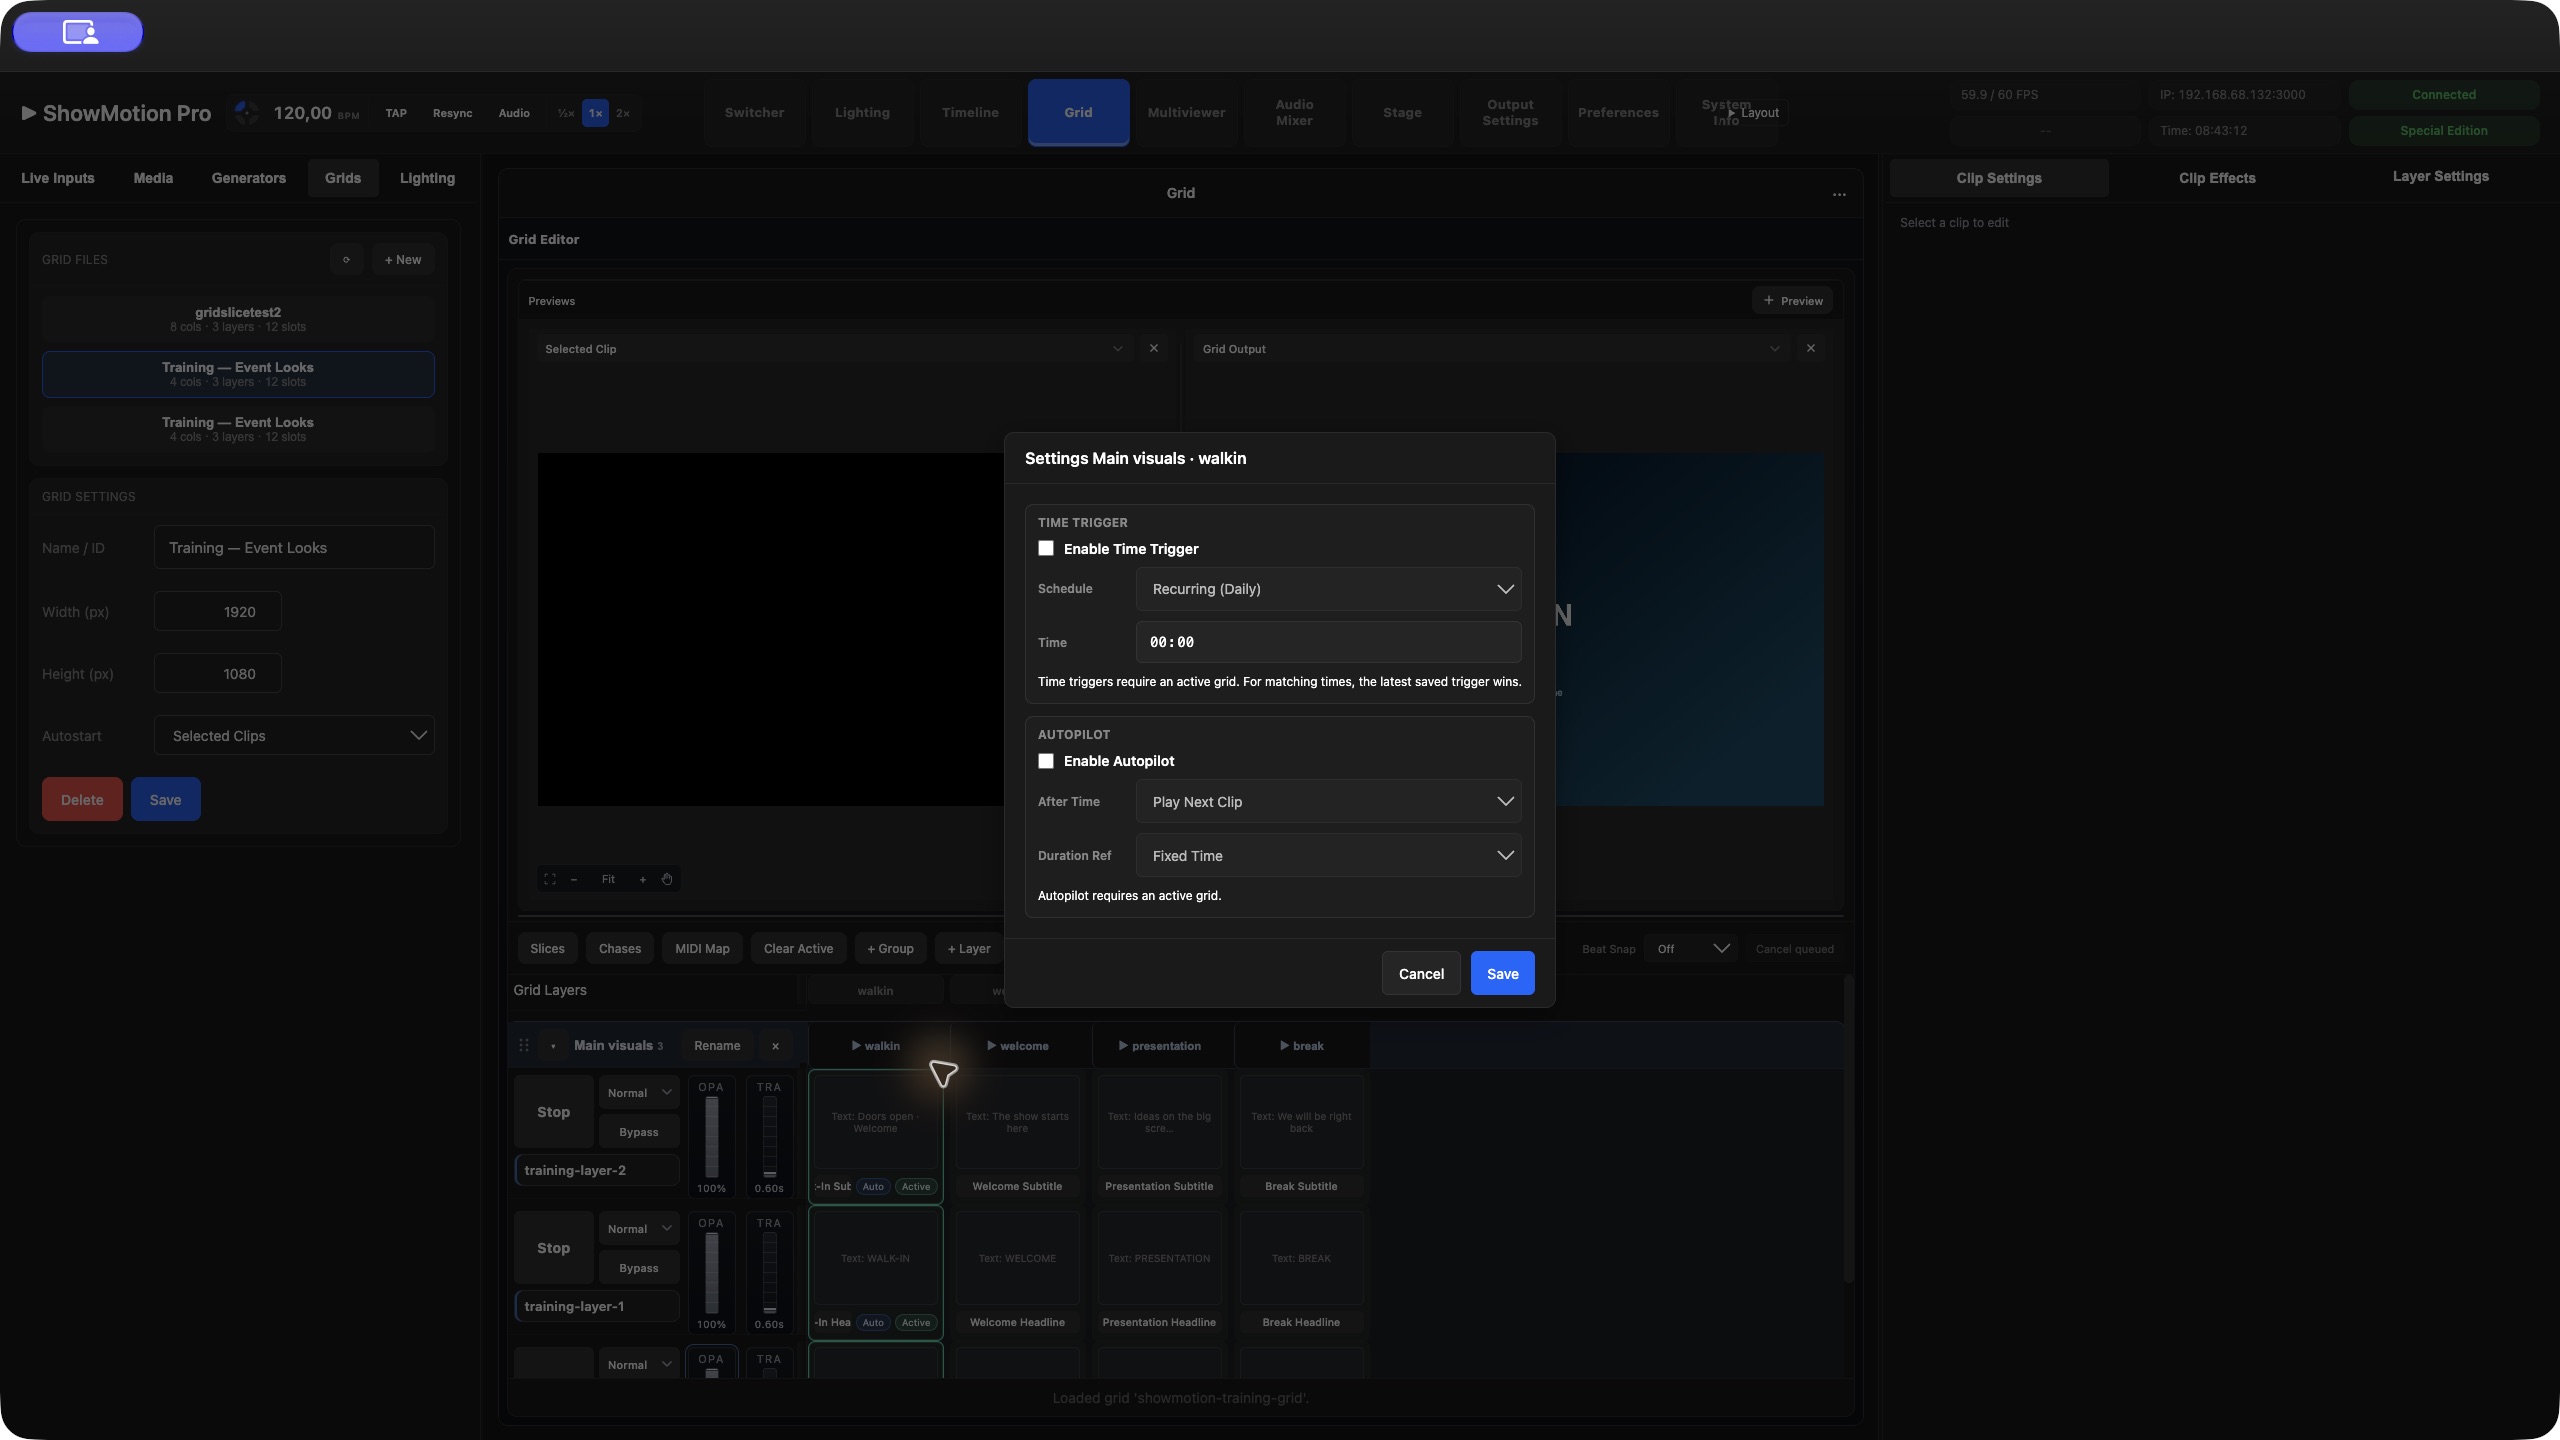
Column options provide time triggers and Autopilot. Autopilot can advance using a fixed duration or clip-duration rules and can target another column. Time triggers can be once, daily or weekly.
The Grid must be active for these mechanisms to run; a time trigger is not a replacement for activating the Grid itself. Rehearse manual operation first, then enable automation. Check the computer clock and the longest/shortest-duration rule with the actual media.
Open an imported Grid document
Import the .grid file through the Media file picker. Open the Grid workspace, select the Grids library tab and use Refresh to update its document list. Choose the Grid by name to load it in the editor. Double-clicking a Grid in the general Media browser opens a generic preview rather than this editing workflow.
Exercise: a four-column event Grid
Create layers named Background, Main Content, Lower Third and Music. Make columns named Walk-in, Welcome, Presentation and Break. Put the corresponding media in each row and column. Leave only those cells empty that are intended to stop their layer when the column launches.
1. Launch Walk-in and inspect each active layer.
2. Launch one Main Content slot independently and confirm that the other rows continue as intended.
3. Launch Welcome from its column header and verify the complete look.
4. Set a suitable transition for the background layer; use a different transition where a title needs a faster response.
5. Route the Grid into a Switcher Preview and take it to Program.
6. Trigger Presentation and check that the live composition follows the Grid output.
7. Stop or clear the appropriate layer and verify the result, then restore a known column.
For a second destination, group the layers belonging to that destination and test a group-specific column launch. A group launch and a whole-Grid launch have different scope. Name controls so the operator can distinguish them at a glance.
Slot settings versus layer settings
The layer defines properties shared by that row's output, such as its opacity, blend mode and transition. The slot refers to particular content and its playback behavior. If every clip on one row is too dim, inspect the layer. If only one clip restarts unexpectedly, inspect that slot and source's start/restart settings.
Check Restart on Trigger or equivalent restart settings when repeatedly firing the same slot. For a background that should continue, an unintended restart can be visible even when the column change seems otherwise correct. For an opening cue, failing to restart can begin halfway through the clip.
Common Grid mistakes
A selected cell is not always the same as the currently playing cell; use playback feedback. An empty stop cell is not a neutral placeholder. Autopilot duration based on the longest clip can become unexpectedly long when a new item is added. A schedule configured on an inactive Grid does not activate the Grid. Test these cases before relying on timed operation.
Keep a layer running across column changes
A column launch starts the populated cells in that column and stops rows with no cell, within the chosen Grid or group. To keep a music bed or background independent, right-click its layer header and enable Ignore Column Header Trigger. That row is then left alone by column launches; launch its own clip when you want to change it. A group column button affects only that group's rows. The main column header affects the complete Grid, subject to each layer's ignore setting.
Use Stop layer when you want to stop one row, and Clear Grid to clear playback across the Grid. These playback actions are different from deleting media or clearing a slot's content in the editor.
Control a Grid with MIDI
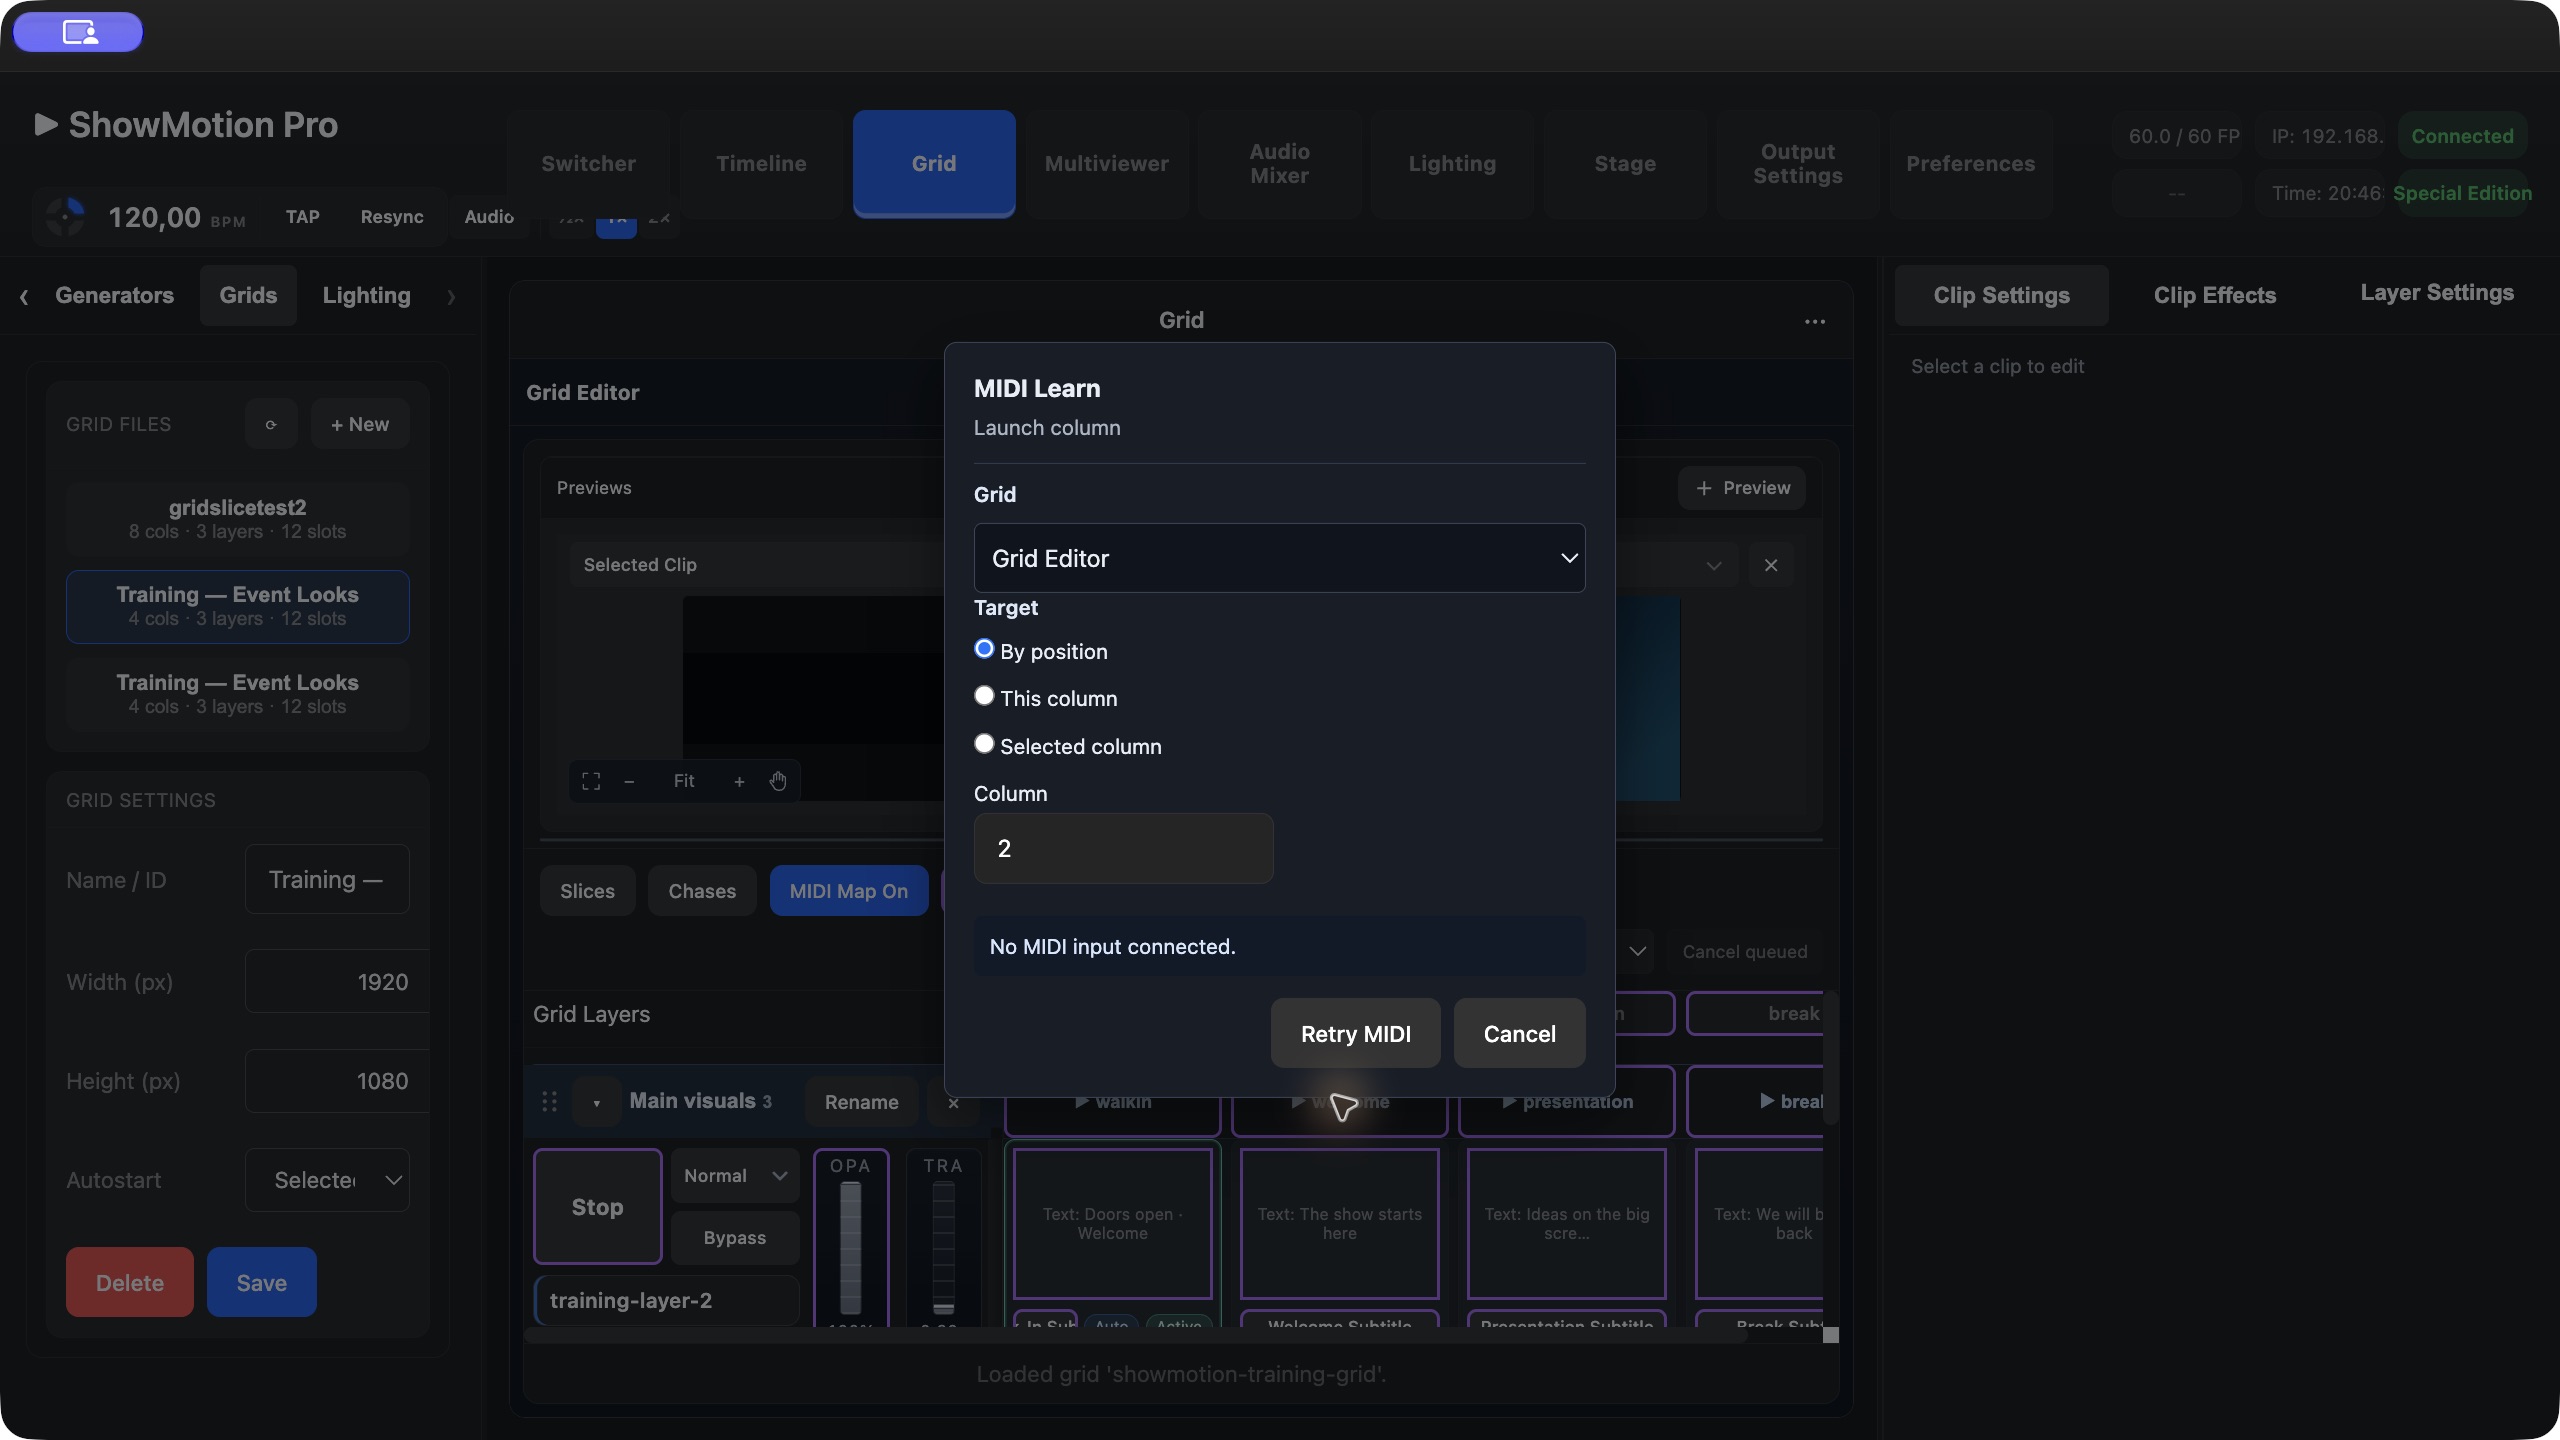
Use pads for clips and columns, and faders or encoders for layer opacity and supported effects. Connect the controller to the computer running the ShowMotion interface that will receive it. MIDI Learn uses that interface's MIDI access; allow access when prompted. If the interface reports that Web MIDI is unavailable, use a MIDI-capable desktop/browser environment. Do not assume that a controller attached to a different workstation is automatically forwarded over the show network.
1. Open the Grid you want to operate and make sure it is active.
2. Click MIDI Map in the Grid toolbar. Assignable controls are highlighted.
3. Click the control to assign: a clip launch area, clip selection button, column header, group column header, layer stop button, Clear Grid, layer opacity or a supported effects control.
4. In MIDI Learn, choose the Grid and target behavior before touching the controller.
5. Press the desired pad or move the fader/encoder. ShowMotion learns the incoming device, message, channel and controller/note number. The learn dialog closes when a usable message is received.
6. Turn MIDI Map off before rehearsing. While mapping mode is active in the Grid editor, normal MIDI actions are suppressed so that assigning controls does not launch the show.
7. Test one action at a time and confirm the active playback feedback, not just the selected cell.
For launch actions, use a button or pad rather than a continuously changing fader. A Note On launches on the press; its release does not launch again. A CC button triggers on the transition from zero to a non-zero value and must return to zero before the next press. Select clip changes the editor selection without launching it; the corresponding Grid must be open in the active editor for selection to work.
Choose what a MIDI mapping follows
Grid Editor follows the Grid currently loaded in the editor. This grid keeps the mapping tied to that Grid document. Selected Switcher Grid follows the Grid source in the currently selected Switcher layer; a non-Grid selection is not a valid target.
For clip, column and stop actions, choose the appropriate target behavior:
• By position: follows the row/column location. Moving different content into that location changes what the control operates.
• This clip / This column / This layer: follows that item's identity when it is moved or reordered within its Grid. This choice fixes the mapping to the assignment Grid. If the item is removed, the mapping becomes unavailable instead of silently launching a replacement.
• Selected clip / Selected column / Selected layer: uses the current selection when the MIDI message arrives. This is useful for a shared launch or stop button; it requires a valid selection in the matching Grid.
A mapping learned from a group's column header retains that group scope, even though the Learn dialog calls the action Launch column and does not show the group name. Label controller buttons so an operator can distinguish a whole-Grid column from a group-only column. Column and layer numbers in the mapping dialog are shown starting at 1. For a group-specific controller, choose This grid to keep the destination predictable. If you switch to another Grid that does not contain that group, the target is unavailable.
Map opacity and effects
A layer-opacity mapping controls the row, so it applies as different clips play on that row. Its target can follow the loaded Grid, a fixed Grid or the selected Switcher Grid source. Layer-opacity targets use the layer number: review them after rearranging layers.
Supported effects sliders and enable/bypass switches can follow the currently selected layer or clip. For Grid clips, the mapping can instead target the active clip on a particular row or a fixed row/column. Fixed effect targets follow the location, not the identity of a moved clip. Rehearse the exact parameter and scope you intend to use; not every effect control supports every fixed-target mode.
In MIDI Settings, use Absolute for a conventional fader. Choose the matching relative encoding for an endless encoder and adjust Relative step to set its sensitivity. The available relative modes are two fixed values, binary offset, signed bit and two's complement. 14-bit CC combines an MSB controller numbered 0–31 with its LSB partner 32 numbers higher. The Output range limits the parameter's working range; absolute input is scaled into that range and relative input is clamped to it.
Review and maintain mappings
Open Controls > MIDI Mappings… to inspect all assignments. Builds with the renamed menu use Config > MIDI Mappings… instead; the label depends on the Engine/interface version, including in Web Remote. Each row lists the MIDI source and the target behavior. Use Edit… to change device, channel, note/CC number, scope or value settings; Duplicate creates another assignment; Delete removes one. You can also right-click an assignable control in MIDI Map mode for MIDI Settings… or Remove this MIDI Mapping.
Mappings are stored in ShowMotion Preferences. One MIDI input can intentionally operate several targets, and one target can have several controller assignments. Review duplicate-input indicators before rehearsal to avoid an unintended second action. If a device is disconnected, check its input selection; choosing Any MIDI input broadens the mapping to matching messages from all available inputs.
Exercise: a small MIDI show controller
Create a Grid with Background, Titles and Music rows and two show columns. Put Background and Titles in a Visuals group. Keep Music outside that group.
1. Map one pad to a populated title clip and another pad to the first Visuals group column.
2. Map a third pad to the whole-Grid second column. Compare the affected rows with the group-only launch.
3. Enable Ignore Column Header Trigger on Music. Start music manually and verify that both column buttons leave it running.
4. Map a fader to the Background layer opacity and limit its output range if the background must never fully disappear.
5. Assign one pad using By position and another using This clip. Move the assigned clip within the Grid and compare the targets.
6. Turn MIDI Map off, test press and release behavior, then reopen MIDI Mappings to verify the device, channel and target names.
7. Program a Timeline
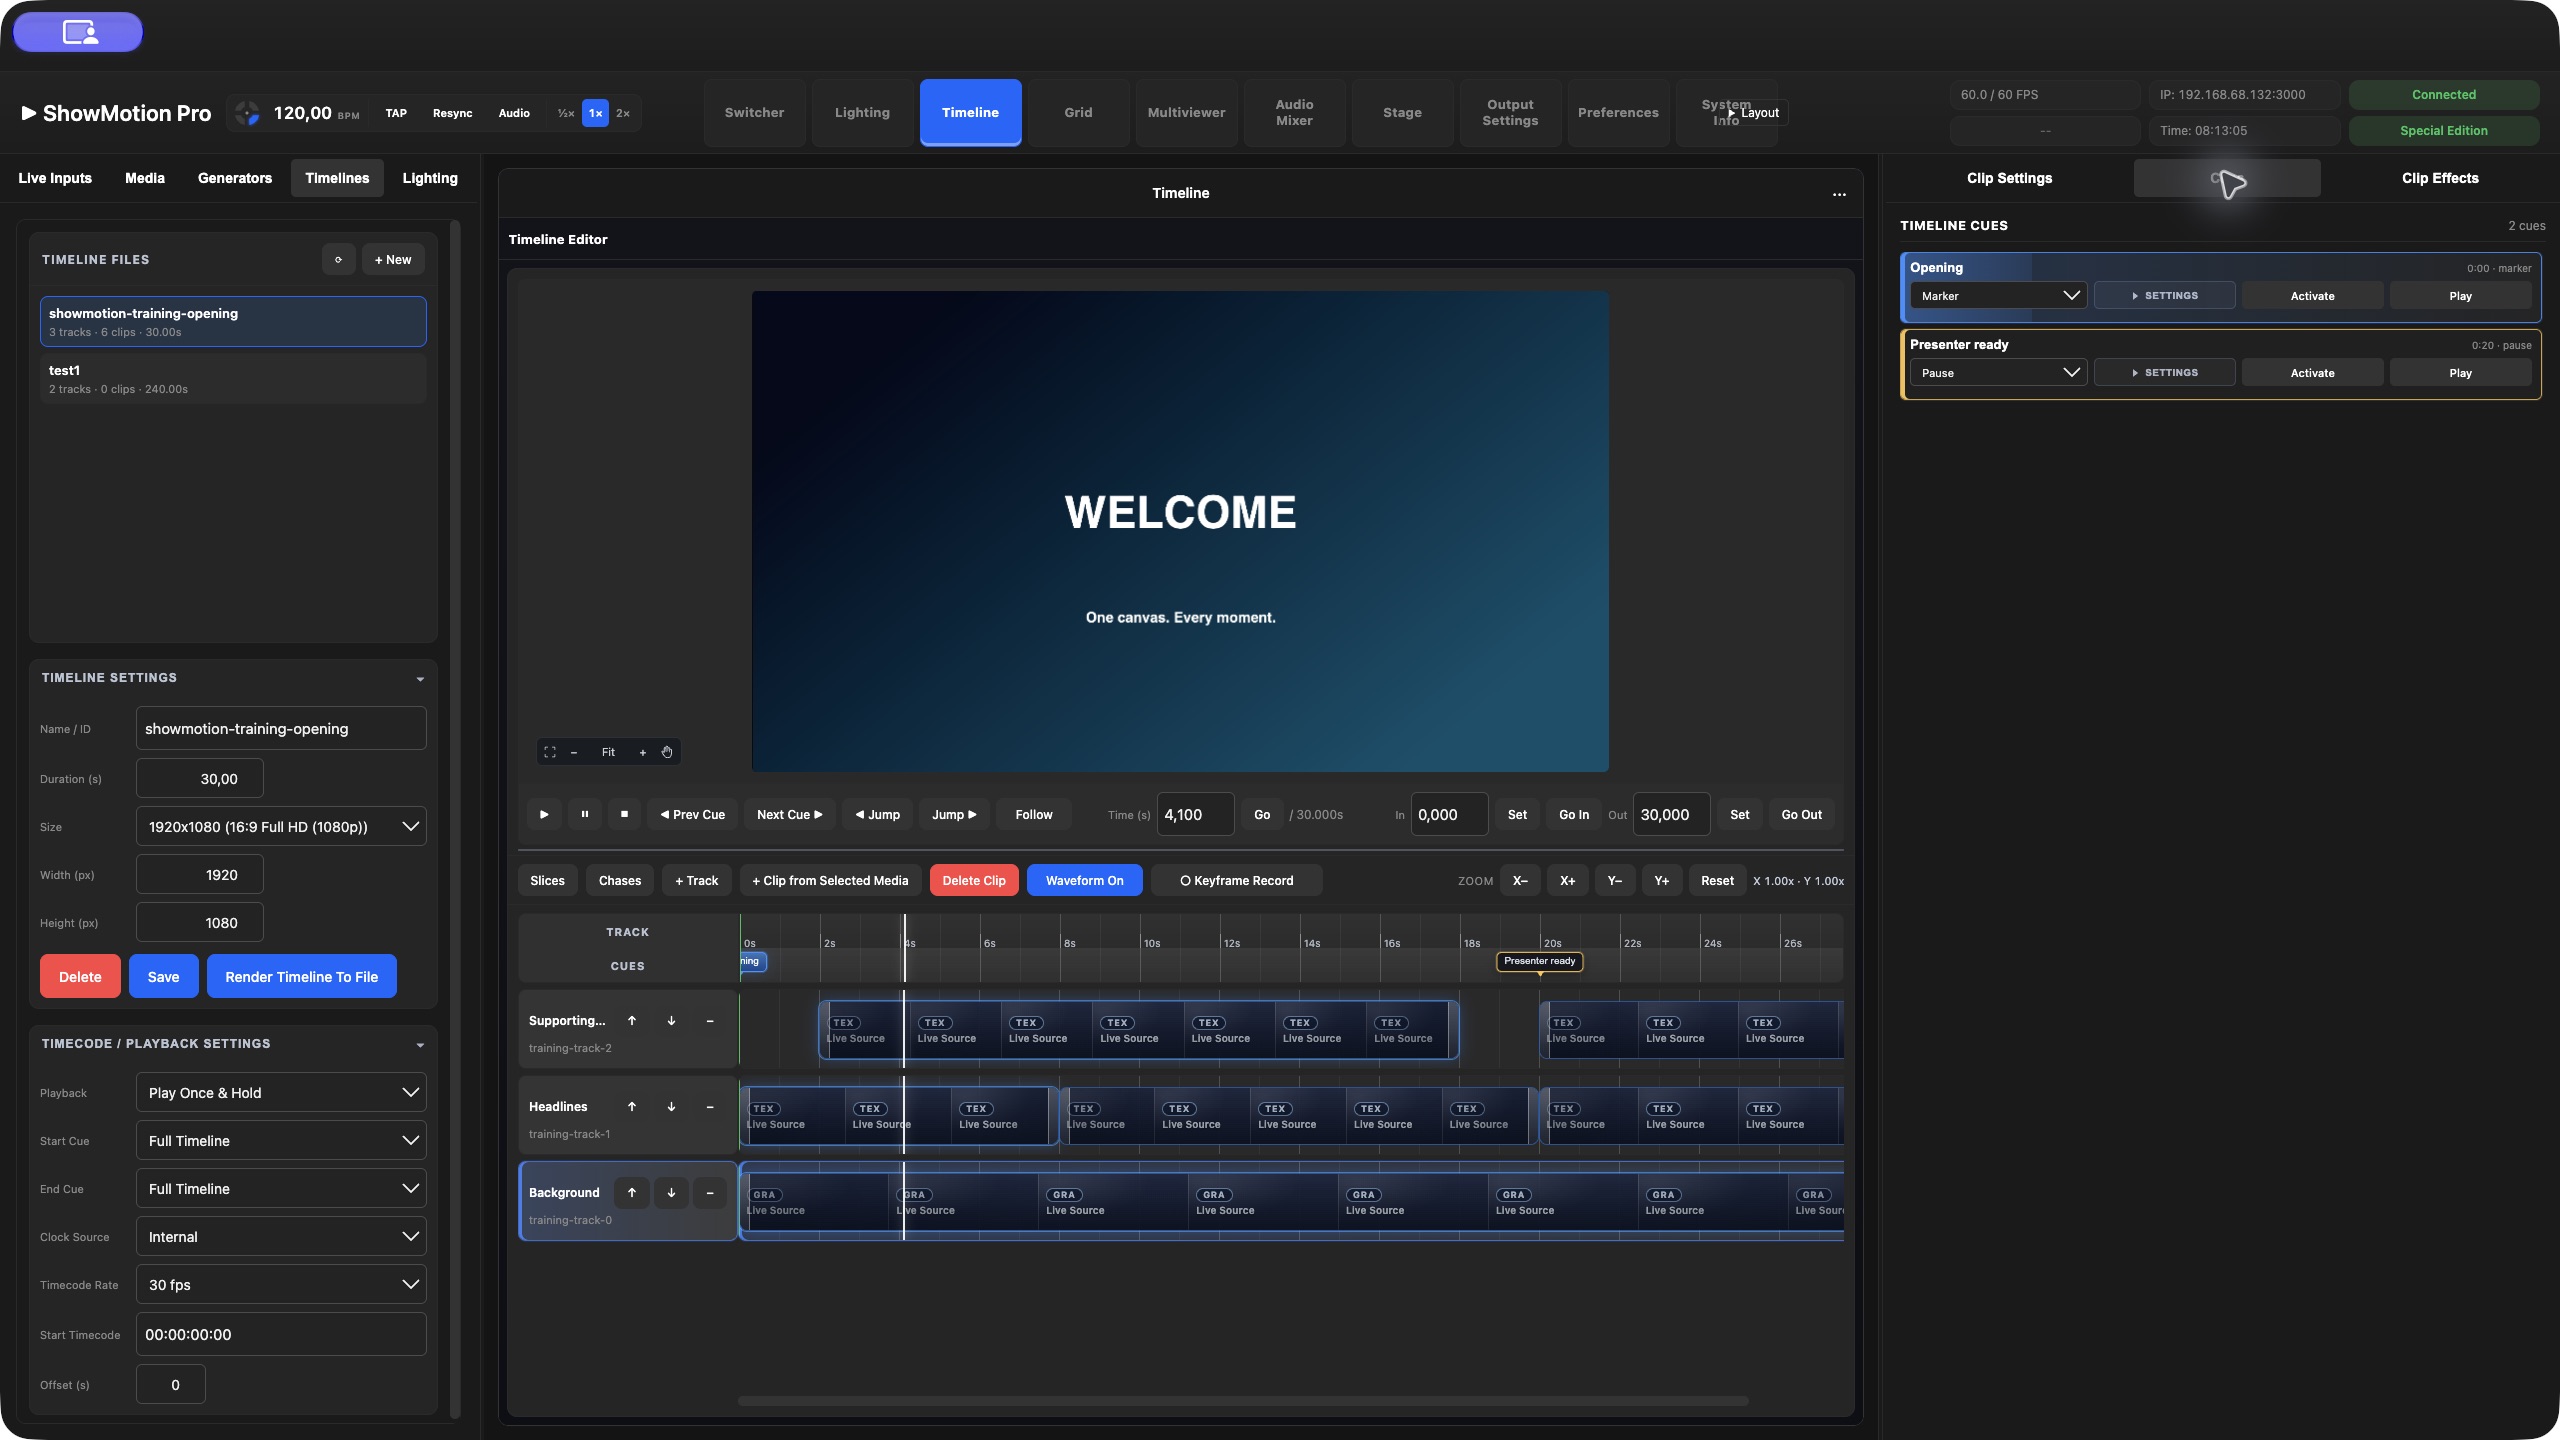
Create the sequence
Create a Timeline with a name, duration and resolution. Choose Loop, Play Once & Hold or Play Once & Clear. Add tracks, then drag sources onto them. Track order determines visual stacking. Adjust timing, transforms and effects using the procedures below, then rehearse the full sequence and save.
Render a file
Use Render Timeline To File when a finished sequence should become a media file. Check composition FPS, Timeline resolution, the selected range and source availability. Review the rendered file's complete picture and sound before using it in production.
Timeline editing: place, trim and repeat clips
A Timeline combines two kinds of time. Timeline time determines when a clip appears in the show. Source time determines which part of a media file it displays. Changing one does not necessarily change the other.
For example, a clip can begin at show time 10 seconds, read its video from source time 2 seconds, and remain on the Timeline for 6 seconds. At normal speed, its first pass reads source seconds 2–8 while the show advances from 10–16 seconds.
Read a clip before editing it
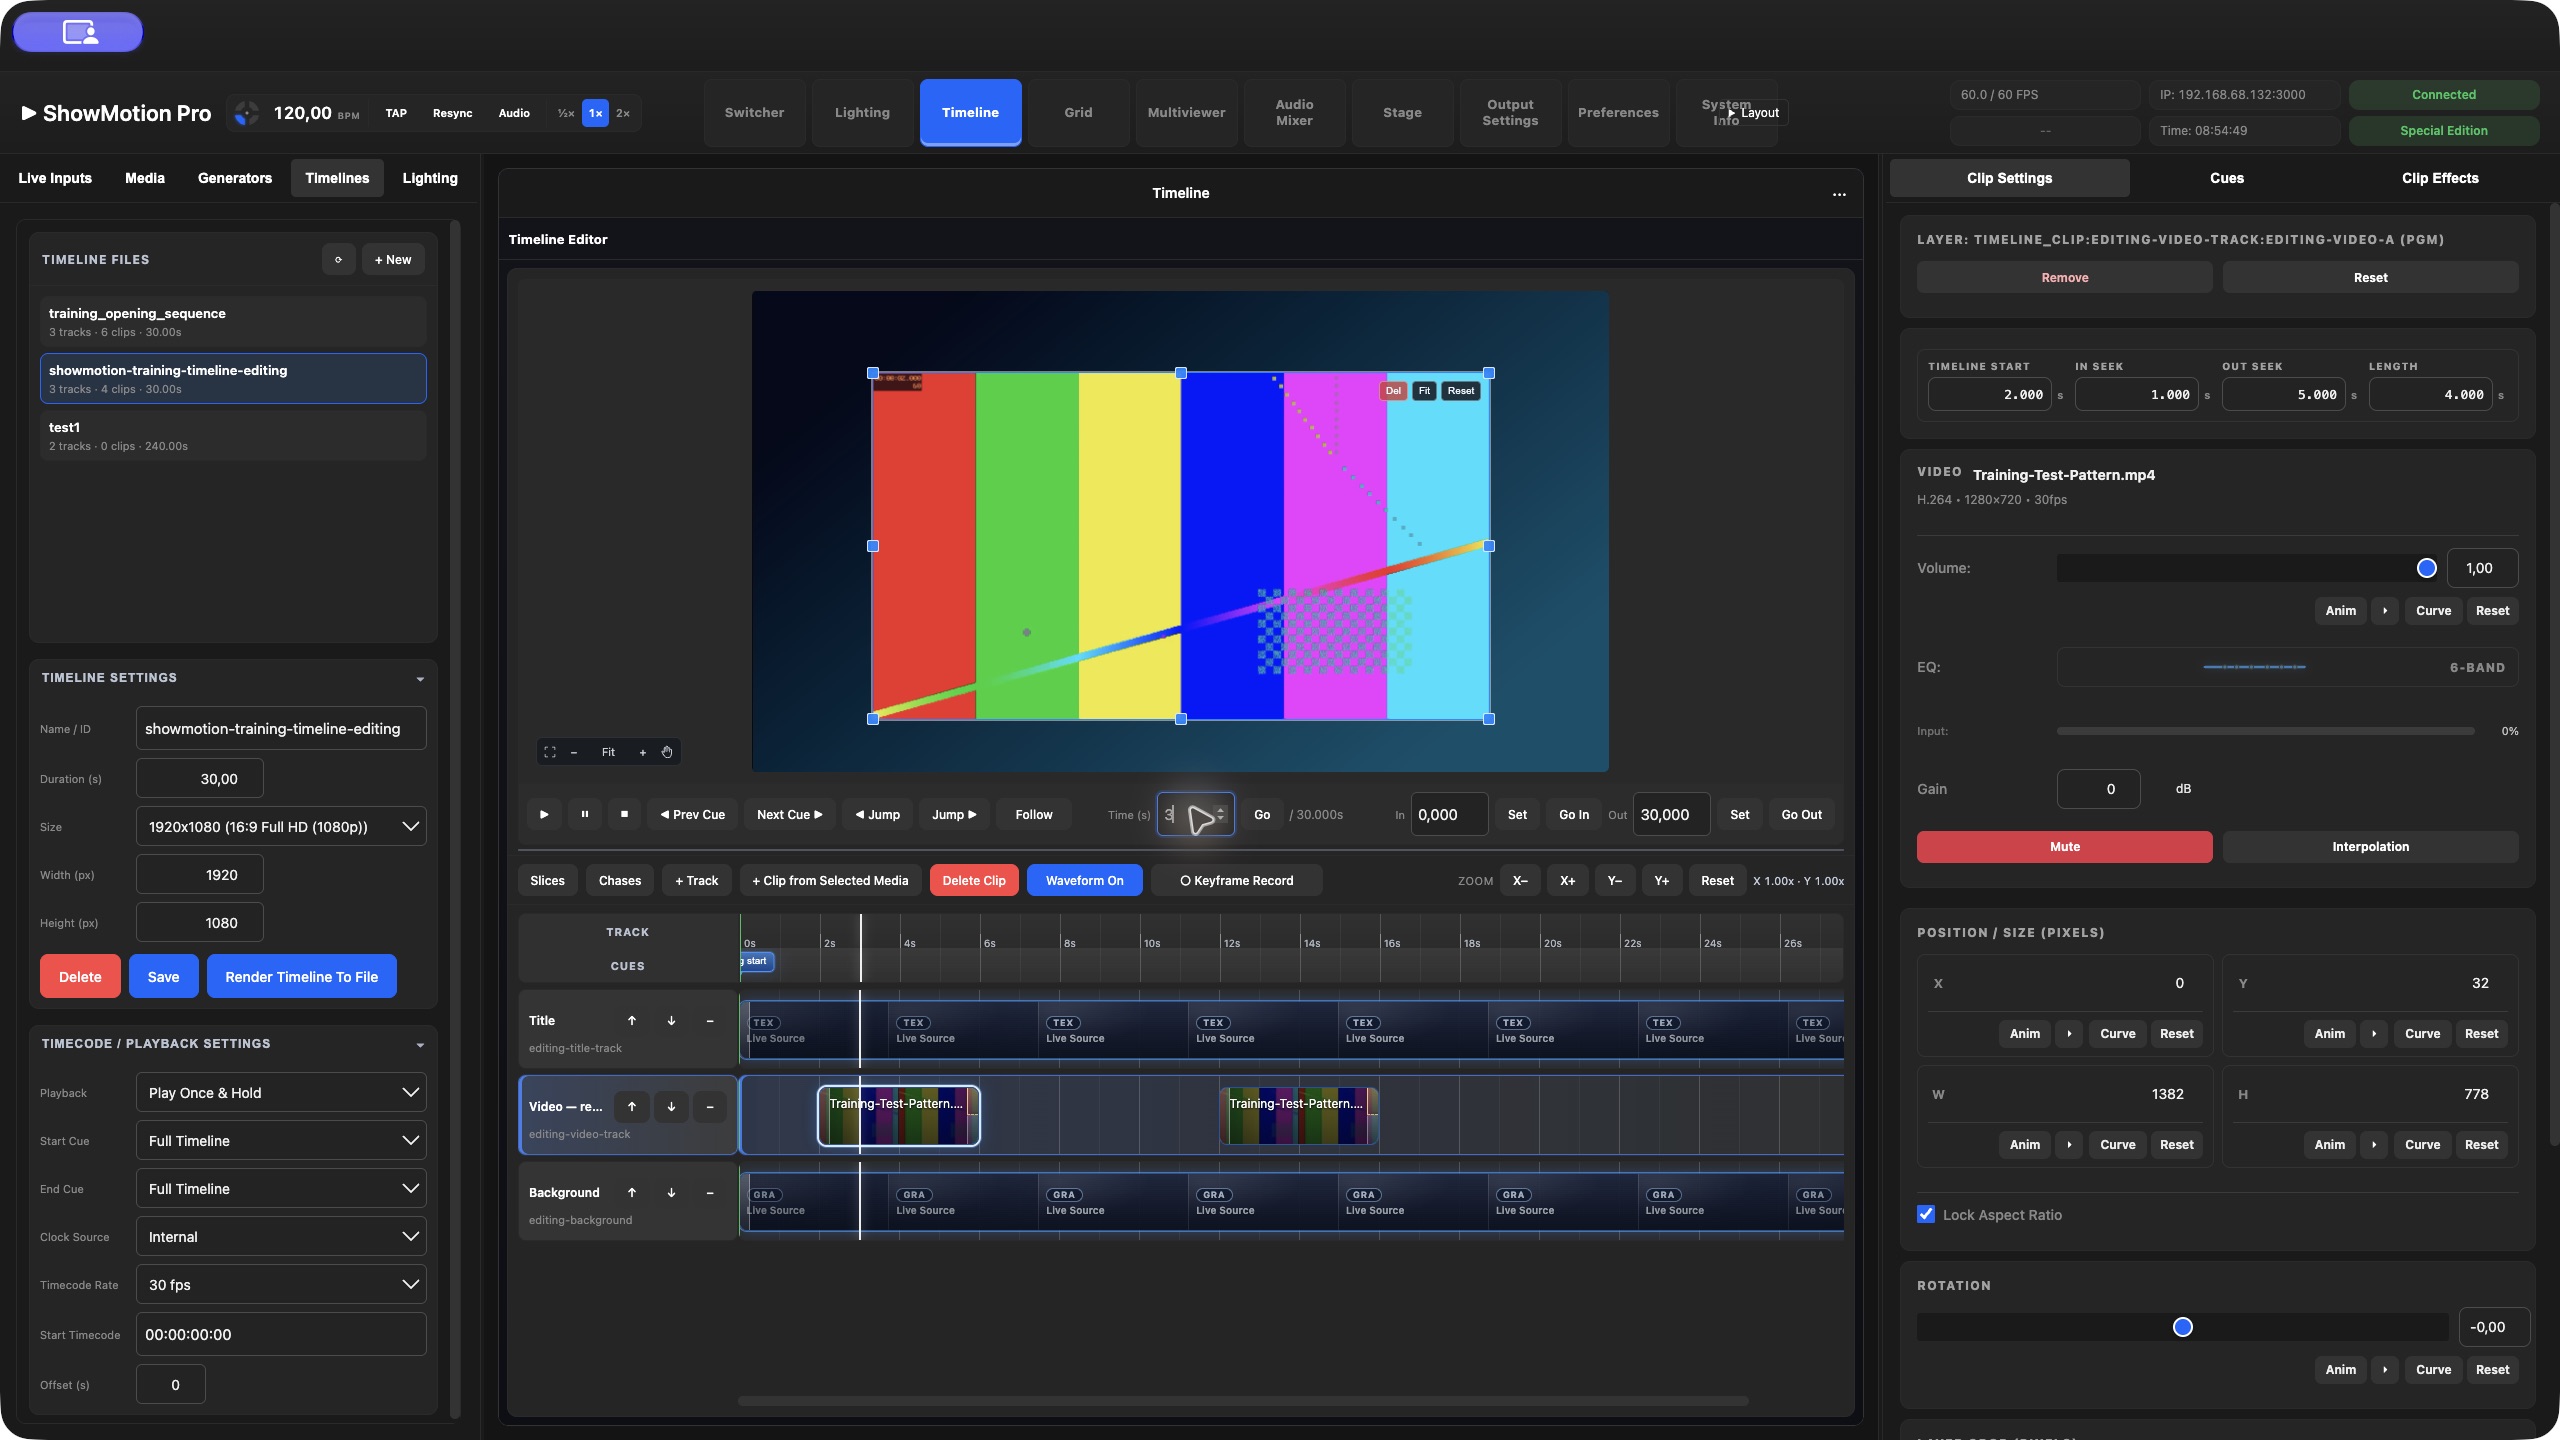
Select a clip and inspect its timing fields. Timeline Start is its position in the show; In Seek and Out Seek describe the media window; Length is its occupied Timeline interval. The video Speed changes how quickly source time advances. A clip's rectangle shows its Timeline interval, not the original file's full duration.
| Control or gesture | What changes | What to check |
|---|---|---|
| Drag the clip body | Timeline position, and optionally its track | Source trim and clip length remain intact. |
| Drag the left edge: Trim In / In Seek | Timeline start and source in point together | The right edge stays in place; the clip becomes shorter or longer. |
| Video right handle: Trim Out (Source Max) | The first-pass source window | It cannot extend beyond available source media. |
| Video right handle: Extend Clip (Loop) | The overall Timeline interval | The extra interval can repeat the selected video section; check the video's playback mode. |
| Timeline Start field | Exact Timeline position | Moving earlier is different from revealing earlier source frames. |
| In Seek field | Source starting point | It preserves the current Timeline length; recheck the resulting source window. |
| Out Seek field | Source ending point | For a normal video, the length is recalculated from the source window and playback speed. |
| Length field | Overall Timeline interval | Source out and Timeline end can differ when the interval repeats. |
The two right handles appear on normal video clips when ShowMotion knows the source duration. Images and generators have one right edge because there is no finite movie section to trim. Container clips also have one right edge: their source loop is configured separately.
Place and move clips
1. Open the Timeline document and select the intended track.
2. Drag media from Sources → Media onto an empty part of the track. Watch the time ruler when choosing the starting position.
3. Select the clip and enter Timeline Start for an exact placement.
4. Drag its body to move it later or earlier. Drag vertically to place it on another track.
5. Preview the sequence across both the clip's beginning and ending.
Normal dragging magnetically aligns against relevant Timeline positions and clip edges. Hold Shift during a move or edge resize to use the time grid instead. Grid precision increases as you zoom in: the interaction grid ranges from 0.1 seconds down to 0.01 seconds. Shift is a snapping modifier here; it does not time-stretch the video.
The editor blocks a drop that would overlap another clip on the same track. It also stops an edge resize at its neighbouring clip. To layer pictures or create overlapping fades, place the clips on separate tracks. Dragging an edge does not push later clips along as a ripple edit would.
Select, duplicate and remove clips
Click a clip to select it. Shift-click adds another clip; Command-click on macOS or Ctrl-click toggles a clip in the selection. Hold Shift and drag across empty track space to draw a selection rectangle. Command/Ctrl while drawing makes that rectangle additive.
Drag an already selected group to move its members together. Their relative timing is preserved; make sure every destination track has enough empty space. Command/Ctrl-drag copies the selected clip or group instead of moving it. Keep the modifier held through the drop.
Use Command/Ctrl+C and Command/Ctrl+V to copy and paste clips at the playhead. When a cue or curve points are selected, those shortcuts can act on that selection instead, so select the intended clip first. Delete/Backspace removes selected clips. Command/Ctrl+Z undoes; Command/Ctrl+Shift+Z redoes. These Timeline shortcuts apply when focus is outside a text-entry field.
Trim a video without changing its playback speed
1. Select a normal video clip and zoom in until you can identify its edges.
2. Drag Trim In / In Seek to the right to remove the beginning. The Timeline start moves right, the media in point advances, and the ending stays fixed.
3. Drag that edge left to restore previously trimmed material. You cannot reveal source time earlier than zero.
4. Drag Trim Out (Source Max) to shorten or restore the first pass of the video.
5. Check In Seek, Out Seek, Length and Speed before playback.
The left trim is speed-aware. At 2× speed, moving the Timeline start one second later advances the source in point by two seconds. Resizing changes how much material is used; use Speed when you want faster or slower motion.
If the left edge refuses to extend, the source may already begin at zero or the previous clip may occupy the space. If the right source edge refuses to extend, you may have reached the end of the file. Use the loop-extension handle when the intention is to repeat footage for a longer interval.
Exercise: distinguish move, trim and split
Use a video at least 10 seconds long, with no neighbouring clips on its track. Set Speed to 1×. Use decimal seconds in the timing fields.
1. Set Timeline Start = 10.000, In Seek = 2.000, then Out Seek = 8.000. Confirm Length = 6.000. The clip occupies show seconds 10–16.
2. Move the clip to Timeline Start = 20.000. It now occupies 20–26, but still reads source seconds 2–8.
3. Drag the left edge to show second 22. Expect In Seek = 4.000 and Length = 4.000. The right edge remains at 26.
4. Position the playhead at 24. Right-click the clip and choose Cut At Playhead.
5. Confirm two adjacent clips: the left occupies 22–24 and the right 24–26. The right clip begins at source second 6, continuing the original footage.
6. Preview the cut, then undo it and repeat until the distinction is clear.
Cut At Playhead is available only when the playhead lies inside the selected clip, with more than 0.05 seconds left on each side. It creates a second clip referencing the same source; it does not rewrite the media file. Treat clips with authored curves as a separate check after cutting: the split copies clip settings, so review the animation on both halves rather than assuming it was retimed into two identical visual segments.
Extend a normal video for a longer interval
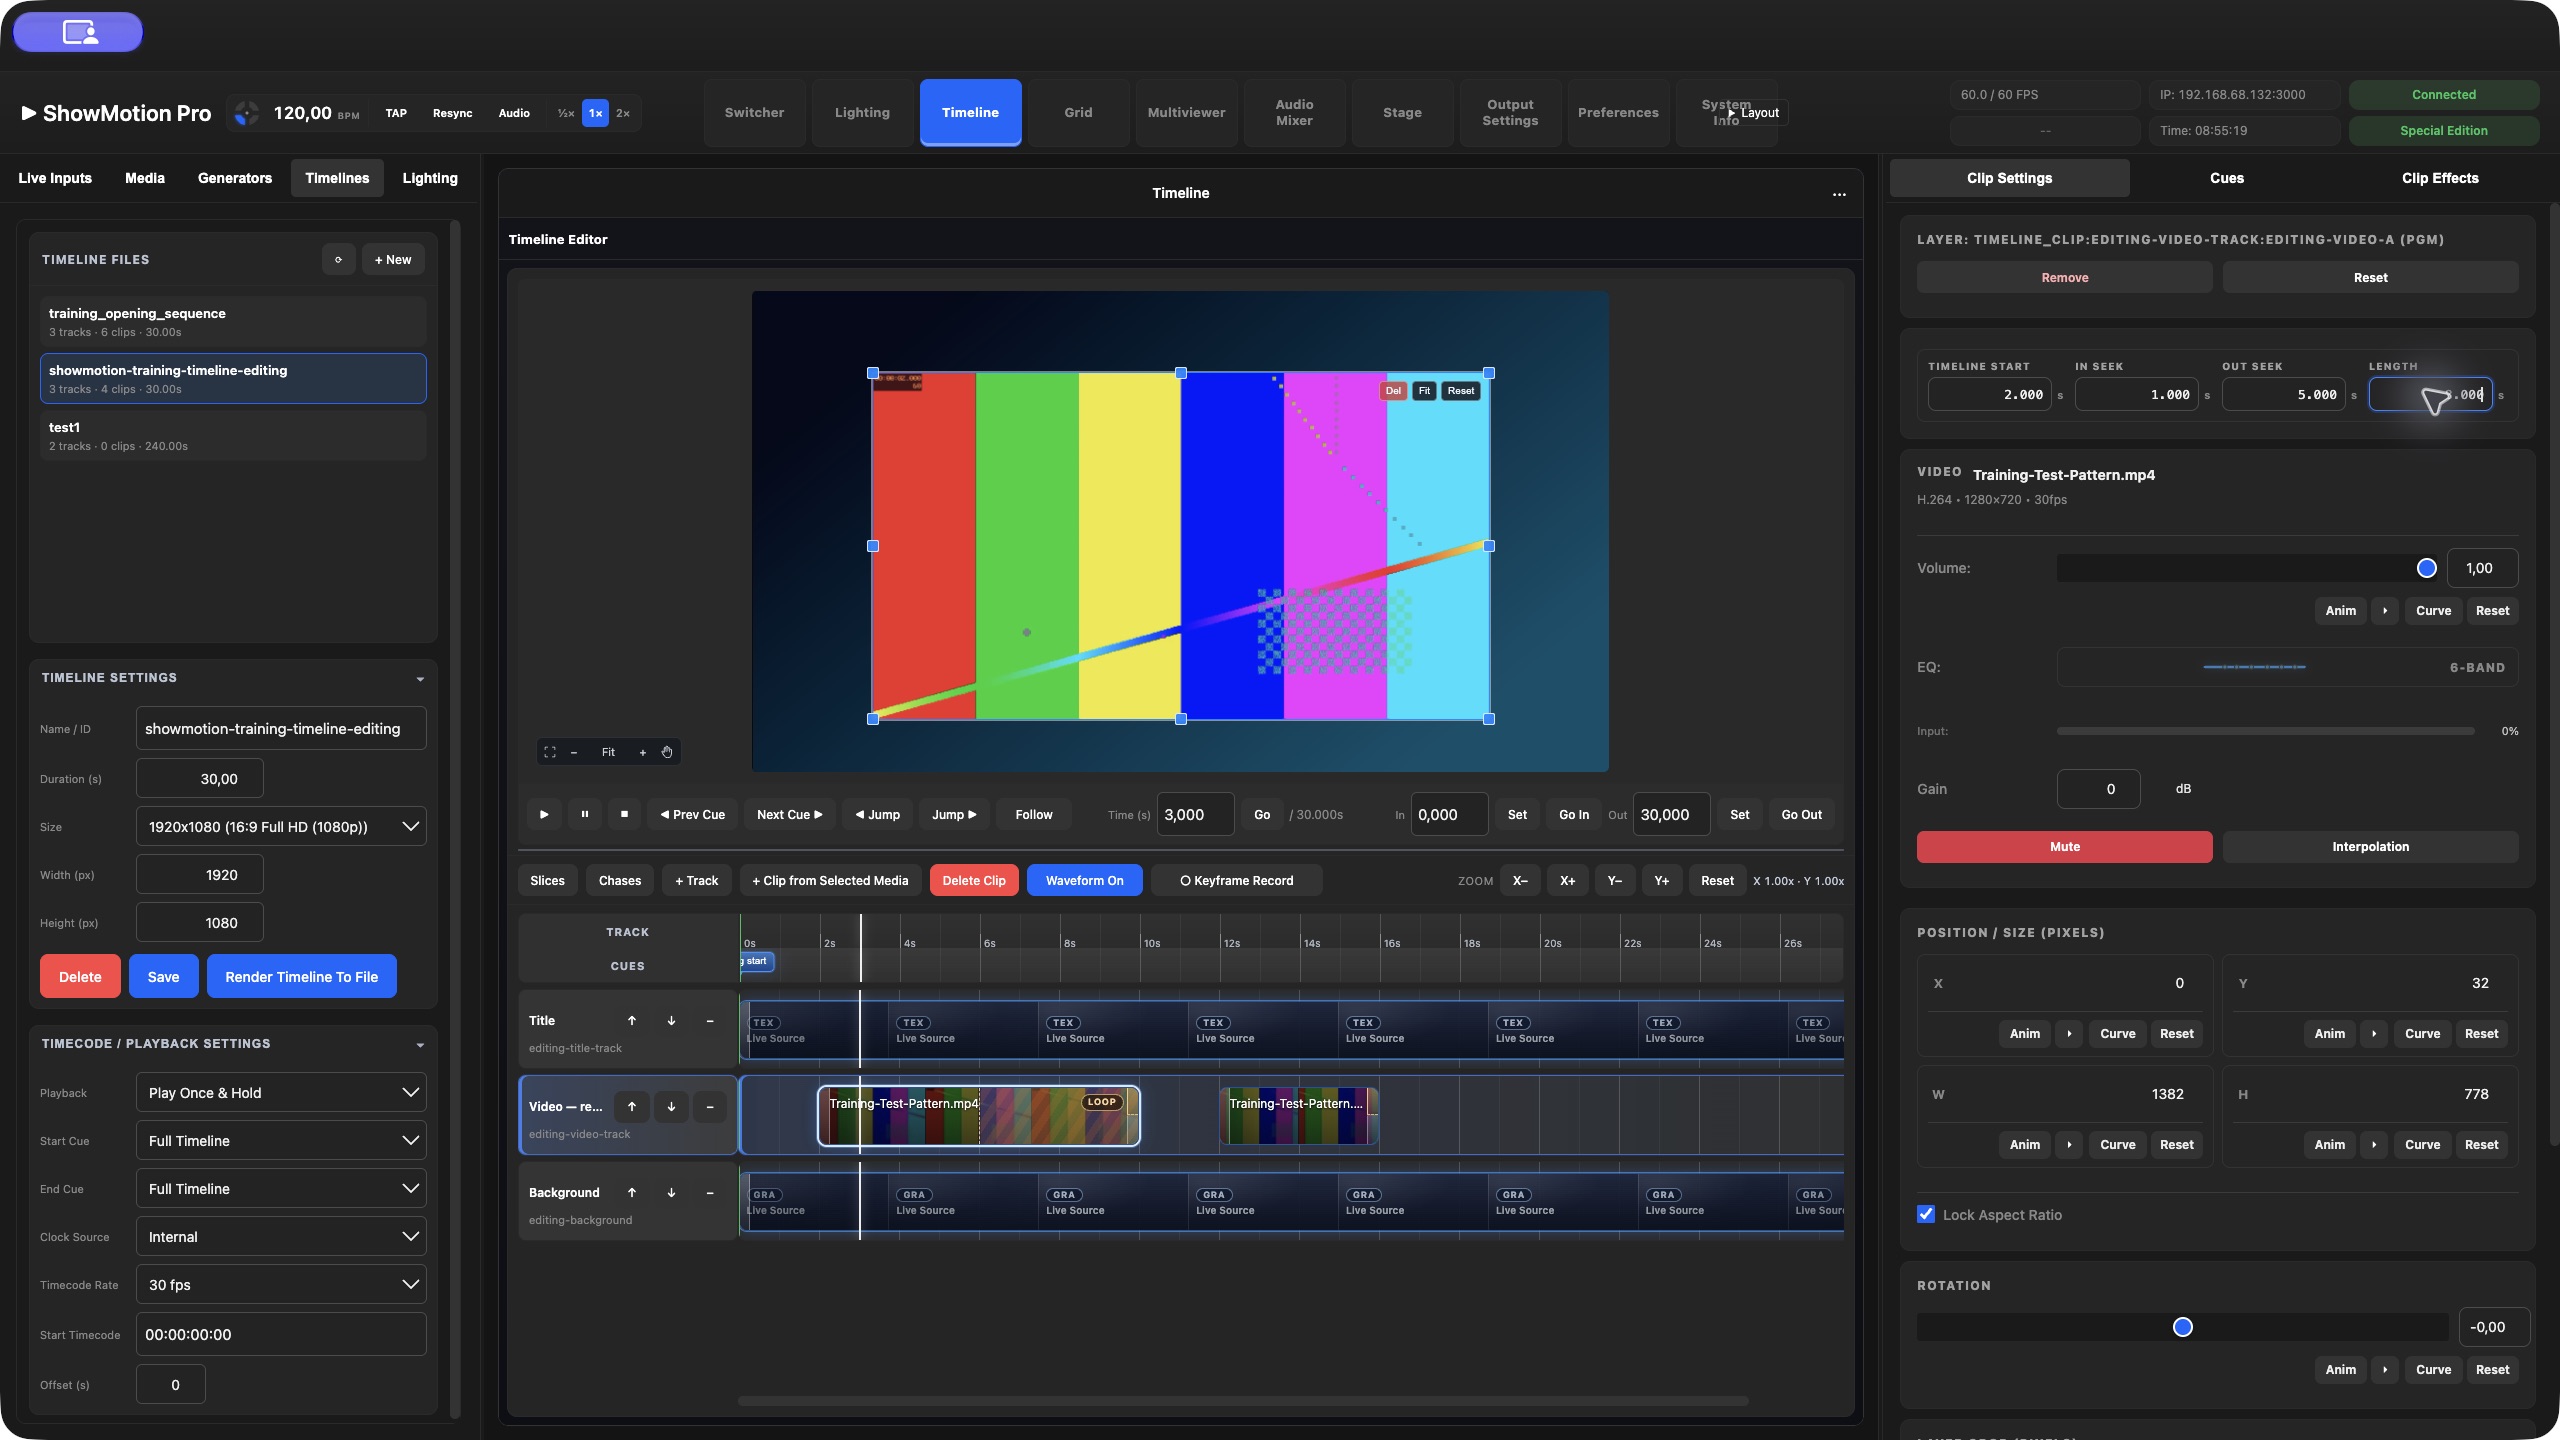
A normal video can have a source window shorter than its Timeline interval. Select its Loop playback mode, define the source In/Out, then drag Extend Clip (Loop) to the required Timeline end. The added part is shown as a loop extension. For example, a source window from 2–6 seconds is four seconds long at 1×. A 12-second Timeline interval can show three passes of that window.
Check the playback mode explicitly. Loop repeats; other modes can hold, bounce or stop according to their setting. Extending the rectangle alone is not a substitute for choosing the intended playback behaviour. If you subsequently trim the source-out handle, the editor preserves the existing extra extension duration, so inspect the final Timeline end again.
Container clips: a moving background during a hold
A Container clip is a timed window for a video that loops independently in real time. It is useful when a presenter needs an unpredictable amount of time while an animated background continues behind them.
A normal clip follows the Timeline's playback position. In contrast, an active Container video's loop continues when the Timeline is paused. The playhead can wait at a Pause cue while the video keeps moving. Stop stops the loop. Resuming the Timeline lets the playhead advance towards the end of the Container's interval.
A Container is not a collection of child clips, a grouped edit or a nested Timeline document. Converting a clip changes its playback behaviour; it does not create another editing Timeline. For multiple independent sequences, use separate Timeline documents and the cue system to coordinate their playback. Their pictures still need their own routes to Switcher, a Grid or outputs.
Create a Container clip
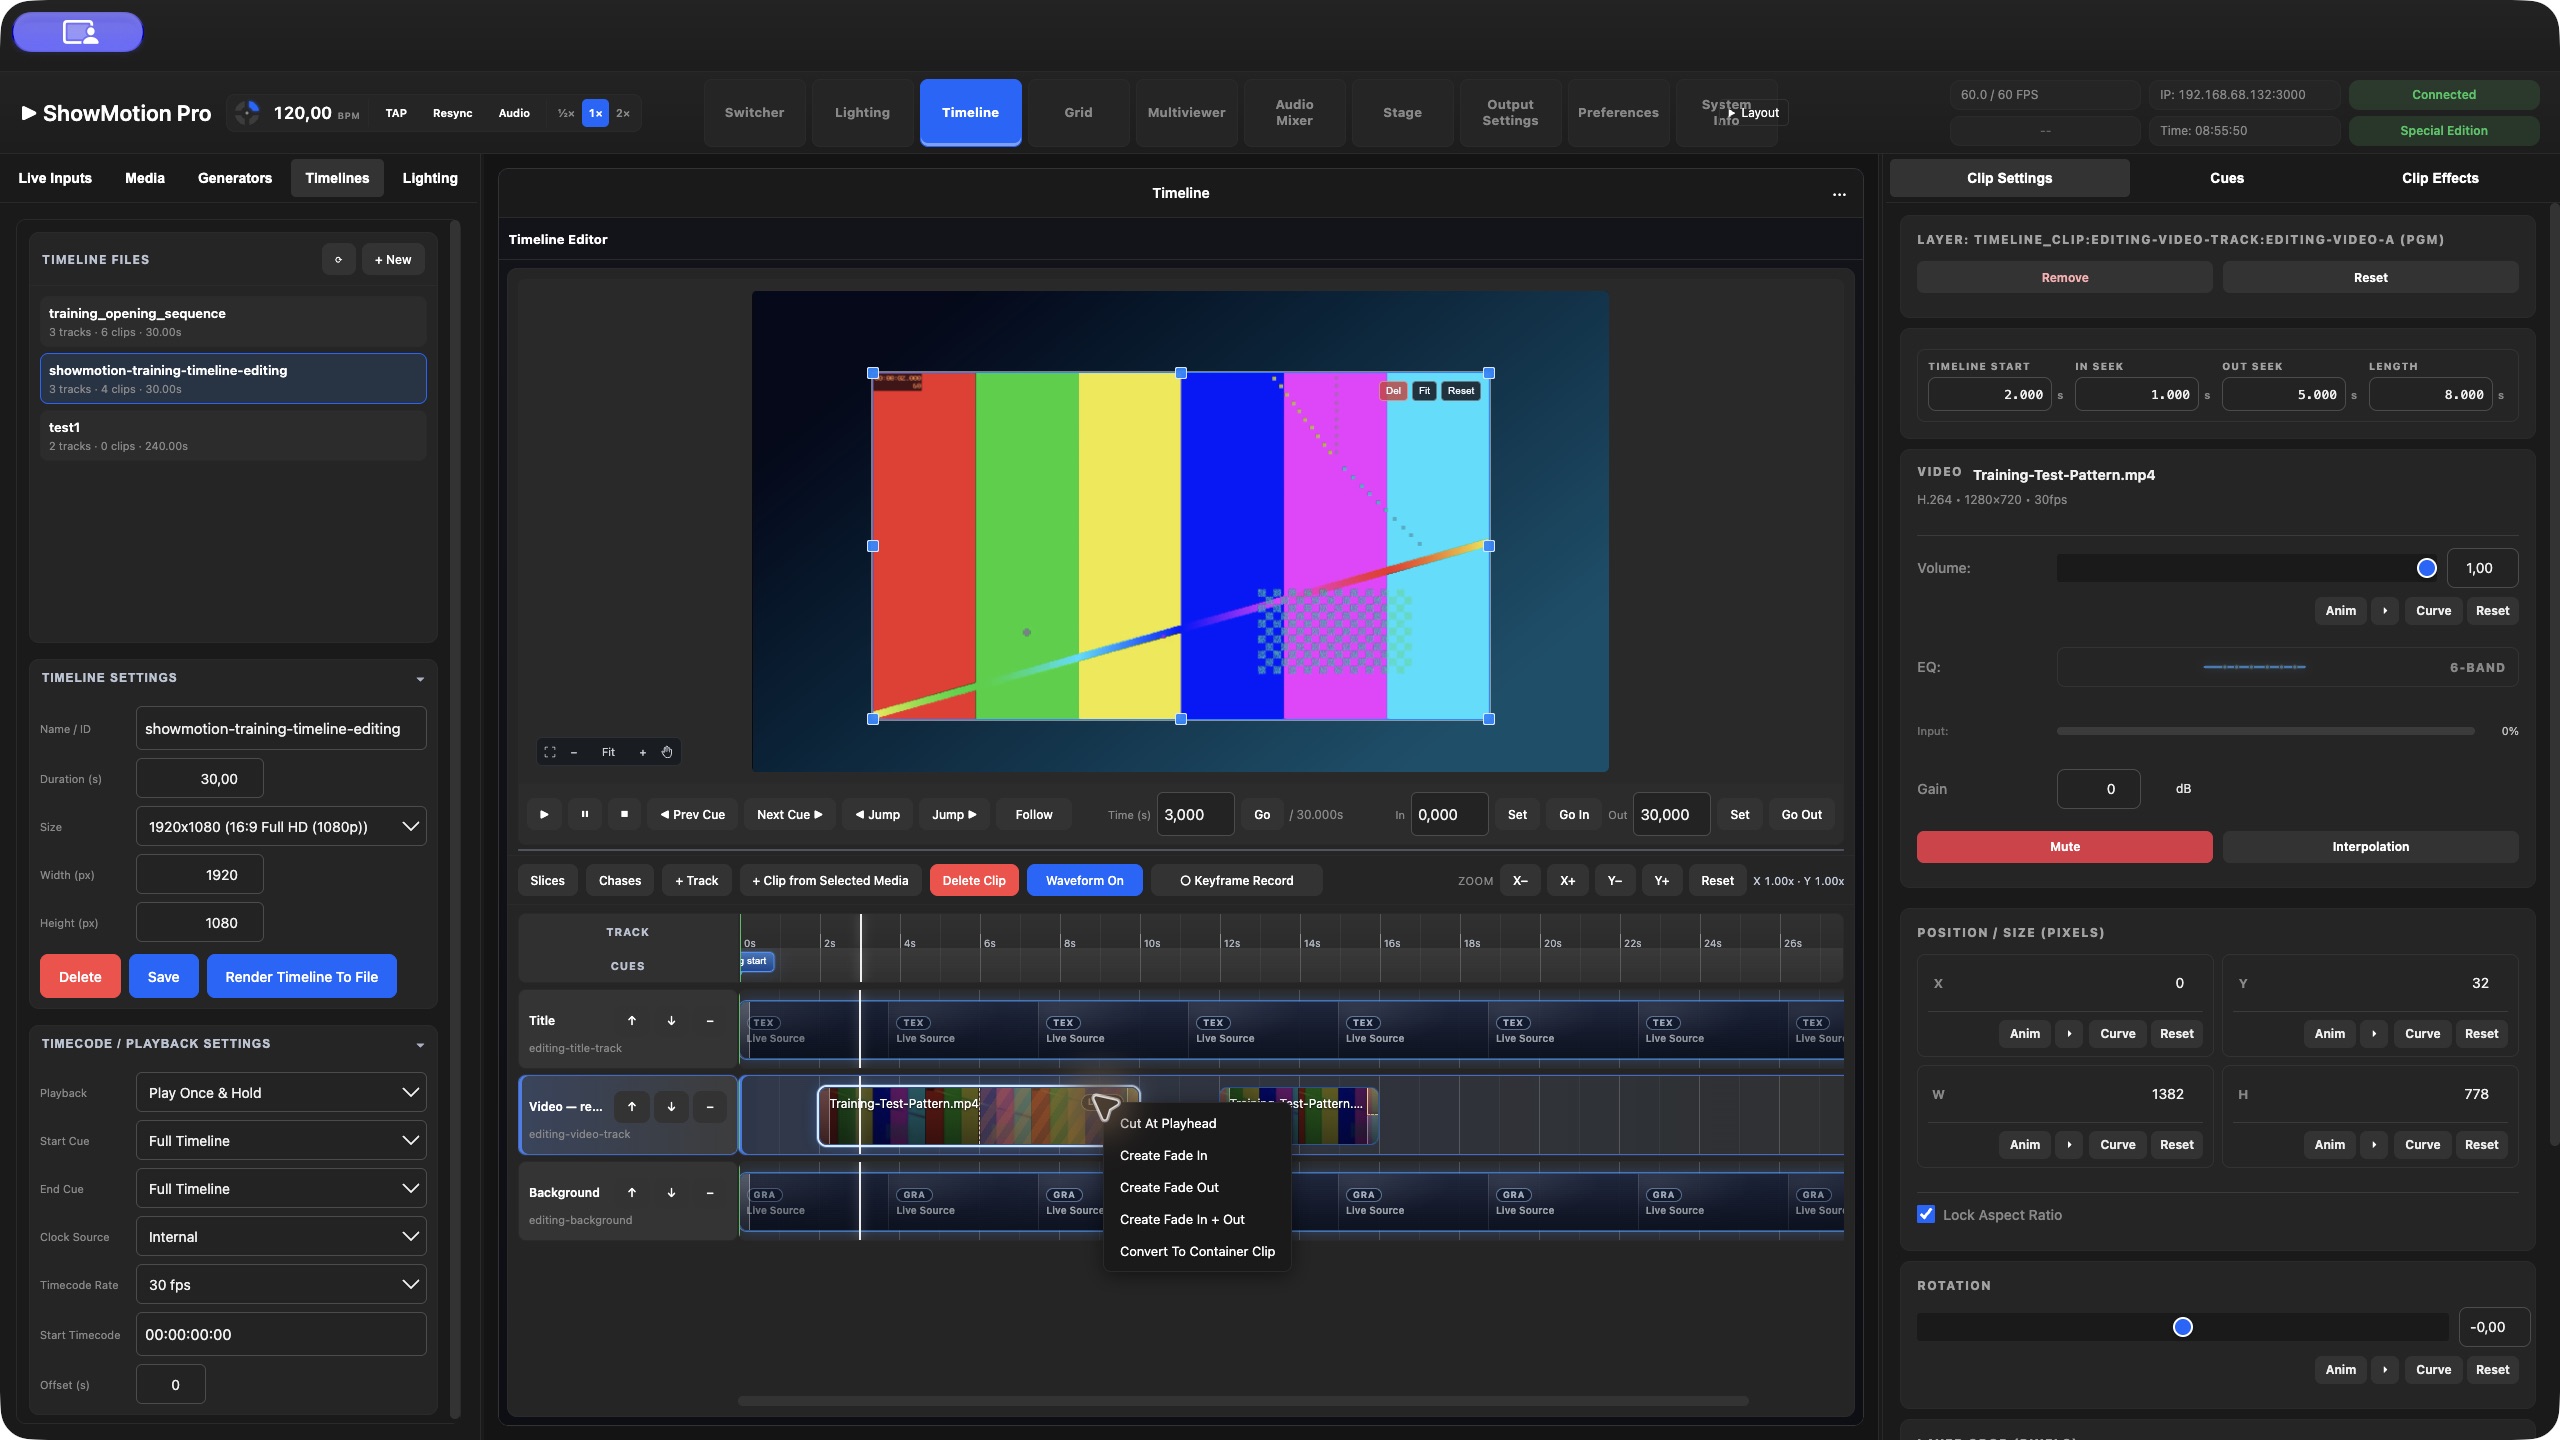
1. Place a video on a track and select it.
2. Right-click its body and choose Convert To Container Clip. A Container badge appears on the clip.
3. Set the occupied show interval with Timeline Start and Length, or drag the right edge.
4. In the video's source controls, set In: and Out: to the part of the file that should repeat. These are the Container's media loop bounds. The Set In Point and Set Out Point buttons take their values from the source seek control.
5. Set Speed, playback direction and audio level as required. For a silent background, mute its audio or reduce its volume.
6. Play into the Container interval and pause there. Verify that the background keeps moving while the Timeline time remains stationary.
7. Resume playback and check that the composition changes correctly when the playhead leaves the Container interval.
The Container's source Out must be later than its source In. With no explicit valid Out, playback uses the available media end. Set both bounds deliberately for a repeatable show. If you left-trim the Container later, the trim also advances its source in point, so check the loop again.
Right-click and choose Convert Back To Normal Clip to return to normal Timeline-controlled playback. Recheck source In/Out, duration and playback mode after conversion; converting back is not a reset of all prior timing edits.
Exercise: hold for a presenter without freezing the background
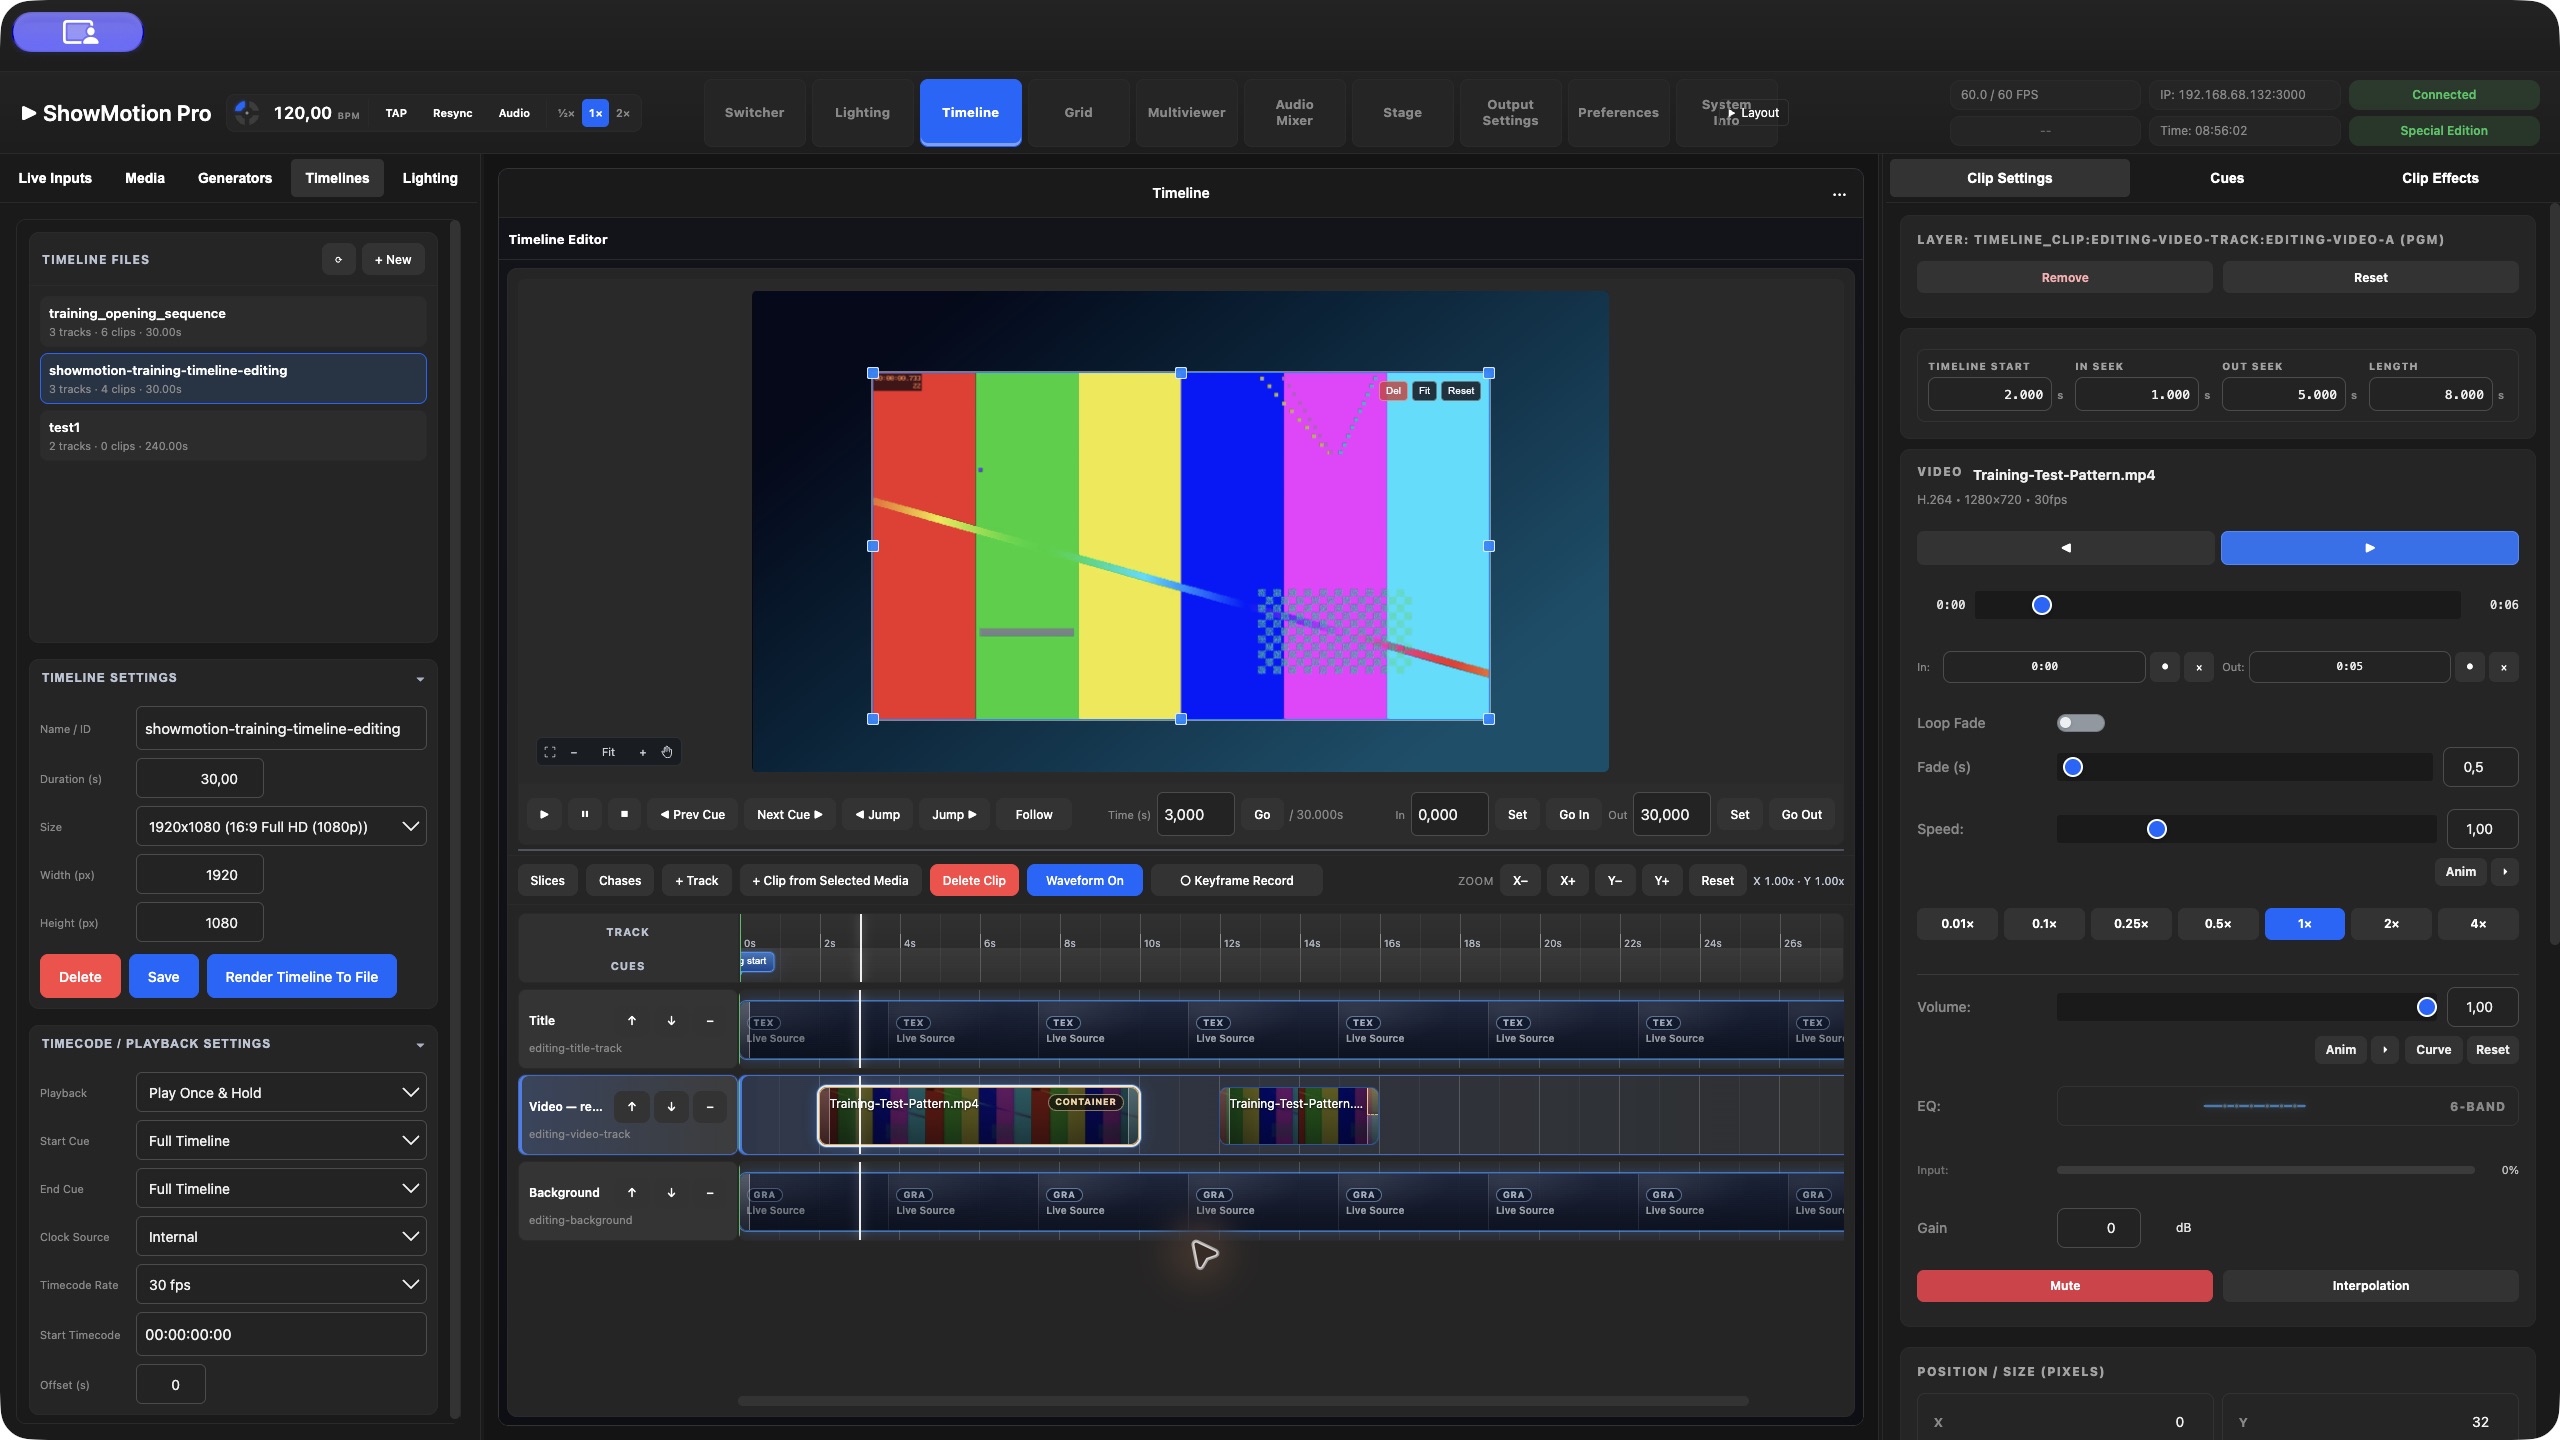
Use a background video with at least eight seconds of usable footage. Create a Container that begins at show second 0 and lasts 30 seconds. Set its source In = 2 seconds, Out = 6 seconds, and Speed = 1×.
Add a Pause cue at show second 10, safely inside the Container interval. Put the next visual section at second 30. Play from the beginning.
At second 10, the playhead pauses. The selected four-second section of background footage keeps repeating for as long as the Timeline remains paused. Its audio also continues unless muted. When the presenter is ready, resume with Play. There are still 20 seconds of authored Timeline time before the next section begins. Use the cue controls described in the next section if the operator should jump directly to that section instead.
For a true hold, keep the cue inside the active clip's interval. A cue at or beyond its end can select the following content instead. Rehearse Pause, Play, Stop and cue jumps independently: they have different purposes.
Container timing and parameter animation
The looping video's motion and its parameter curves are different mechanisms. Timeline clip curves are evaluated against the clip's position within the Timeline. During a Pause hold, the playhead and its curve position stay fixed even though Container video playback continues. This is useful for holding a completed title fade over a moving background.
Live Container playback is free-running, so scrubbing a paused Container is not the same frame-accurate inspection workflow as scrubbing a normal video. Offline export evaluates frames against the authored Timeline; it cannot include an unknown amount of time spent waiting for a presenter. Use a normal clip when the exact source frame at every show time is the priority; use a Container for a deliberate live hold.
Animate the Timeline picture
Use Curve for changes tied to a clip's position and Anim for repeating motion. The curves and parameter animation guide contains a ten-second fade exercise, recorded position changes, point editing, reusable shapes and the controls shared with Switcher and Grid. Complete the timing exercise above first: resizing a clip also rescales its normalized curve timing.
Build a cue sequence
A cue is a named position with an optional action. A Marker labels a point without interrupting playback. Other cue types can hold the show, jump within this Timeline, control another Timeline or recall a saved Switcher preset. Cue control and picture routing are separate: starting another Timeline does not add its image to the current Timeline.
Start with Clock Source: Internal while learning. An external LTC, MTC or Art-Net clock can subsequently drive position, so internal Play/Pause exercises are easiest to understand without an external clock.
1. Open your Timeline and right-click the ruler at the required time.
2. Choose Add Cue Here. The new cue appears on the ruler and in Cues.
3. Right-click its marker and choose Rename Cue. Use a stage instruction such as Presenter ready rather than Cue 3.
4. Select the cue, choose its type and expand Settings.
5. Enter the precise Time (s). Set On enter for the first exercise, and leave Wait empty or zero.
6. Save the Timeline. Rehearse by playing from before the cue, then test its Activate and Play buttons separately.
Right-click a cue for Copy Cue, Rename Cue, Delete Cue, Set As Start Cue and Set As End Cue. Right-click a new ruler position and choose Paste Cue Here to duplicate an action. After copying a cue, check its target and timing; a copied external trigger can restart the same target again.
Choose the right cue type
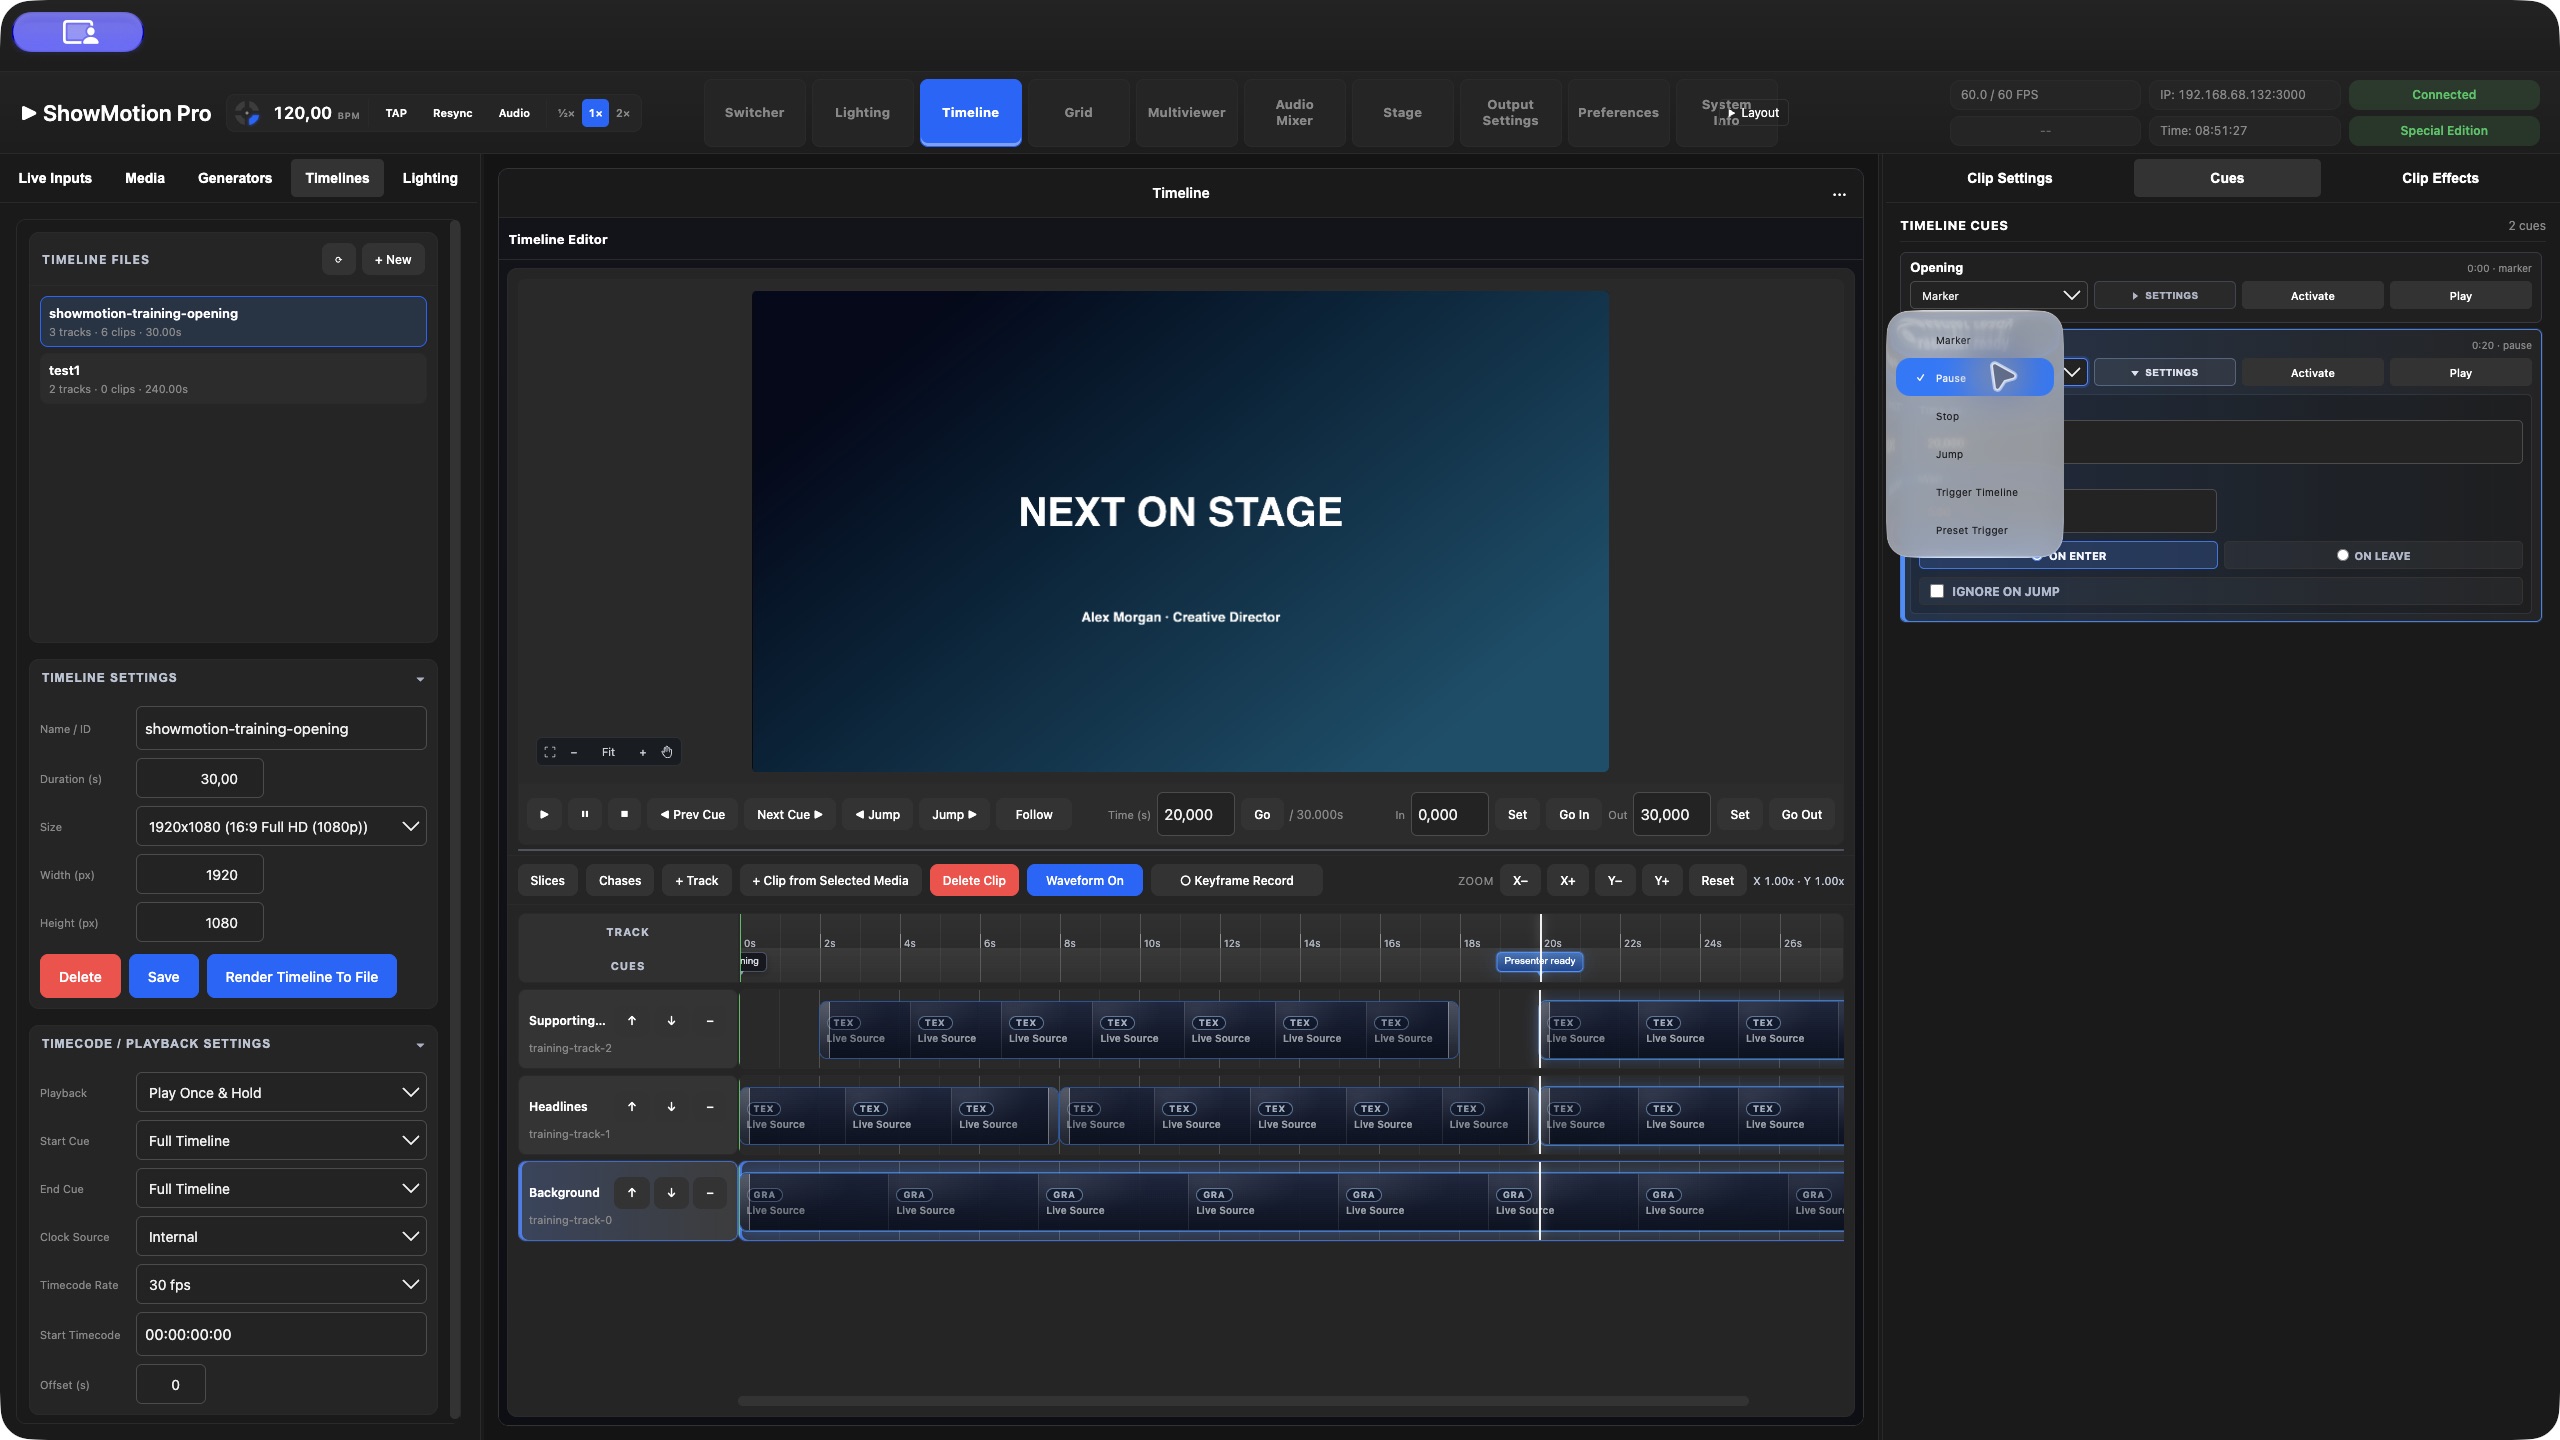
| Type | What it does | Typical use |
|---|---|---|
| Marker | Names a position; normal playback continues. A positive Wait changes this into a timed hold. | Label an opening, verse or destination for another cue. |
| Pause | Parks at the cue during playback. With no Wait, it stays paused until resumed. With a positive Wait, it holds temporarily and then resumes. | Wait for a presenter or hold a title for a fixed interval. |
| Stop | Stops and resets the Timeline to its reset position. | Return a finished sequence to its ready state. |
| Jump | Moves to another cue in this same Timeline, then applies Target Cue + Play or Target Cue + Pause. | Repeat a section, skip an optional section or park at a named point. |
| Trigger Timeline | Moves a different Timeline to its chosen cue and plays or pauses that target. | Launch a separate LED-wall sequence or prepare another Timeline at a named position. |
| Preset Trigger | Recalls a saved preset to selected Screens on PGM or PVW, with an optional fade to PGM. | Coordinate a timed sequence with a Switcher look. |
Stop is not a hold. Its reset position is the selected Start Cue, otherwise the first cue, otherwise zero. For a picture that should remain at the handover point, use Pause and verify the content present at that time. A Timeline may contain special container playback behavior; see the container-clip exercise before assuming every animated source freezes with the main playhead.
The cue-type menu does not provide OSC, MIDI, arbitrary network-command or API-command cues in this version. MIDI timecode is a clock-source feature; it is not an outgoing MIDI cue action.
Navigate without confusing selection and activation
Selecting a cue exposes its settings. Activate moves to that cue, applies its cue properties and normally leaves this Timeline paused. Play moves to it, applies its properties and requests playback. A Stop cue still resets; a blocking Wait is allowed to finish rather than being overridden immediately by Play.
Prev Cue / Next Cue jump to a neighbouring cue and play. The neighbouring Jump buttons jump and pause. These are cue activations, so they can run cue properties. They are not a guaranteed action-free rehearsal mode. Ordinary playhead seeking is different from activating a cue and should not be used to verify that a cue action works.
For a rehearsal that must not recall a live preset, route the preset to PVW or test with a dedicated practice preset and Screens. Read the destination before pressing Activate: an editor action can control another Timeline or a Program preset.
On enter, On leave and Wait
On enter fires when playback reaches the cue. On leave fires when the cue ceases to be the active cue as playback enters another cue section. This does not mean “one frame after this marker.” For example, if Section A is at 5 seconds and Section B at 12 seconds, an On leave action on Section A normally runs when playback reaches Section B.
Use On enter for straightforward show timing. Use On leave when the action belongs to the end of a section and there is an explicit next cue to define that boundary. Manual Activate applies the selected cue's properties directly; it should not be treated as a simulation of normal On enter/On leave traversal.
Wait is measured in seconds, but its effect depends on type:
| Cue type with Wait greater than zero | During the wait | When the wait expires |
|---|---|---|
| Marker or Pause | The source Timeline pauses. | The source resumes. |
| Stop | The source pauses. | It stops and resets. |
| Jump | The source pauses. | It jumps and applies the target action. |
| Trigger Timeline | The source continues. | The other Timeline is positioned and played or paused. |
| Preset Trigger | The source continues. | The preset is recalled. |
A Pause with Wait 3 is therefore a three-second timed hold, not a three-second delay followed by an indefinite pause. A Trigger Timeline with Wait 3 launches its target three seconds later without inserting three seconds into the master Timeline's running time.
Play, Pause, Stop, seek or another cue activation can cancel pending waits. Rehearse delayed triggers by allowing playback to cross the cue naturally. Avoid relying on a delayed external trigger surviving a manual activation followed immediately by a transport change.
Ignore on jump has a narrower meaning than “disable this cue when navigating.” It bypasses the cue's Wait on manual cue activation and prevents a Jump cue from immediately performing another jump when manually activated. It does not suppress all other cue actions. In particular, do not rely on it to prevent a Trigger Timeline or Preset Trigger from firing during manual activation.
Exercise: a presenter handover
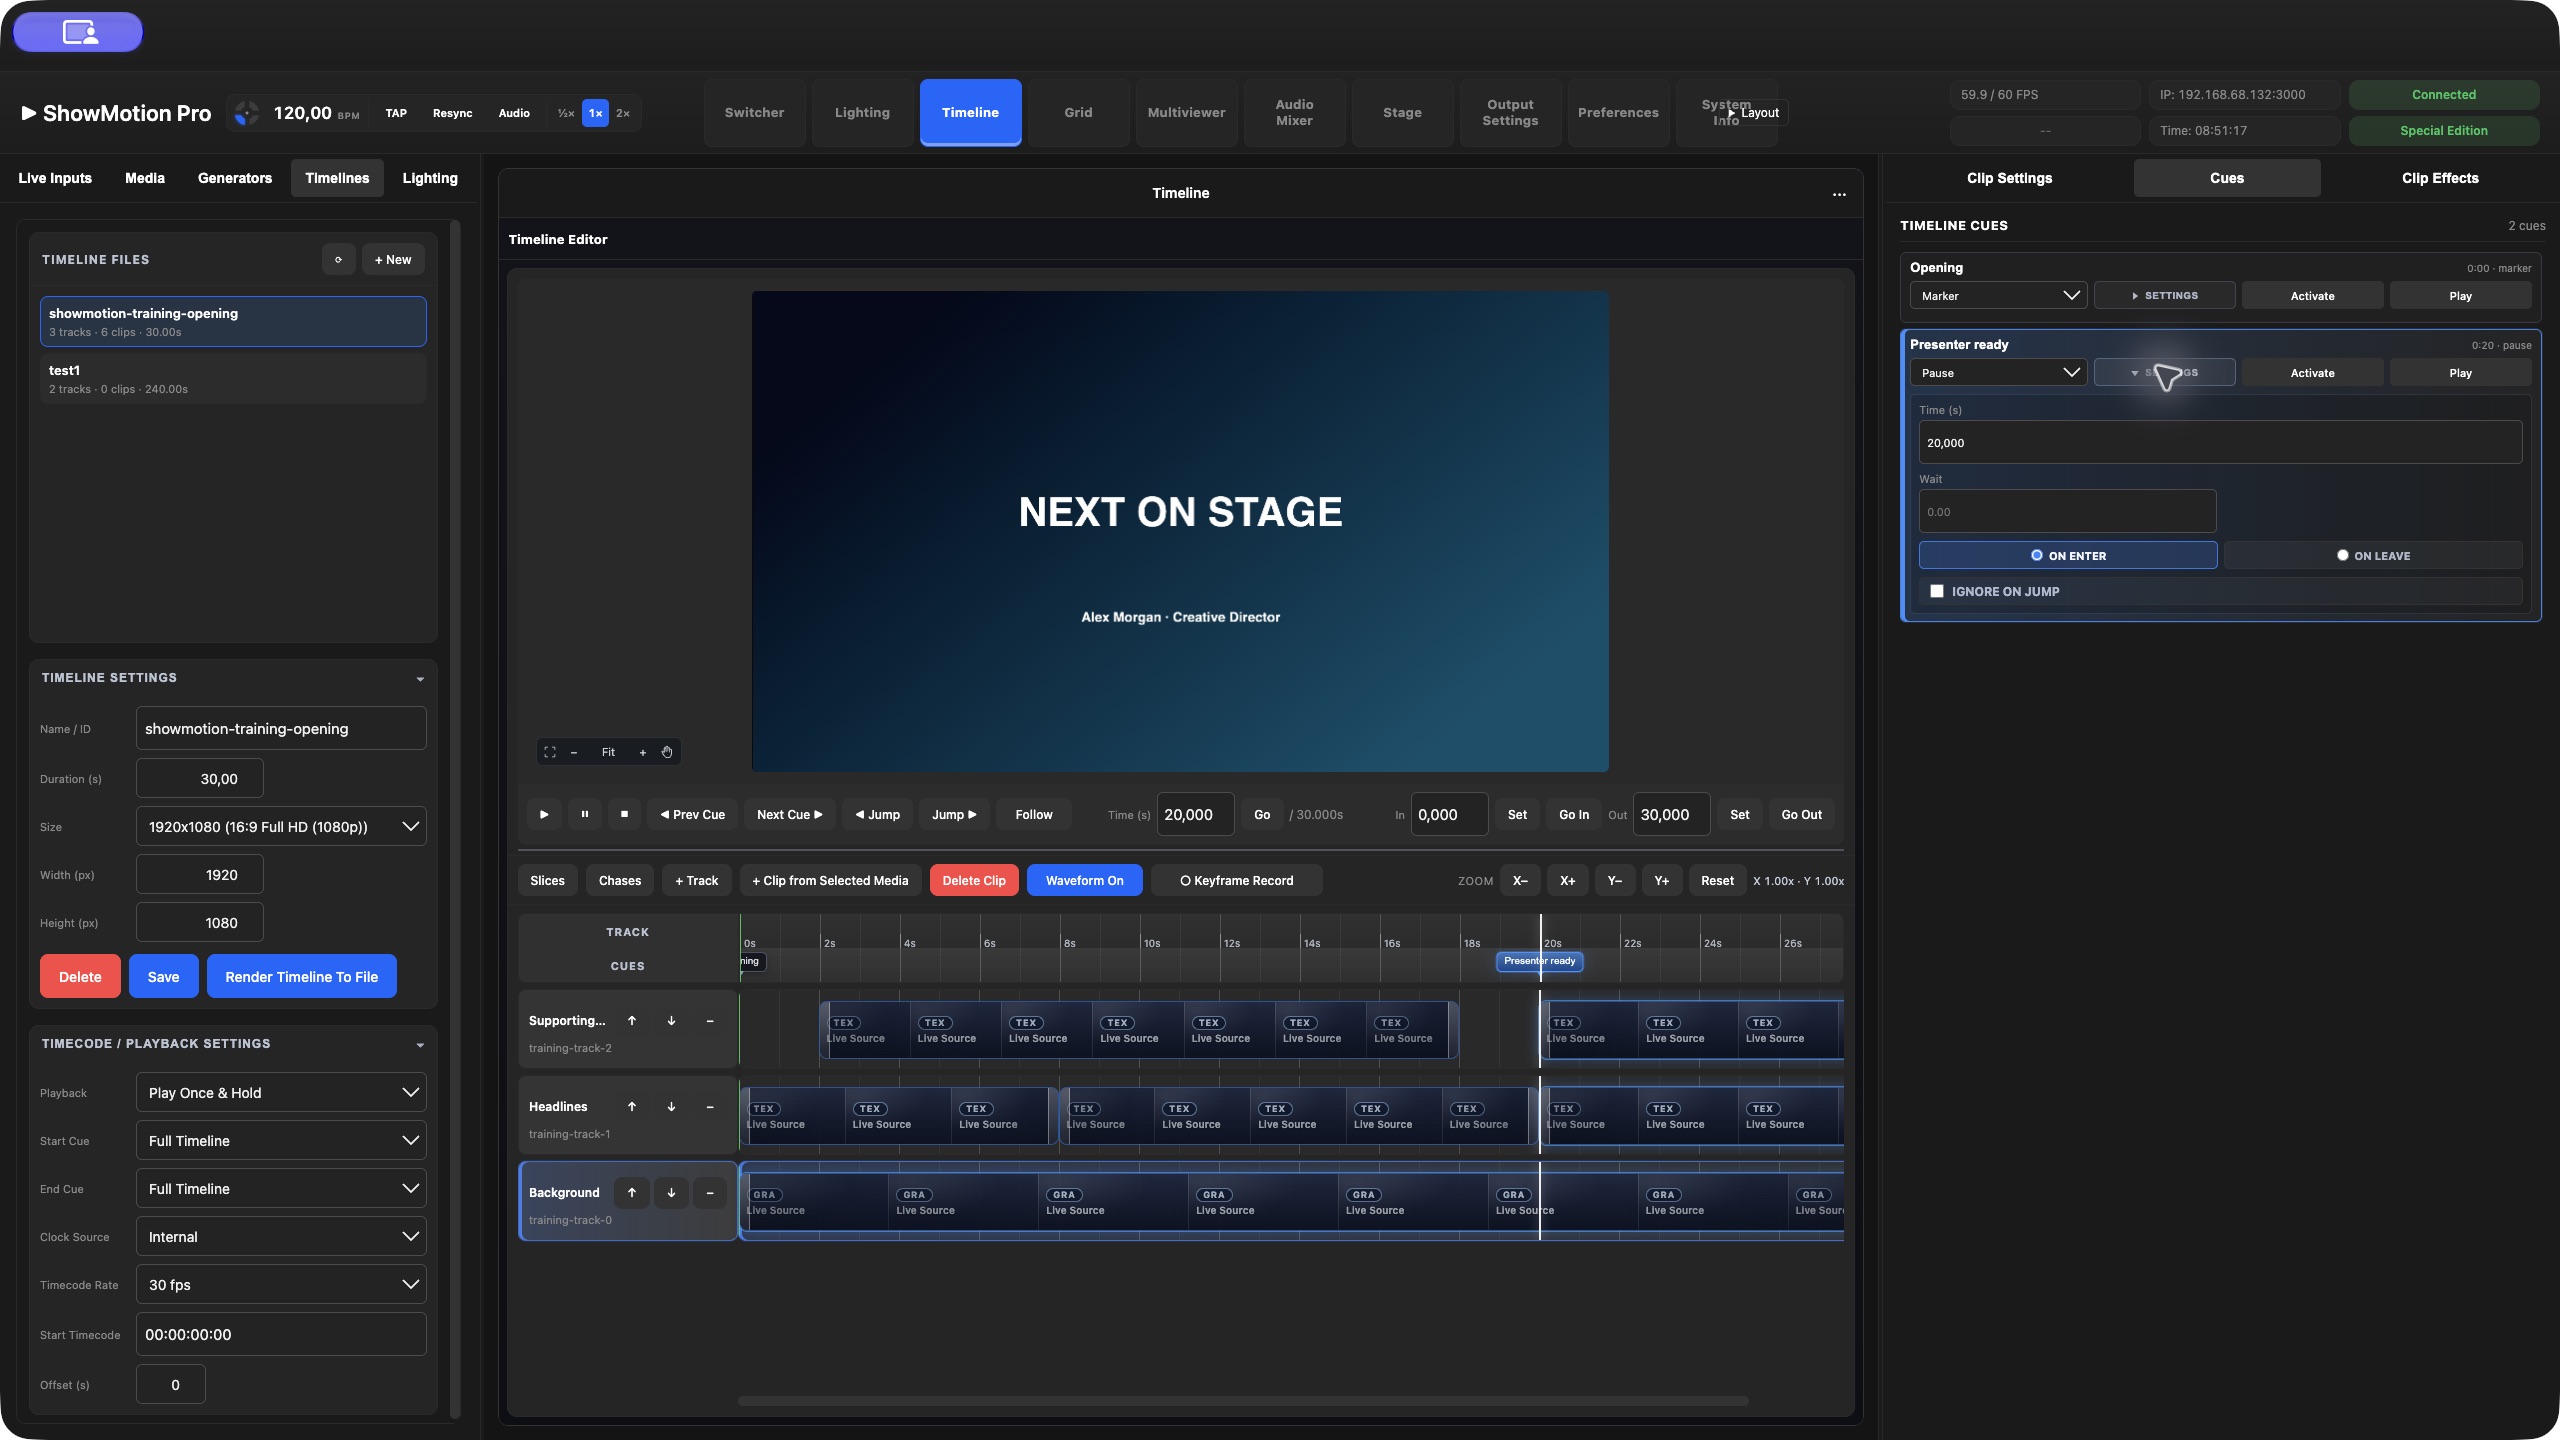
Create a 30-second Timeline with a title visible across the handover:
| Time | Name | Type and settings |
|---|---|---|
| 0 s | Opening | Marker, On enter |
| 10 s | Presenter ready | Pause, On enter, Wait empty |
| 20 s | Closing title | Marker, On enter |
| 29 s | Return to start | Stop, On enter, Wait empty |
1. Choose Play Once & Hold for this exercise and use the full Timeline range.
2. Play from zero. At 10 seconds the Timeline should park for the presenter.
3. Press the main Play control to continue from that position. The pause should not immediately retrigger merely because playback resumes there.
4. At 29 seconds, Stop should reset to the Opening cue.
5. Change the Pause's Wait to 3 and repeat. The show now holds for three seconds and continues automatically.
6. Restore Wait to empty for an operator-controlled handover.
Keep a visible clip spanning the Pause cue. A title that ends exactly at the cue can disappear at its endpoint; the cue controls transport, not clip duration.
Define a playback section and a repeating section
A Start Cue and End Cue define a playback window. Use the selectors under Timecode / Playback Settings, or right-click markers and choose Set As Start Cue / Set As End Cue. Choose Use Full Timeline Range from a cue's context menu to clear that restriction.
Loop repeats the selected window. Cue actions can run again when the loop passes them; a Trigger Timeline inside a loop may restart the other Timeline on every pass. Play Once & Hold parks at the end of the selected range. Play Once & Clear finishes without retaining the final picture. Keep the end after the start and check that important cues are inside the active range.
Play To Next Cue uses Pause and Stop cues as stopping destinations. Do not expect every Marker to stop playback. Put explicit Pause cues at operator handovers, and choose Stop only when resetting is intended. Normal Next Cue navigation can still jump between neighbouring markers; it is a different operation from running until a stopping cue.
To repeat a subsection using a Jump cue:
1. Add a Marker named Loop start at 5 seconds.
2. Add a Jump cue named Repeat background at 15 seconds.
3. Set its Target Cue to Loop start and Target Action to Target Cue + Play.
4. Use On enter and no Wait; run from before 5 seconds.
5. Check that playback returns from 15 to 5. Decide how the operator will exit the loop, for example by activating a separate cue after the Jump.
A same-Timeline Jump can apply the destination cue's On enter action. Use a Marker as the destination while learning. Chains of Jump cues are harder to rehearse and can produce repeated control actions; keep loops explicit and provide a named exit.
Control several Timelines from a master Timeline
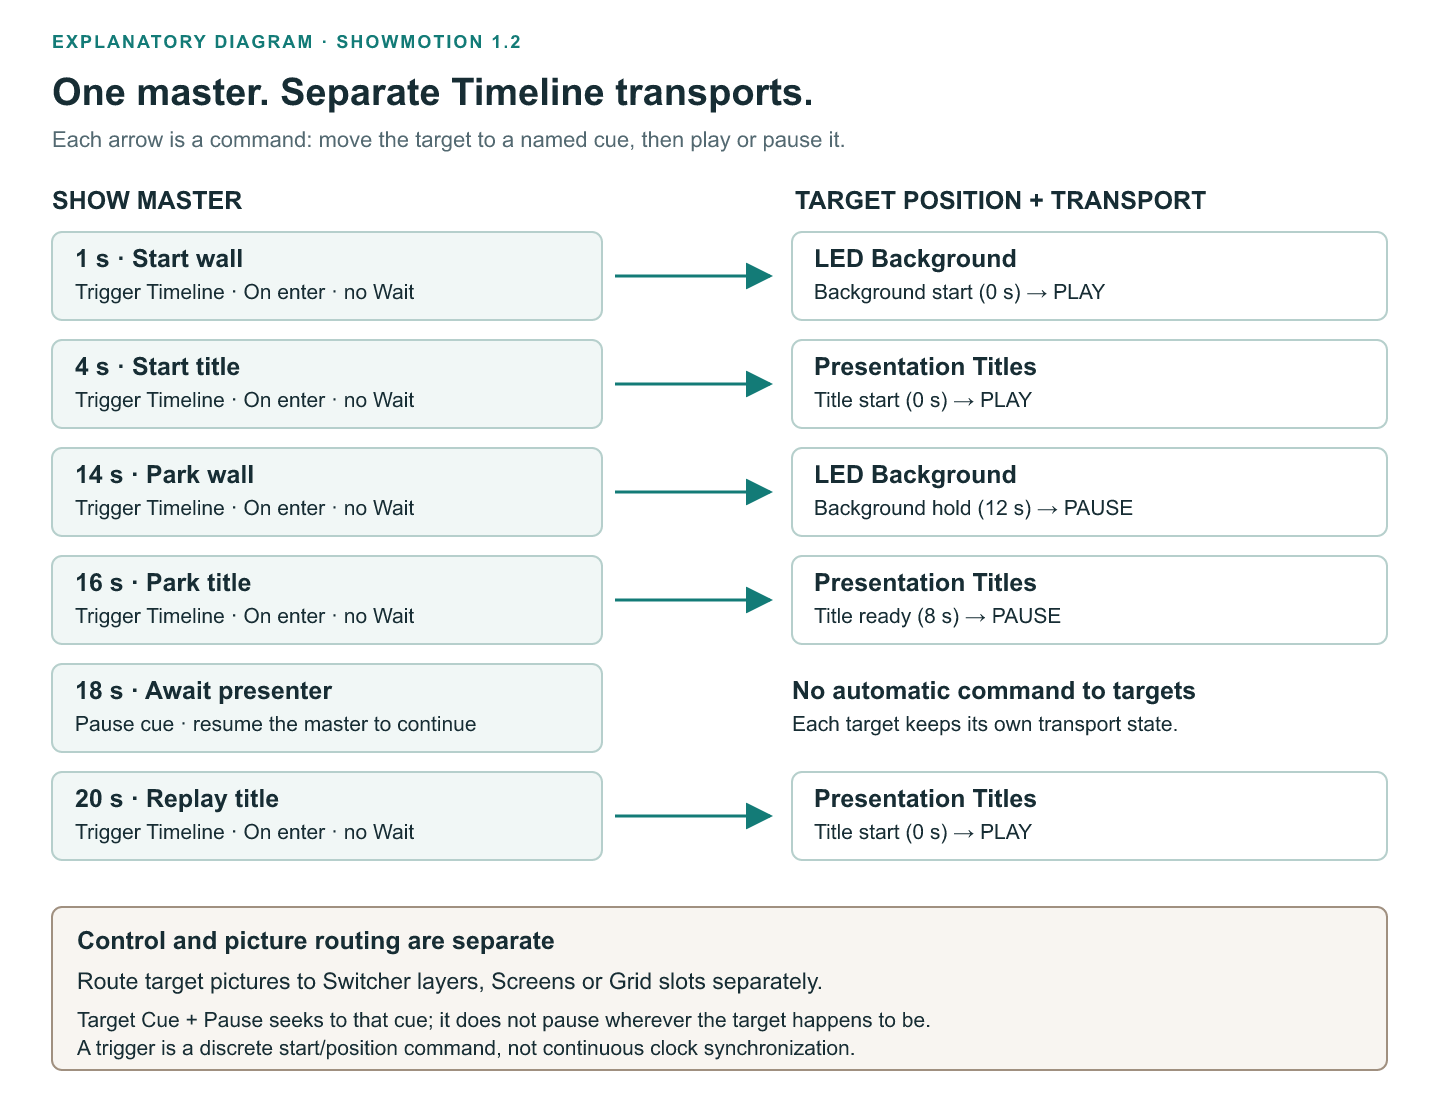
Use a master Timeline when separate content sequences need coordinated starts or named handovers. Each target keeps its own clips, transport and playback settings. The master sends discrete commands; it is not a permanent parent clock, and it does not merge the target pictures.
You can build this exercise yourself or import the included showmotion-training-wall.smtl and showmotion-training-titles.smtl first, followed by showmotion-training-master.smtl. Keep their filenames unchanged and follow Timeline-Cue-Training-README.txt; if an import renames a file to avoid a collision, reselect its target in the master cues. The training files use only gradients and text.
For this exercise, create and save three Timelines:
• Show Master: a 30-second control sequence using Internal clock.
• LED Background: a visual sequence with Marker cues Background start at 0 seconds and Background hold at 12 seconds.
• Presentation Titles: a visual sequence with Marker cues Title start at 0 seconds and Title ready at 8 seconds.
Give the targets sufficient duration beyond their markers. Save their cues before selecting them from the master. Load or open each target once if necessary, then return to Show Master. The Target Timeline list contains other available Timelines; the current Timeline is excluded. On the macOS engine, referenced saved target documents can also be loaded automatically, but the media still needs to be available.
Add these cues to Show Master:
| Master time | Cue name | Type | Target Timeline / Target Cue | Target Action |
|---|---|---|---|---|
| 1 s | Start wall | Trigger Timeline | LED Background / Background start | Target Cue + Play |
| 4 s | Start title | Trigger Timeline | Presentation Titles / Title start | Target Cue + Play |
| 14 s | Park wall | Trigger Timeline | LED Background / Background hold | Target Cue + Pause |
| 16 s | Park title | Trigger Timeline | Presentation Titles / Title ready | Target Cue + Pause |
| 18 s | Await presenter | Pause | No target; Wait empty | — |
| 20 s | Replay title | Trigger Timeline | Presentation Titles / Title start | Target Cue + Play |
For each Trigger Timeline cue, choose the type, expand Settings, explicitly select Target Timeline, Target Cue and Target Action, and use On enter with no Wait. Confirm the target cue again after changing the target Timeline.
Route LED Background and Presentation Titles to the appropriate Switcher layers, Screens or Grid slots. A control cue alone does not create this picture route. Set source start policies deliberately so a separate TAKE or Grid launch does not unexpectedly restart a target after the master has positioned it.
Play the master from zero. The wall starts first, the title follows, and the two targets later park at their named positions. At 18 seconds, the master pauses for the presenter. Resume the master; the title restarts at the 20-second cue. Watch the target transport as well as the visible picture while rehearsing.
Three distinctions matter:
• Target Cue + Pause seeks to a defined target cue and pauses there. It is not “pause the target wherever it currently is.”
• A Trigger Timeline uses its target cue as a destination. It does not execute that destination cue's own action. Prefer Marker destinations and put later actions after them in the target Timeline.
• Pausing or stopping Show Master does not automatically pause or stop its targets. They retain their own transport state. Add explicit target commands at required handovers and rehearse a recovery procedure for every running target.
Each trigger cue has one target. Use separate, clearly named cues for multiple destinations. The staggered times in this exercise make the sequence easy to verify; do not infer frame-locked multi-output synchronization from a set of cue starts. Use the appropriate timecode workflow when a shared external timing reference is required.
Recall a Switcher look from a Timeline
1. Save the required Switcher composition as a preset, including the intended Screens.
2. Add a Timeline cue and choose Preset Trigger.
3. Select the Preset and review the Screens selection.
4. Choose Target Bus: PVW to prepare the look, or PGM to recall it directly to Program.
5. For a Program recall, enable Fade Transition to PGM when a fade is required. The fade option is meaningful for PGM, not PVW.
6. Use On enter and no Wait for the first rehearsal. Test from before the cue, then verify the same action with manual activation.
Check the Screens selection carefully: no explicit subset represents all Screens saved in that preset, rather than “recall nothing.” A preset cue can change a Screen containing the Timeline that issued it. Keep control and destination roles clear when designing a master sequence.
Cue troubleshooting
| Symptom | Check |
|---|---|
| The target Timeline is missing | Save it in the current media library, reopen/refresh the Timeline list and confirm it is a different Timeline from the master. |
| Target Timeline is available, but no destination cue appears | Create and save a cue in that target, then refresh the available Timelines. |
| The target's transport starts but its picture is missing | Add/check its Switcher or Grid route, layer visibility, active slot, media availability and physical output mapping. |
| A target cue's preset action does not run | Trigger Timeline positions the target; it does not execute the destination cue action. Put that action later in the target, or use a separate Preset Trigger in the master. |
| Pause resumes by itself | Check for a positive Wait, external timecode or another trigger controlling this Timeline. |
| The master stops but other sequences continue | Targets have independent transport. Control them explicitly. |
| A cue fires repeatedly | Check Loop, Jump paths and repeated manual activation. |
| An On leave action happens later than expected | Its section ends when another cue becomes active; place and name that next boundary. |
| A delayed cue never runs | Rehearse without intervening Play, Pause, Stop, seek or cue activation, which can cancel pending waits. |
| Play To Next Cue passes a Marker | Use a Pause or Stop cue for the stopping destination. |
| A preset affects more Screens than expected | Review the preset's stored Screens and the cue's subset; an empty subset means all saved Screens. |
Preview, routing and timecode
Use editor Preview while programming, then verify the routed source's playback controls and start policy. See Reuse compositions to launch from Switcher or Grid. Direct Timeline-inside-Timeline placement is unsupported. For an externally clocked Timeline, check incoming timecode before treating an unresponsive Play control as an editing problem. Timecode rate and composition FPS must each match their purpose.
Choose Internal, LTC Audio, MTC MIDI or Art-Net as the clock source. For an external source, match the timecode rate, device or port, starting timecode and offset. Verify normal playback, a jump and signal interruption before connecting the sequence to the live show.
Watch: Timeline: extend a clip and convert it to a Container
8. Route screens, groups and layers
A composition can become a source for another part of the show. For example, a Grid can provide a changing background while Switcher adds a live camera and a title above it. You keep the background's programming in one place and operate the final picture in Switcher.
Three decisions determine the result: what picture is routed, which control changes playback, and where the result is sent. Selecting one Grid group changes the routed picture; selecting This Group changes the scope of its column buttons. These are separate controls.
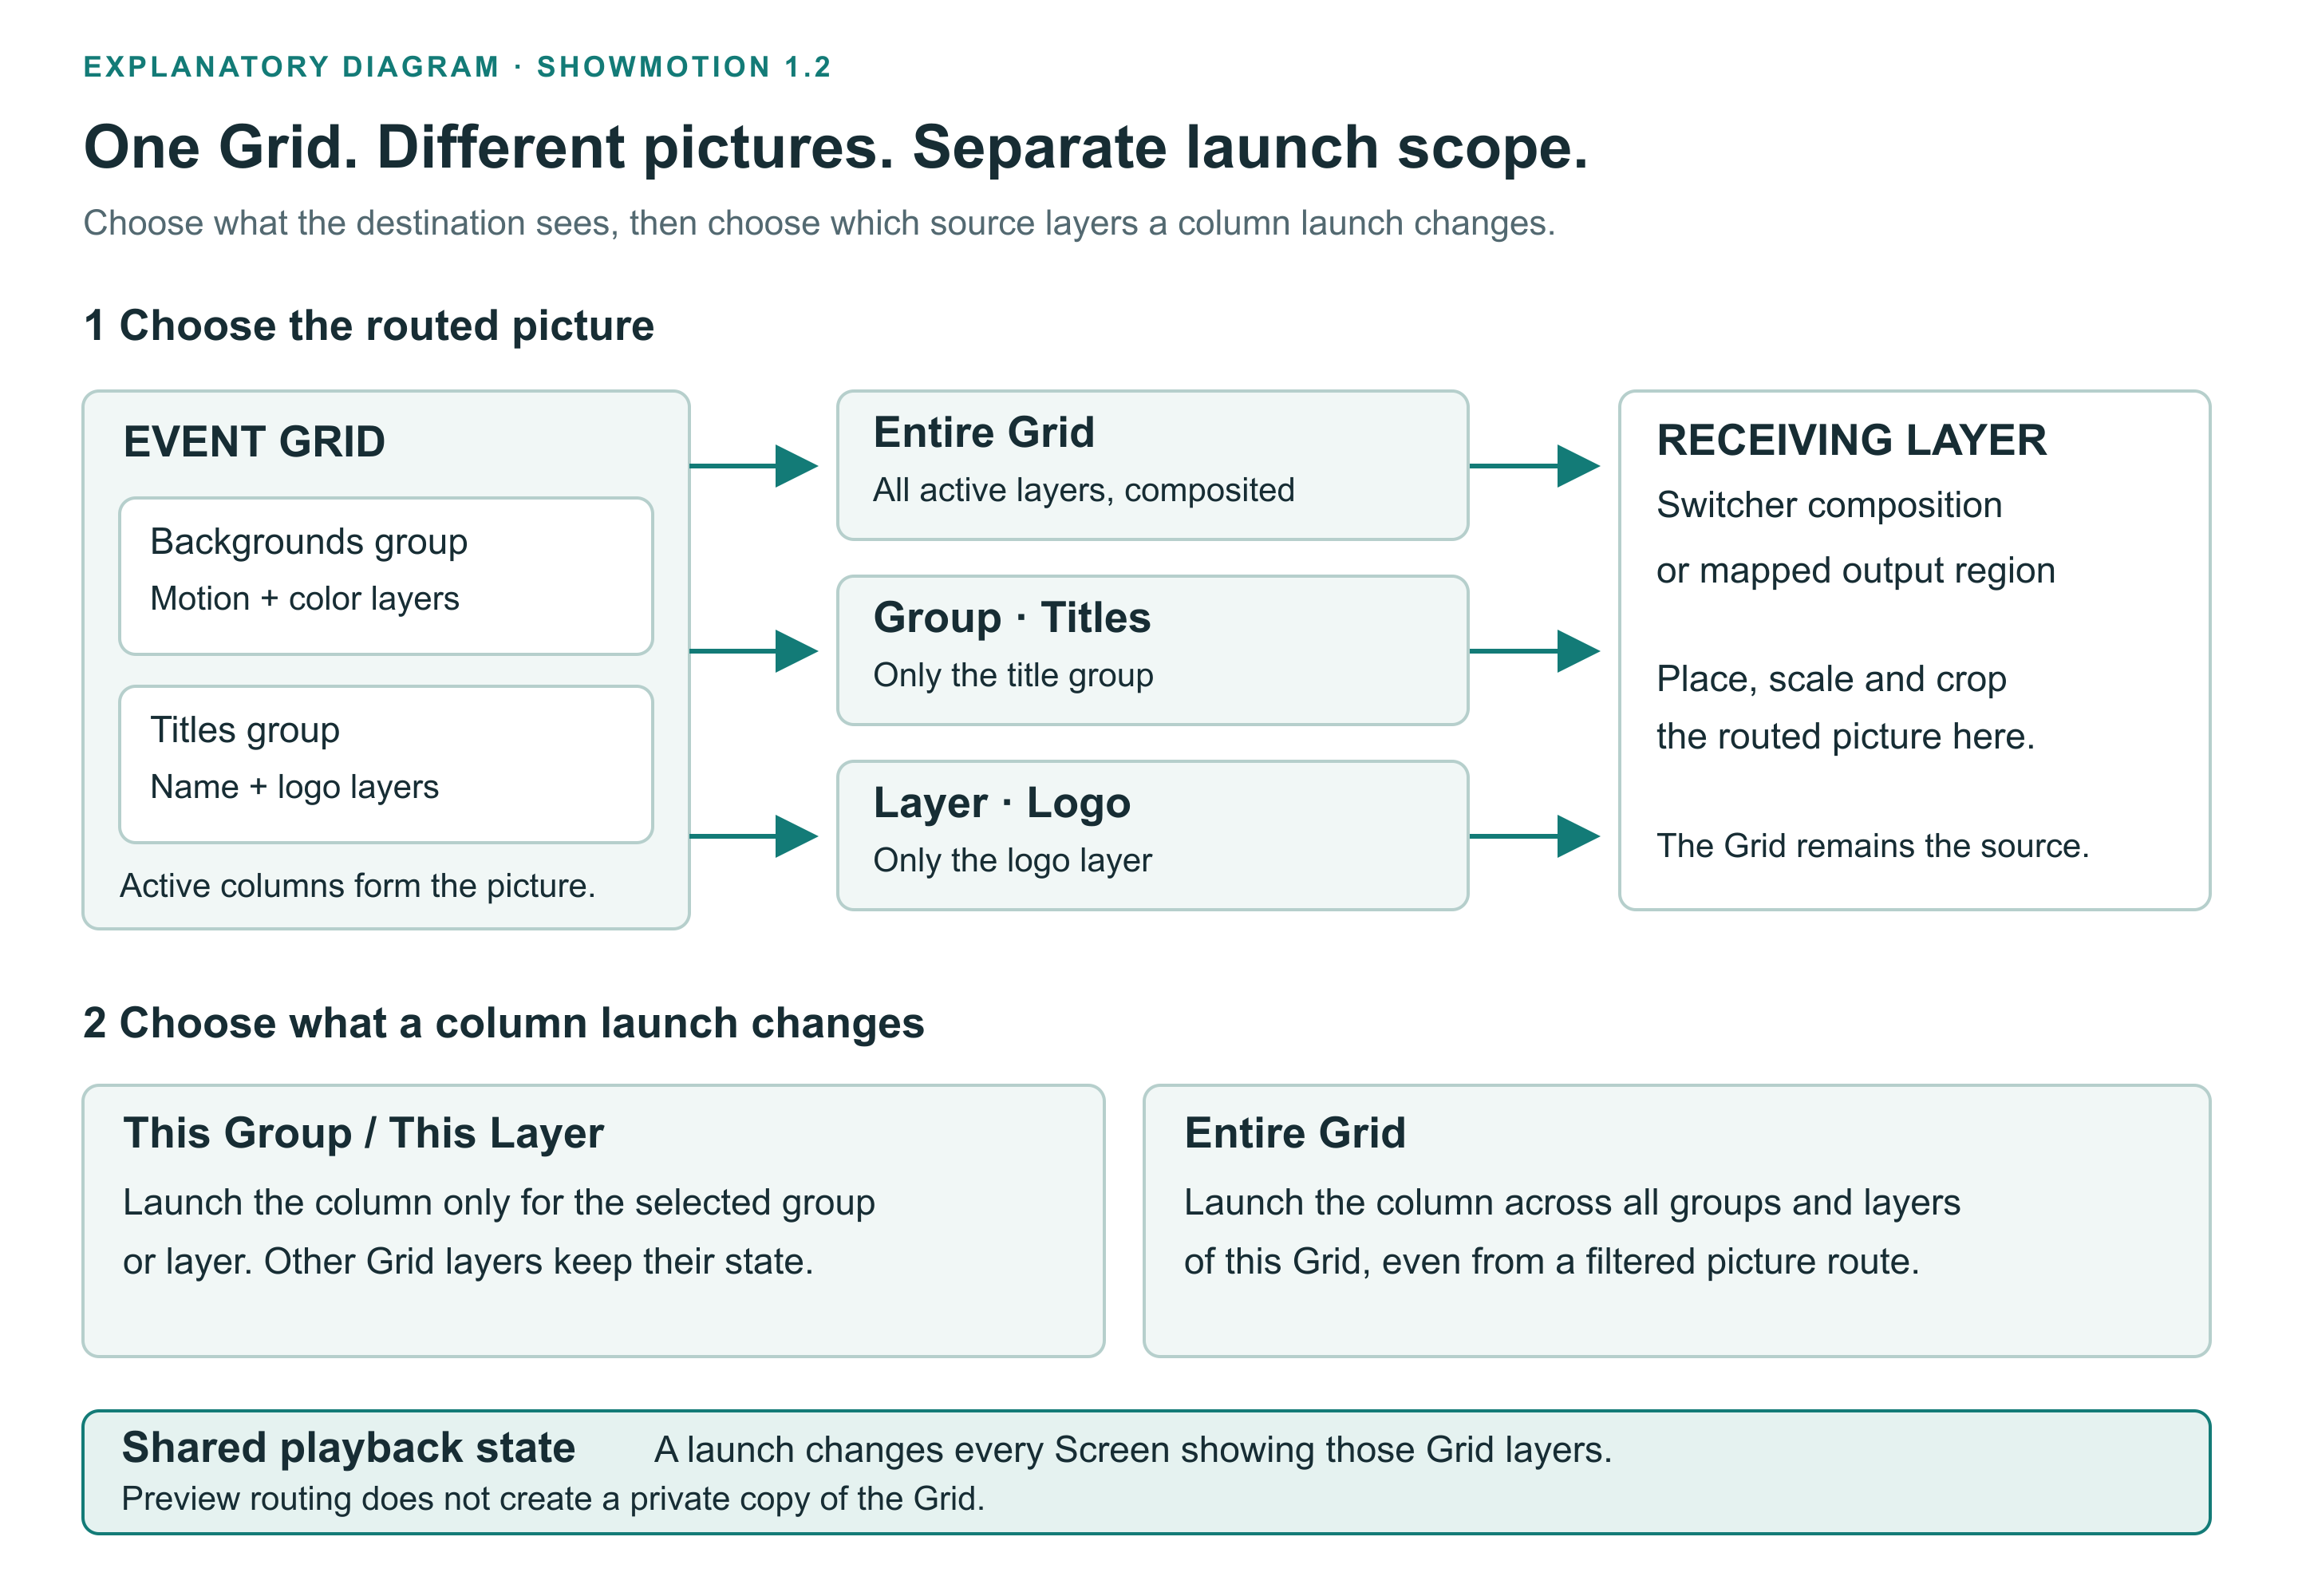
Choose the right route
| Source → destination | What it gives you |
|---|---|
| Entire Grid → Switcher layer | A live composite of the Grid's active layers, beneath or above other Switcher layers. |
| Grid group or layer → Switcher layer | Only that selected part of the Grid; useful for side screens, titles or independent departments. |
| Timeline → Switcher layer | A programmed sequence with transport, cue, start-policy and clock controls in the layer Inspector. |
| Timeline → Grid slot | A prepared sequence that the operator can launch as a Grid event. |
| Grid → Timeline clip | A Grid composition present during a defined interval of a Timeline. The Grid remains a Grid with its own column state. |
| A different Grid → Grid slot | Reuse another Grid's composition in a slot. Do not reference the containing Grid itself. |
| Screen PGM or PVW → another Screen | Reuse the chosen bus of an existing composition, optionally excluding layers. |
| Grid or Timeline → output region | Send the document directly to a mapped region without creating a Switcher layer for it. |
A Timeline placed directly inside another Timeline is not supported in this version. Use a Grid to launch the Timeline, use a Timeline cue to trigger another Timeline, or render the completed sequence to a media file when you need it as a clip. Triggering another Timeline controls its playback; it does not automatically composite its picture into the triggering Timeline.
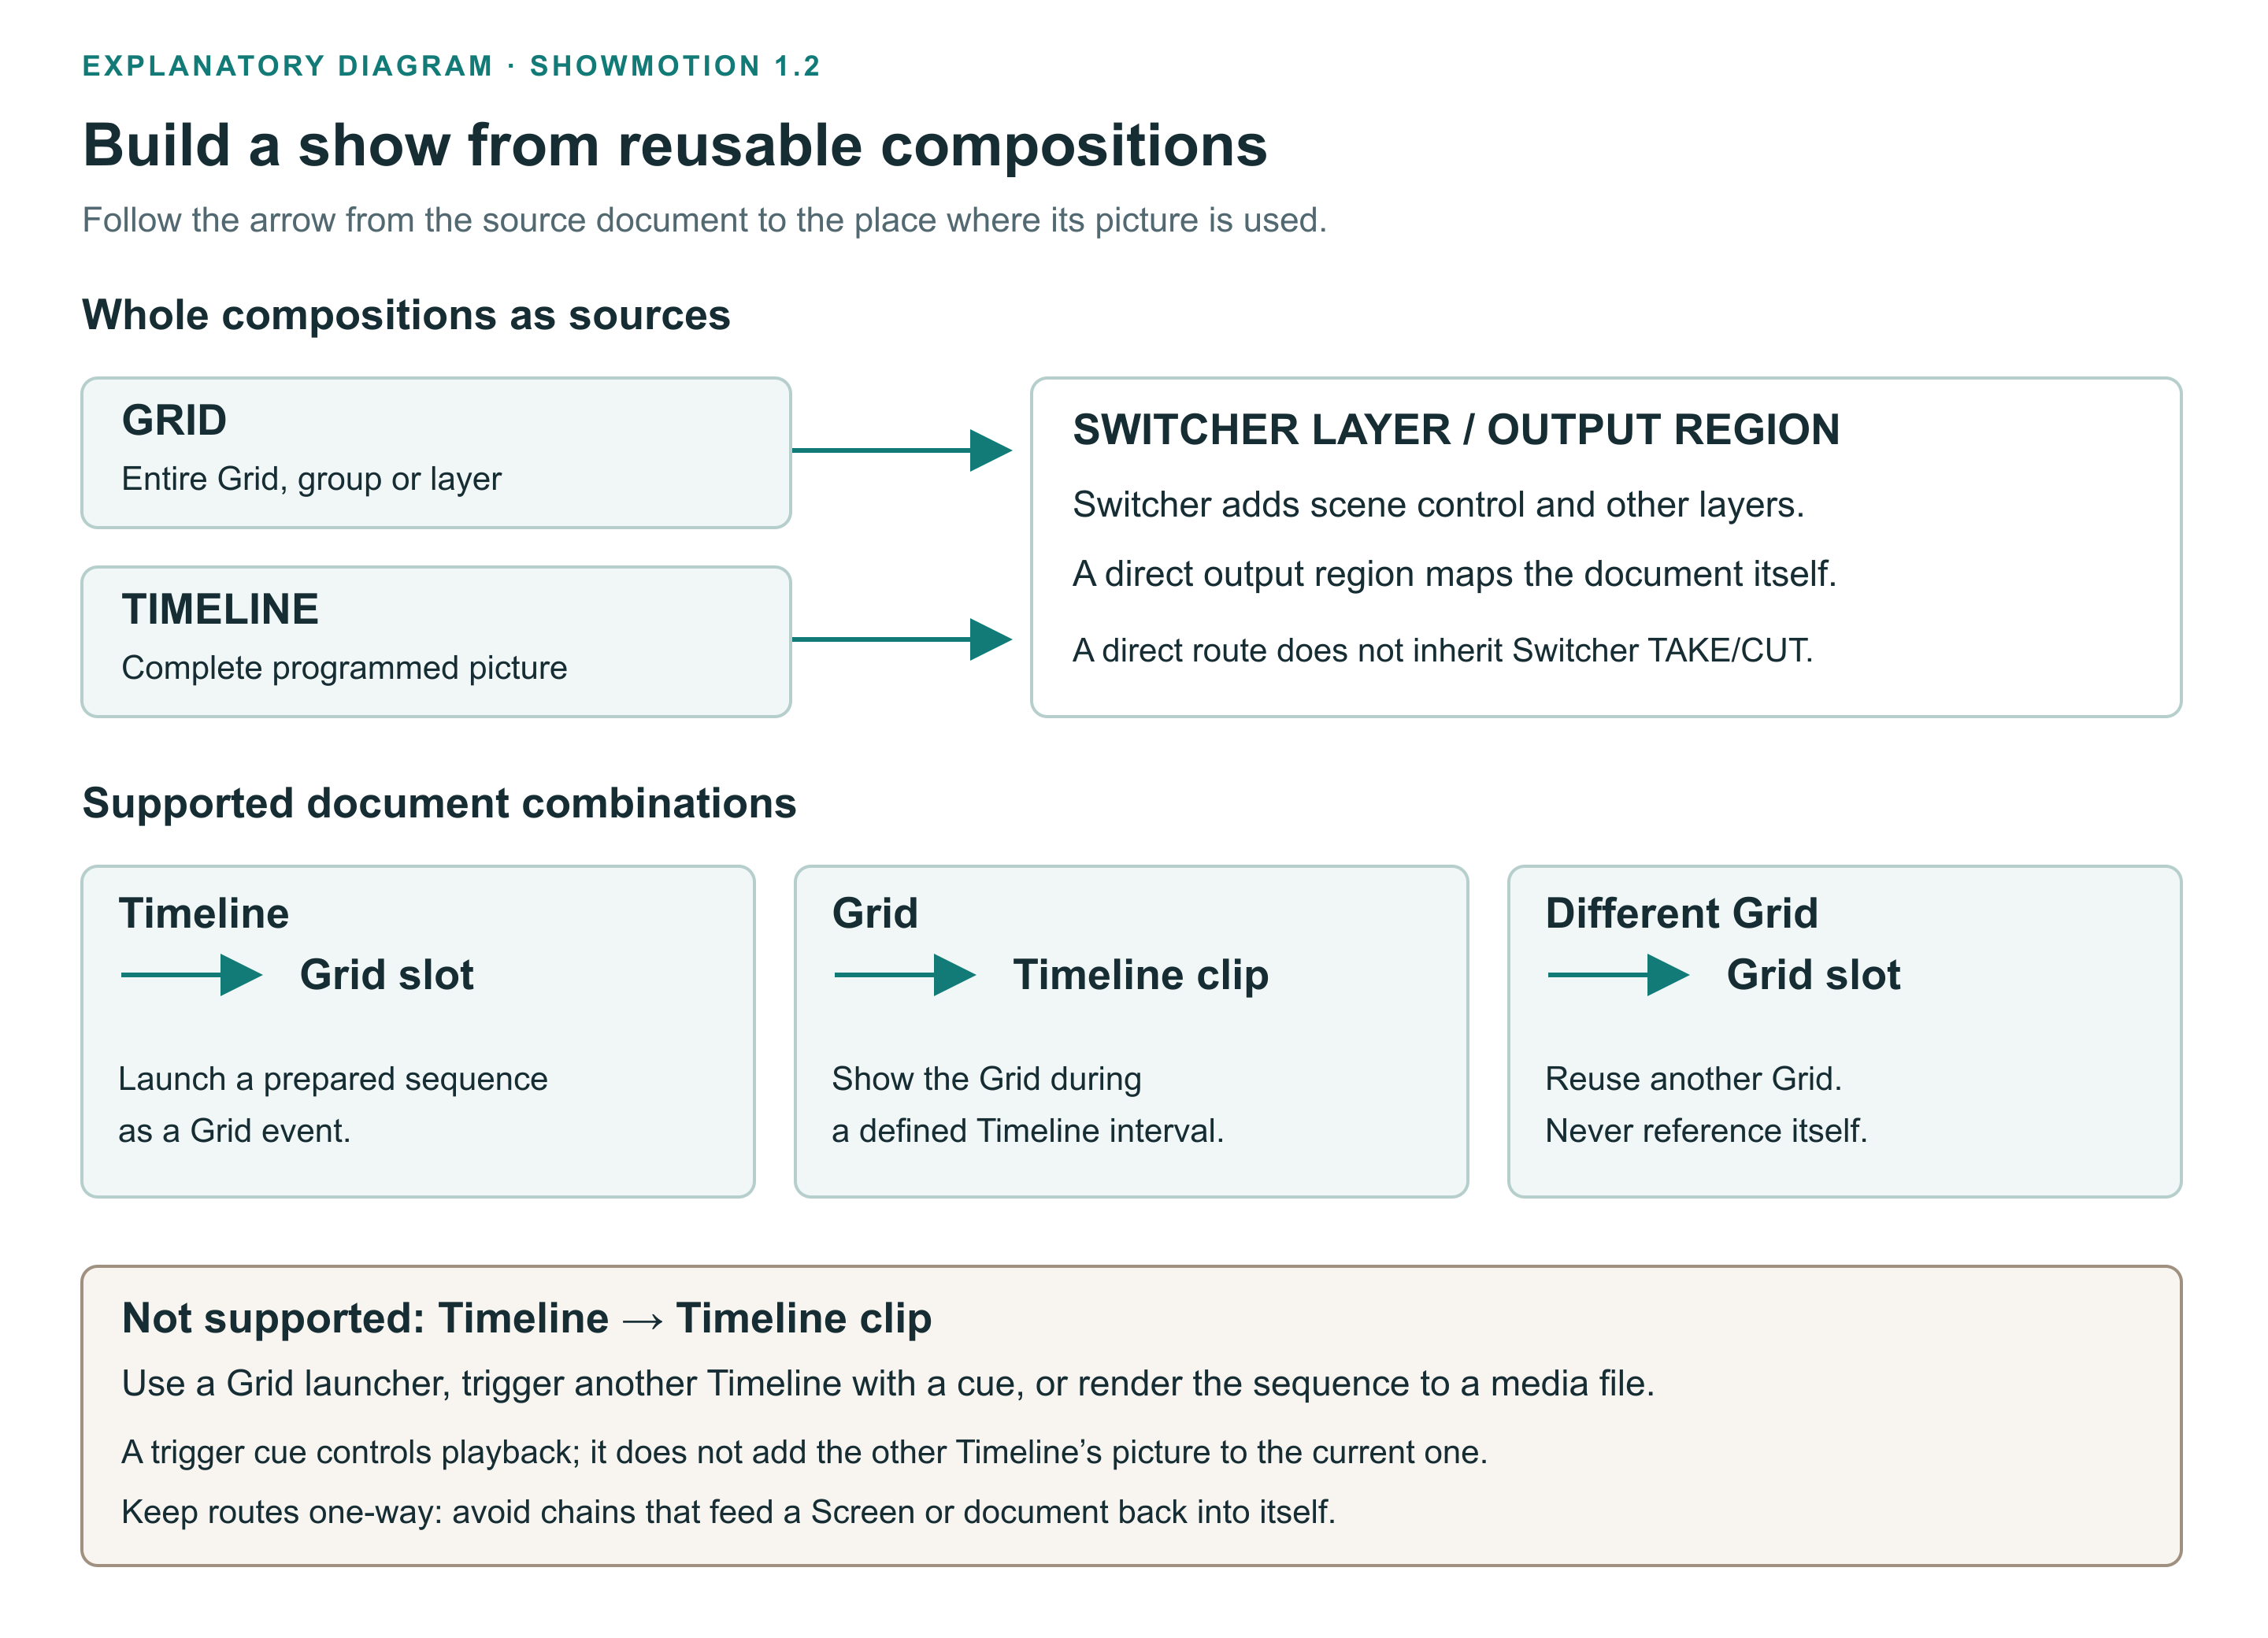
Before you begin
Create and save the source Grid or Timeline first. Imported .grid and .smtl documents must be available in the Media library. Open them in their workspace, check their resolution, and verify that their media are present. Save the document again after editing it.
For practice, use the supplied training Grid and Timeline. Work in Preview and use a virtual destination until the route behaves as intended. Use names that identify both purpose and scope, such as Walk-in — Entire Grid and Titles — Group.
Recipe 1: operate a complete Grid from Switcher
Result: one Switcher layer carries the Grid background; a separate Switcher layer can carry a live camera or title.
1. In Grid, prepare at least two visibly different columns. Launch the first column and check Grid Output. Selecting a slot for editing is not the same as launching it.
2. Open Switcher and select the destination Screen and its PVW bus.
3. Open Sources → Media. Drag the saved .grid document into the Preview composition to create a layer. Select the new layer.
4. In the layer Inspector, find Source → Grid Output and choose Entire Grid. Check the source name, resolution and active column.
5. Use the Inspector's Columns list to launch another column. First, Prev, Next and Last navigate the available occupied columns. Watch the composition change.
6. Add your camera or title as another Switcher layer and arrange its stacking order and size.
7. Use TAKE or CUT when the complete Preview is ready. Verify the receiving output as well as the Program preview.
The Grid route follows the Grid's live state. Column actions can affect other Screens using the same Grid. Preparing a route in Preview does not create a private copy of the Grid's playback state. For genuinely independent looks, create separate Grid documents and test them separately.
Recipe 2: keep the background running while changing titles
Result: two Switcher layers use different parts of one Grid, allowing independent placement and scoped column launches.
1. In the source Grid, organize background layers into a group named Backgrounds and title layers into a group named Titles. Give columns useful names such as Welcome, Speaker and Break.
2. Drag the same Grid from Media into Switcher Preview twice.
3. Select the first layer. Set Grid Output to Group · Backgrounds.
4. Select the second layer. Set Grid Output to Group · Titles. Place it above the background route.
5. In the Titles layer's Columns panel, choose This Group under the column trigger target. Launch the Speaker column there.
6. Check that the title group changes while the background group keeps its current state.
7. Now inspect Entire Grid in that same trigger-target control. Use it only when you intend to recall the column across all groups and layers of this Grid.
For one independently routed row, choose Layer · [name] under Grid Output, then This Layer as the column trigger target. A group or layer route preserves its composition placement; it is not automatically cropped tightly around visible pixels. Adjust the receiving layer or mapped source rectangle if you need a close crop.
Changing a group on one Screen also changes other Screens displaying that group. Group scope limits which source layers are triggered, not which destination Screens see the result.
Recipe 3: take a prepared Timeline live
Result: a timed opening appears when you take the prepared Preview to Program.
1. Create and save the opening in Timeline. Check its duration, media, cue positions and end behavior in the editor.
2. Open Switcher → Sources → Media and drag its .smtl document into the destination Screen's Preview.
3. Select the new layer. In its Timeline controls, set Clock Source: Internal for this exercise.
4. Set Start: On TAKE/CUT. Choose a Play Mode deliberately: Play Once & Clear removes the picture at the end; Play Once & Hold holds its final picture; Loop repeats; Play To Next Cue runs a cue-sized section.
5. Leave Start Cue and End Cue at Full Timeline for a complete opening. Select named cues when you want a defined section.
6. Prepare any camera or title layers around the Timeline. Take the scene live and watch the Timeline time readout.
7. Rehearse the end and a second recall. Confirm the desired restart behavior with the actual content before the show.
The source Inspector also provides Play, Pause, Stop, a seek slider and a Cues list. Cue Play starts from the cue; the navigation's Jump buttons move to a cue and pause. Manual Hold (Cmd+P) is useful when taking the composition and starting its sequence are separate operator actions.
For Timecode Chase, select the correct Clock Source and input, timecode rate, start timecode and offset. A sequence waiting for timecode cannot be tested simply by pressing Play with no clock arriving. Composition FPS and timecode rate describe different things.
Recipe 4: launch an opening sequence from a Grid
Result: an operator selects an Opening slot alongside other Grid looks instead of manually switching into the Timeline editor.
1. Save and test the opening Timeline on its own.
2. Open the destination Grid. Choose a layer and an empty slot in the Opening column.
3. Drag the Timeline document from Media onto that slot. Its source is the Timeline document, not a rendered movie.
4. Save the Grid. Launch the slot and inspect the complete Grid output.
5. Place walk-in and break content in other columns. Rehearse switching from walk-in to Opening, leaving Opening halfway through, and launching it again.
6. Route the complete Grid into Switcher or a mapped output region. Verify the sequence again through that final route.
A Grid containing a Timeline provides a convenient event launcher. The Grid's column timing and the Timeline's internal cues remain separate. Test any autopilot rule against the actual nested content; do not assume a nested sequence's end is equivalent to a simple video's duration. Where the Grid Inspector exposes Timeline cue controls, those target a Timeline slot; they are not a replacement for the column controls of a nested Grid.
Recipe 5: show a Grid during one section of a Timeline
Result: a programmed show makes room for a live-selectable Grid section, while other Timeline tracks carry titles or background elements.
1. Create the Grid section first, launch a known starting column and save it.
2. Open the host Timeline. Drag the .grid document from Media onto a track at the desired start time. Use a separate track or free space if another clip occupies that interval.
3. Select the clip and set its Timeline Start and Length in the Inspector. These define the interval in which the Grid appears in the host Timeline.
4. Leave Grid Output at Entire Grid, or choose a group or layer when only one part belongs in this sequence.
5. Play the host Timeline through the interval. Confirm that the Grid appears at the clip's start and is absent outside its length.
6. During the interval, launch a different Grid column and observe the change. When using a filtered route, verify This Group, This Layer or Entire Grid before triggering.
7. Replay the section and check the starting column again. A clip's placement does not author a new Grid column sequence for you.
This is useful for a fixed introduction followed by a flexible presentation segment. If every picture change must happen at an exact show time, author those changes in the appropriate Timeline tracks or verified cue controls instead of relying on manual Grid launches.
Recipe 6: make a clean feed from another Screen
Result: the main Screen keeps its full composition, while a second Screen carries a version without a local title or other selected layers.
1. Prepare the source Screen. Create a different destination Screen and select its Preview.
2. Open Sources → Live Inputs → SCREEN SOURCES. The list contains the other Screens with separate PGM and PVW entries.
3. Drag the source Screen's PGM entry into destination Preview. Use PVW only when you deliberately want to display what is being prepared.
4. Select the routed layer. Change Entire screen to Select layers and uncheck the source layers to exclude.
5. Check both Screens. The source Screen stays complete; the receiving route omits the selected layers.
6. Route the destination Screen to the required output and check it on the receiver.
Selecting the source bus matters: a PGM route follows the source Screen's live composition; a PVW route follows its preparation bus. For an operator-only view, the routed layer also offers Video remaining time overlay. Keep that overlay out of audience-facing routes unless it is intended.
Do not route a Screen back into itself or build a chain that returns to its starting Screen. The source list excludes the current Screen, and a direct self-drop is blocked. Treat feedback as an invalid show design, not a creative recursion feature.
Direct Grid and Timeline output regions
In Output Settings, select the destination and open its visual region mapping. Select the region to edit. Under Input Region, the Screen selector also provides Grid Source and Timeline Source choices. Selecting one reveals the corresponding Grid or Timeline document selector. Grid choices include the entire Grid, its groups and its layers.
Choose the document, then set the input rectangle and destination rectangle. Check the content on the destination preview. A direct route is useful when an LED surface should always receive one specific Grid group or Timeline. A route through Switcher is useful when that same surface needs scene transitions or additional live layers. A direct document route does not gain Switcher's TAKE/CUT behavior simply because it shares an output device.
Audio, timing and effects in a nested show
Listen through the final route, not only in the document editor. The source clip, its container and the Audio Mixer can all affect what reaches the destination. For nested Grid audio, the parent level, clip gain and transition audio fade combine; muting the parent or the clip can silence that route. When troubleshooting, check the source meter, container level and mute state, then the mixer bus and output routing.
Do not use one muted Preview route as proof that a source is silent everywhere. The same document can also be active through a Program or another output route. Check all active destinations and the mixer before changing levels.
Apply an effect inside the Grid or Timeline when it belongs to that source element wherever it is reused. Apply an effect to the receiving Switcher layer when it should affect the complete routed picture at that destination. For example, a color treatment on a Grid clip stays with that clip; a crop or transform on the Switcher Grid layer changes the resulting composite's presentation. Inspect both levels when a nested picture looks unexpectedly cropped, dim or displaced.
Keep the route chain easy to trace: source document → receiving layer or clip → Screen → mapped output. Save the .grid and .smtl files with the media when moving the show. A saved project does not bundle all referenced documents and external media.
Troubleshooting nested compositions
| Symptom | Check first |
|---|---|
| A Grid route is blank | Launch an occupied slot/column; check the selected group/layer, visibility and opacity. A route named Missing selection may refer to a deleted group or layer. |
| Changing Preview changes an on-air Grid elsewhere | The routes share the same Grid playback state. Check the column trigger scope and use separate documents when independent state is required. |
| A title change also changes the background | The column trigger target may be Entire Grid. Select This Group or This Layer for the intended route. |
| A Timeline-in-Timeline drop cannot be saved or played | Direct Timeline nesting is unsupported. Use a Grid launcher, a trigger cue, or rendered media. |
| The picture is cropped or scaled incorrectly | Compare source-document and destination resolution, the container transform/crop, and the mapped input rectangle. |
| A Timeline waits without advancing | Check Start policy, transport, clock source and incoming timecode. |
| A nested source disappears early | Check the host clip's Length as well as the source document's own duration and play mode. |
| The picture is correct but audio is missing | Check source and container mute/volume, Grid transition fade, mixer bus and destination routing. |
| A clean feed shows preparation changes | Check whether the Screen route was created from PVW rather than PGM. |
9. Design slices and chases
The Slice Editor creates layouts for Switcher Screens, Grids and Timelines. A slice identifies part of a composition. Chase patterns animate slice visibility.
1. Open the Slice Editor for the relevant composition.
2. Create and arrange the required slices.
3. Check the slice boundaries against your content and destination geometry.
4. Apply or create a chase pattern.
5. Adjust the pattern controls and rehearse it with the complete composition.
6. Save reusable patterns for the show.
A chase changes which slices are visible; it does not replace physical output mapping. If the effect is intended for separate LED sections, also verify the output regions and processor assignment.
10. Create graphics and web content
Text, timers and lower thirds
Drag the relevant generator into a composition and edit its parameters in the Inspector. Search the font list, then set text, typography, color and placement. Lower thirds include 19 designs; logo badges are available on supported designs.
Check long names and unusual characters at the real output resolution. A title that fits the preview can still become hard to read at a distance. Timer behavior should be rehearsed with the intended start and reset actions.
Web Browser Generator
Use the Web Browser generator to render a web source natively. Configure its URL and rendering size, then preview the result. The generator supports a fullscreen YouTube player and CSS-based background removal.
CSS background removal changes web-page styling; it is different from the AI foreground mask used for video. Check the actual page after applying CSS because the page's structure and styles determine the result. Test browser audio and playback before taking the source live. Network availability and the remote page remain part of this source's operation.
Web Browser: exact control workflow
1. Add Web Browser from Generators to PVW and select its layer.
2. Enter the page URL in Address and choose Load / Reload.
3. Wait for the browser status to settle and inspect the resulting page.
4. Choose Interact… when you need to use the page's mouse and keyboard controls in its separate interaction window. Press Esc to close that interaction view.
5. Use Transparent background for the supplied transparency styling, or enter your own Custom CSS and choose Apply CSS.
6. Preview the page again: applying CSS reloads it, which can reset page playback or interaction state.
7. To remove the custom style, clear the CSS field and apply again.
For a YouTube source, enter and load the intended video page, use the supported player/interaction controls, and verify the fullscreen content and sound. A cookie dialog, login requirement or remote-page change can alter what is rendered. Check the source before the show rather than assuming a previously working URL still opens directly to video.
Generator reference
| Generator | What it supplies | What to inspect |
|---|---|---|
| Text | Editable typography | Font, size, weight, alignment, line spacing, padding and color |
| Lower Third | Styled name/title graphic | Design, title, subtitle, optional eyebrow and supported logo treatment |
| Timer | Clock or elapsed/countdown display | Mode, duration, running state, overtime and displayed time fields |
| Solid Color | Flat color fill | Color and layer size |
| Gradient | Two-color transition | Start/end color and angle |
| Checkerboard | Alternating pattern | Colors and pattern size |
| Shape | Procedural graphic | Shape, fill, stroke, corner and size controls |
| Noise | Generated texture | Source controls and how it combines with other layers |
| Test Pattern | Setup image | Pattern mode, labels, motion and grid sizes |
| Stroboscope | Alternating output colors | Colors and rate; inspect before live use |
| Web Browser | Rendered web page | Address, interaction, CSS, loading and audio |
| Electronic | Network control actions and animated controls | Protocol, destination, activation mode and receiving-device result |
| Pixelhue | Control of a compatible Pixelhue processor | Host, selected preset and Send TAKE on ShowMotion TAKE |
Generator controls are source-specific. Moving or resizing a generator layer changes its placement; editing font size or internal shape dimensions changes its generated content. If text looks cropped, inspect both the layer geometry and text padding/alignment.
Control other systems with Electronic
The Electronic generator sends commands to other devices and software. It is a control source rather than a visible graphic: add it to a Switcher scene, Grid slot or Timeline clip to connect an external action with your show. For example, a scene can recall a supported processor setting, a Grid slot can trigger a Companion button, or a Timeline can animate an OSC parameter on another application. The receiving product must support the selected protocol and command.
This is the opposite direction from using a controller to operate ShowMotion. Companion can send commands into ShowMotion; an Electronic source can also trigger actions in Companion, which then operates its configured devices.
1. Open Generators and drag Electronic to the destination workspace.
2. Select the new layer or clip. In the Electronic Action inspector, enter a descriptive Name and select Protocol.
3. Enter the destination and the exact command expected by that device. A destination such as 127.0.0.1 refers to the Engine computer, not a remote browser operator's laptop.
4. Keep Enabled off while setting up a real show destination. For an initial test, use a local test receiver or an unused Companion test button with no live actions.
5. For a one-shot protocol, choose the activation mode for the workspace. Use Fire Now for a deliberate test, then verify the result at the receiver.
6. Save the scene, Grid or Timeline and rehearse the same activation path you will use during the show.
First test: send an HTTP request
Use an HTTP test receiver on the Engine computer that logs requests and returns a successful response. The example address below is a test endpoint; it only works if you have started a receiver there.
1. Drag Electronic from Generators into a Switcher Preview scene and select the new layer.
2. In Electronic Action, change Name to “HTTP test”. A new Electronic source defaults to HTTP, GET, an empty URL, Body: None, Enabled on and an automatic entry mode.
3. Set Mode to Manual. Enter http://127.0.0.1:8768/test in URL, or substitute your test receiver's address. Click outside the field to commit the edit.
4. Leave Method: GET and Body: None. Leave the headers JSON empty ({}) unless the receiver requires headers. In Timing, leave Retries at 0 for this first test.
5. Ensure Enabled is checked, then click Fire Now once. Confirm exactly one request in the receiver's log.
6. Change the destination only after confirming the required command in the real device's documentation. If it requires a POST, select POST, choose Text or JSON under Body, and enter the requested payload. A GET request does not send the body field.
Manual mode controls automatic activation; it does not disable the Fire Now button. Enabled controls whether the action may execute. A successful send is not proof that a projector, processor or application completed its intended action: verify the receiving device too.
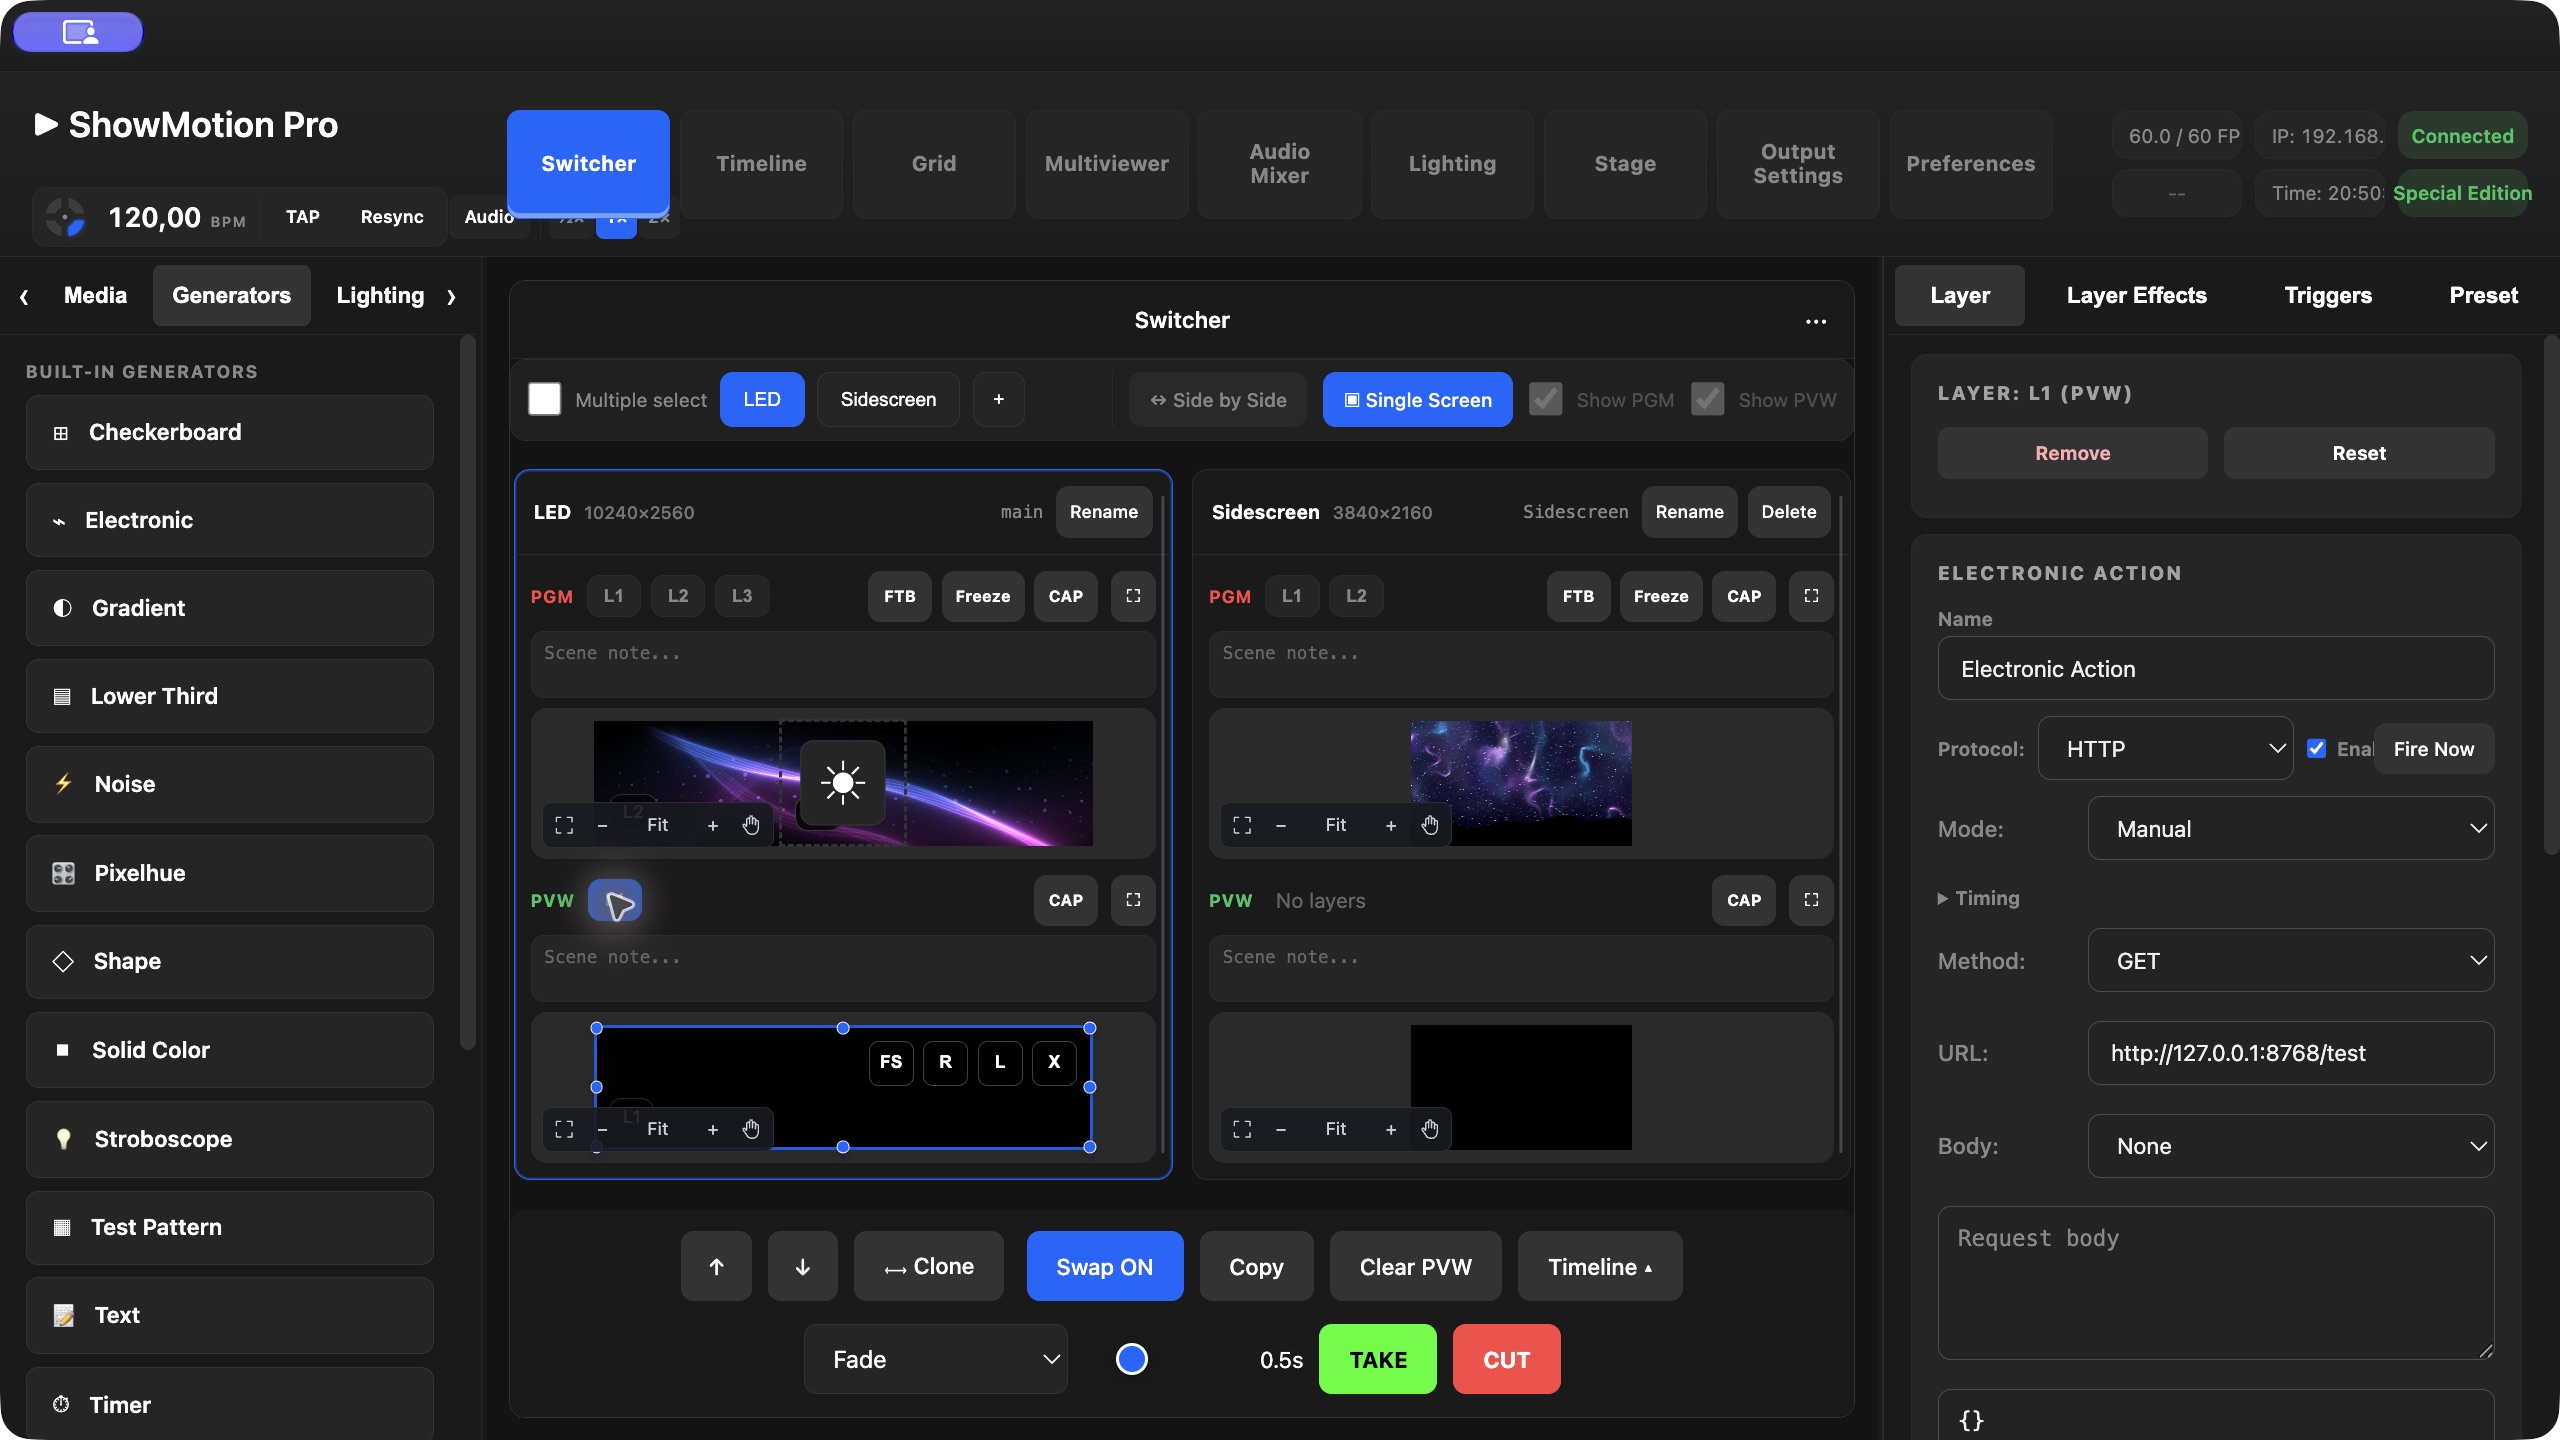
Choose how an action fires
| Workspace | Inspector choices for one-shot actions | Use |
|---|---|---|
| Switcher | Manual; Fire on take (enter to PGM); Fire on take (leave from PGM) | Associate a command with a scene entering or leaving Program |
| Grid | Manual; Fire on slot trigger | Launch a control action from its slot |
| Timeline | Manual; Enter clip; Leave clip | Place a command at the start or end of a control clip |
Fire Now sends a real command, including when editing a Preview layer. Do not use Preview as a blanket safeguard for external control; use an isolated test destination while rehearsing. A repeated trigger may send another command. Avoid retrying non-repeatable actions until you understand the receiving device's behavior.
Protocol reference
| Protocol | Configure | Typical use |
|---|---|---|
| HTTP | URL, method, headers, body type and body | Call an equipment or application API |
| UDP | Host, port, payload encoding, optional newline and broadcast | Send a device's network command |
| TCP | Host, port, payload encoding, optional response read | Send a command over a TCP connection |
| OSC | Host, port, control addresses/types/ranges, FPS | Animate values in OSC-capable software |
| Art-Net | Host or broadcast, Net/Sub/Uni, named controls, DMX mappings, FPS | Send animated DMX channel values |
| sACN | Destination or multicast, universe, priority, source name, channel data | Send an E1.31 channel packet as an action |
| Companion | Host, port, page, row, column, Press or Release | Activate a configured Companion button |
| WebSocket | URL, Text or Binary message, payload | Send a message to a compatible WebSocket endpoint |
The exact command, port and address come from the receiver's documentation. TCP and WebSocket actions open a connection for the action rather than maintaining a general interactive control session. The current sACN action is a packet send; it is not the same continuous control editor as OSC and Art-Net.
Animate OSC and Art-Net controls
OSC and Art-Net use continuous control panels instead of the one-shot Fire Now and activation-mode controls. Start with a test receiver.
For OSC, enter Host and Port, then Add Control. Give it the receiver's address (starting with /), select its argument type and set its range and value. Add further controls for additional addresses. Advanced JSON Args is available for commands that need structured arguments.
For Art-Net, enter the target and Net/Sub/Uni addressing. Add a named control, then Add Mapping to assign it to a DMX channel. Channel numbers run from 1 to 512 and control values from 0 to 255. One control can map to several channels. Match the receiver's universe numbering convention; the inspector exposes the Art-Net Net/Sub/Uni fields separately.
Animate the exposed sliders using the parameter animation/curve tools described in the animation chapter. Timeline curves provide timed changes; Switcher control animations run while the control source is in Program. The FPS field sets the requested update cadence (1–60); the engine can suppress unchanged values and send keepalive updates, so this is not a promise of one packet on every rendered video frame.
Continuous output depends on the active playback/routing context. For a first test, use a Switcher Program layer. A Timeline's continuous control stream follows a Program or direct-output route; merely seeing its editor is not proof that control data is going out. Check Grid and nested routing with a receiver before relying on a particular arrangement.
Verify external control before a show
Keep a record of the receiver address, port, command and expected result. Test Fire Now, automatic activation, repeated triggers, stopping/pausing playback and reloading the saved document. Observe the receiver or device, not only the ShowMotion UI. When a stream stops, the receiver may retain its last value; provide the device's intended reset/idle command where needed.
Pixelhue processor control
Pixelhue is a control generator for a compatible Pixelhue processor. Enter its Host, refresh the preset list if needed, and choose the intended Preset. The Send TAKE on ShowMotion TAKE option connects the processor's TAKE action with ShowMotion's TAKE operation. Check the selected processor preset and the resulting destination picture before using the link during a show.
Electronic and Pixelhue are control sources rather than procedural picture generators. Their useful result is an action at the receiving system, not a new visible graphic in the composition.
Exercise: a countdown confidence screen
Create a separate Screen for the presenter display. Add a Solid Color background and a Timer above it. Set its intended duration and mode, choose readable typography, and decide whether hours, seconds or fractions should be visible. Set warning and critical thresholds if using warning colors. Test start, pause, reset and overtime behavior, then route this Screen only to the confidence output.
Check timer instance behavior if you use copies in several places. The default generator has a shared timer identifier; do not assume that every added visual is automatically an independent stopwatch. Confirm which timer changes when operating each control.
SMFX plugins
Liquid Orbit: Choose a scene or preset, then adjust the controls exposed by that scene: geometry, lighting, camera and motion. Preview at the intended resolution and save the look. Different scenes expose different parameters.
Reality Backgrounds: Load a Gaussian Splat environment and use its navigation and camera controls to frame the view. Set the light mood, rehearse any camera movement and confirm performance with the rest of the composition active.
11. Apply effects
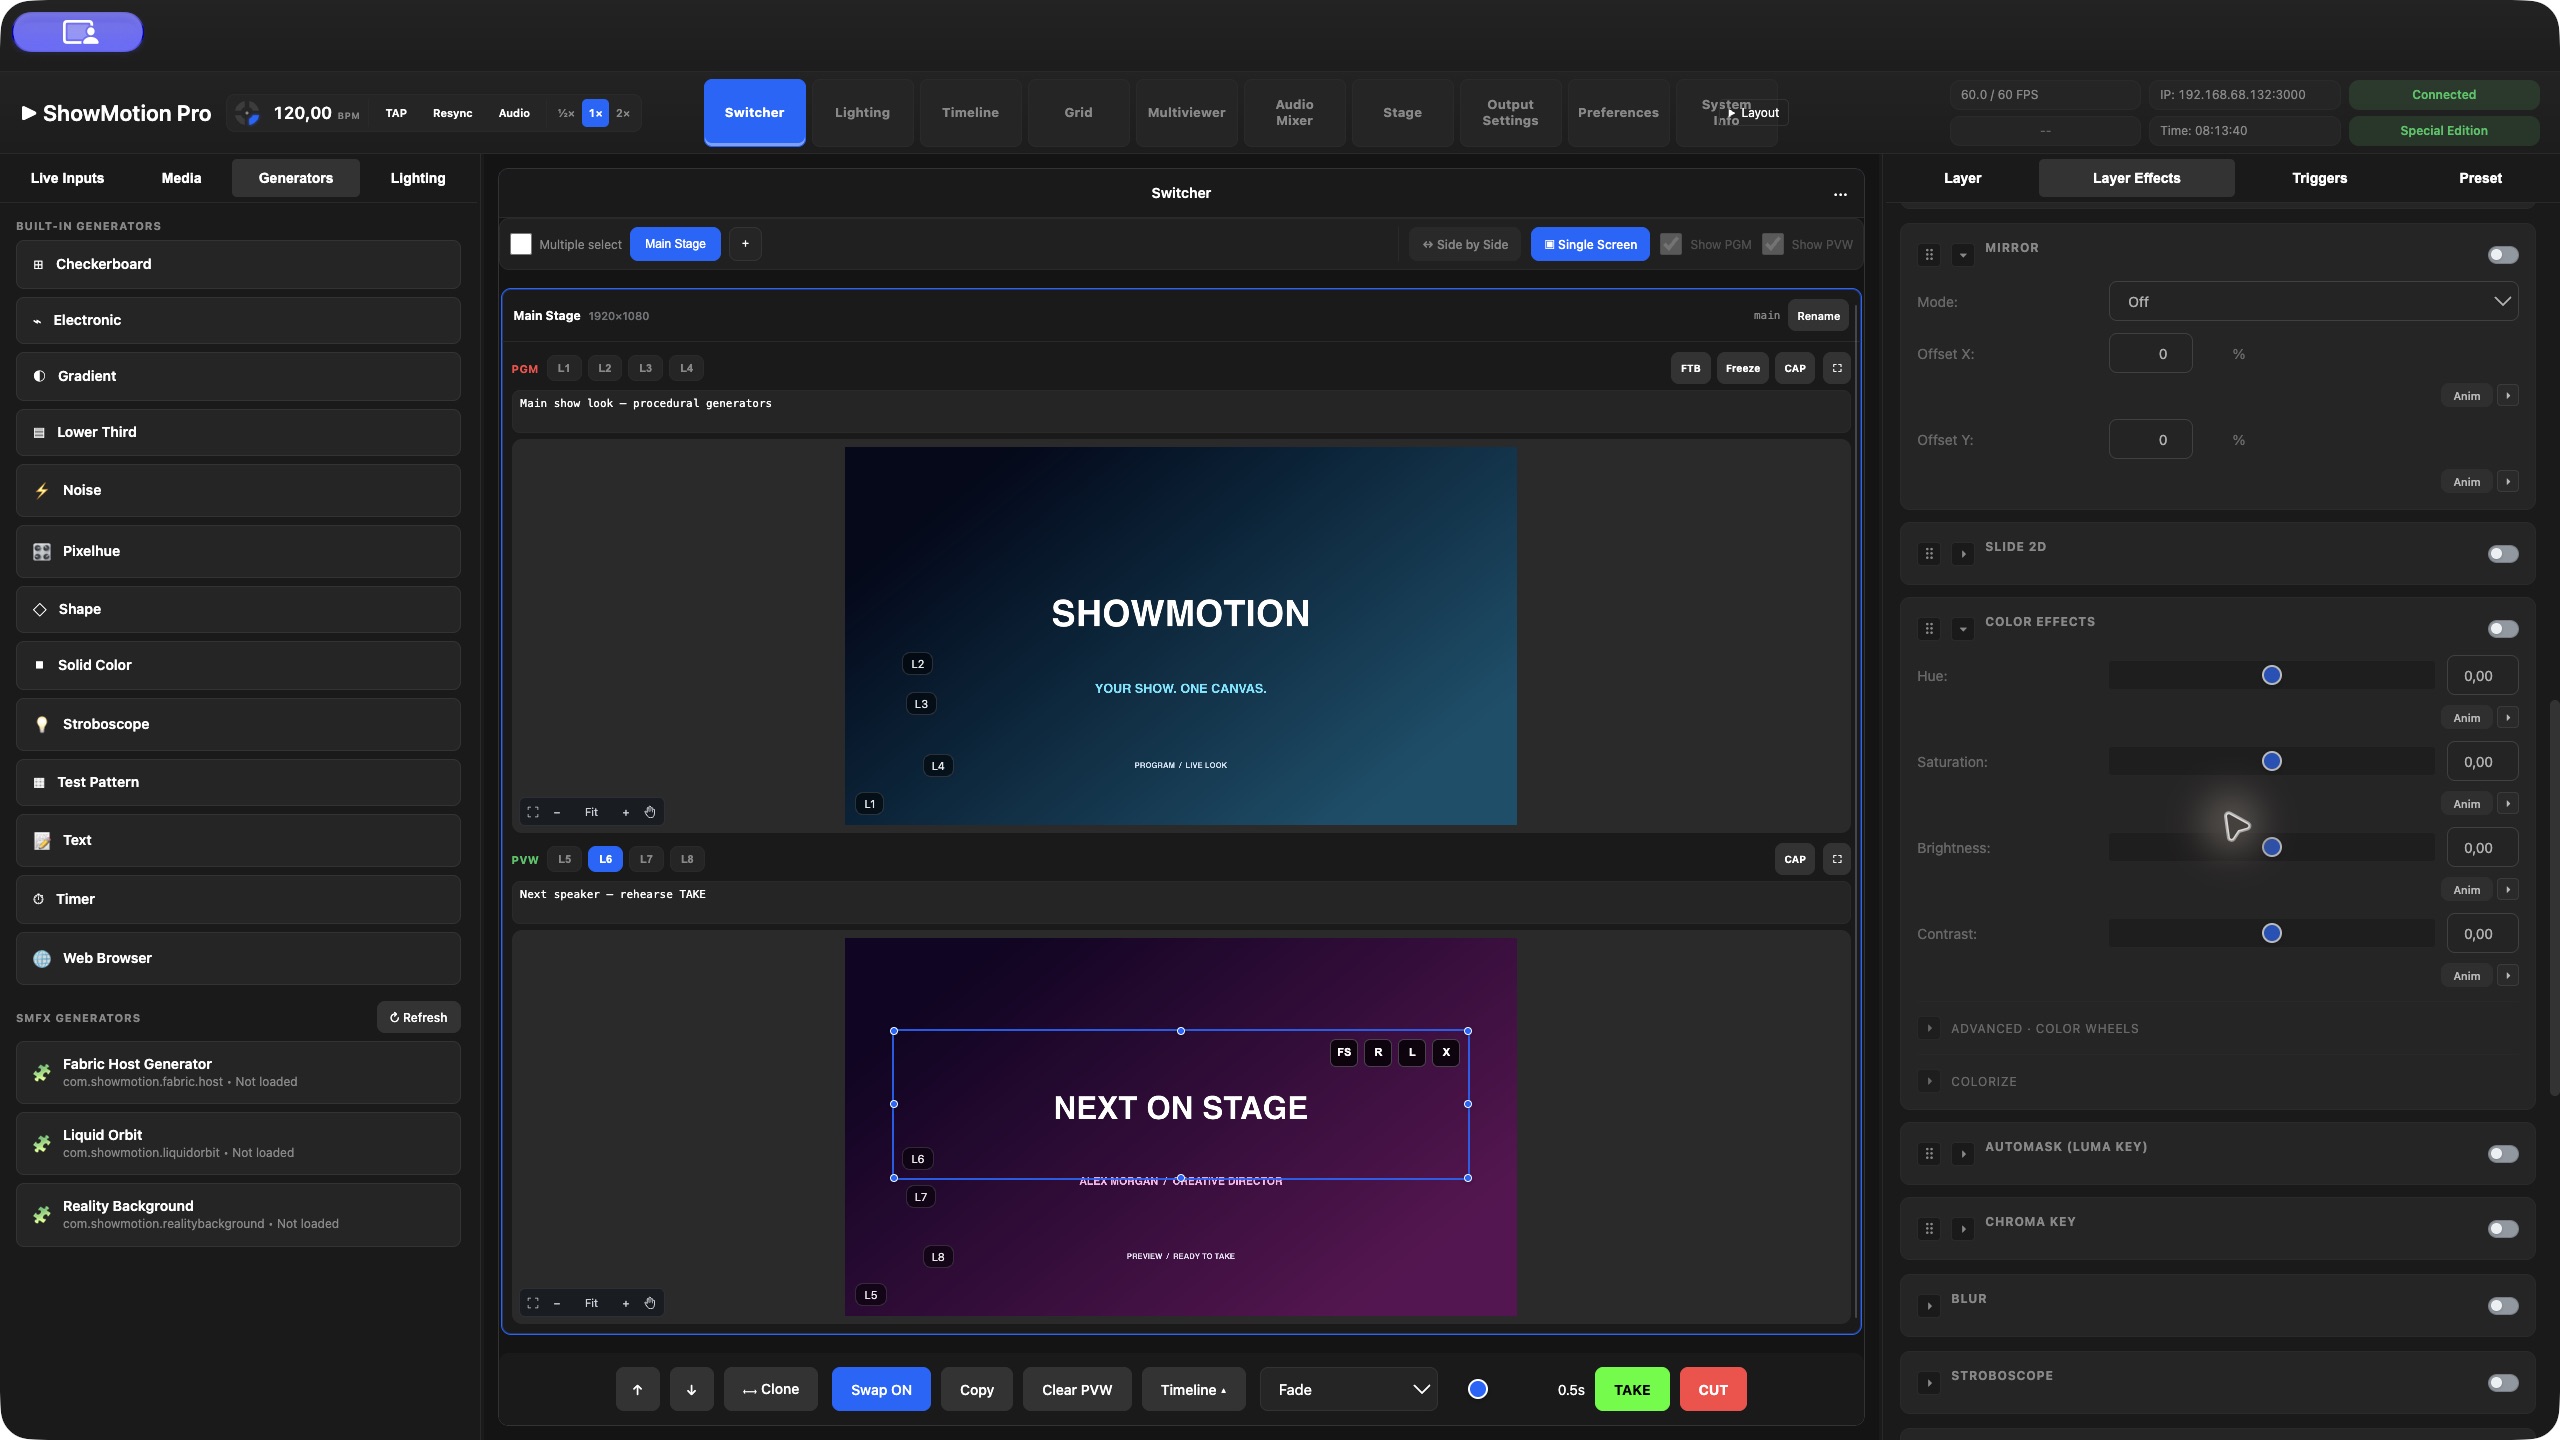
Effects operate on the selected layer. Before changing a control, confirm the Screen, bus and layer selection. In Switcher, work in PVW when preparing an upcoming scene; editing a layer already on PGM can change the live result. Open Layer Effects, enable the relevant effect section, then expand its controls. Collapsing a section hides its controls; bypassing its enable switch changes processing.
Build the look in small steps. Start with framing, then establish the matte if needed, then adjust color and finishing effects. Toggle a section off and on to compare. A good comparison uses the same source frame and layer size so that the visual difference comes from the effect.
Color correction and Colorize
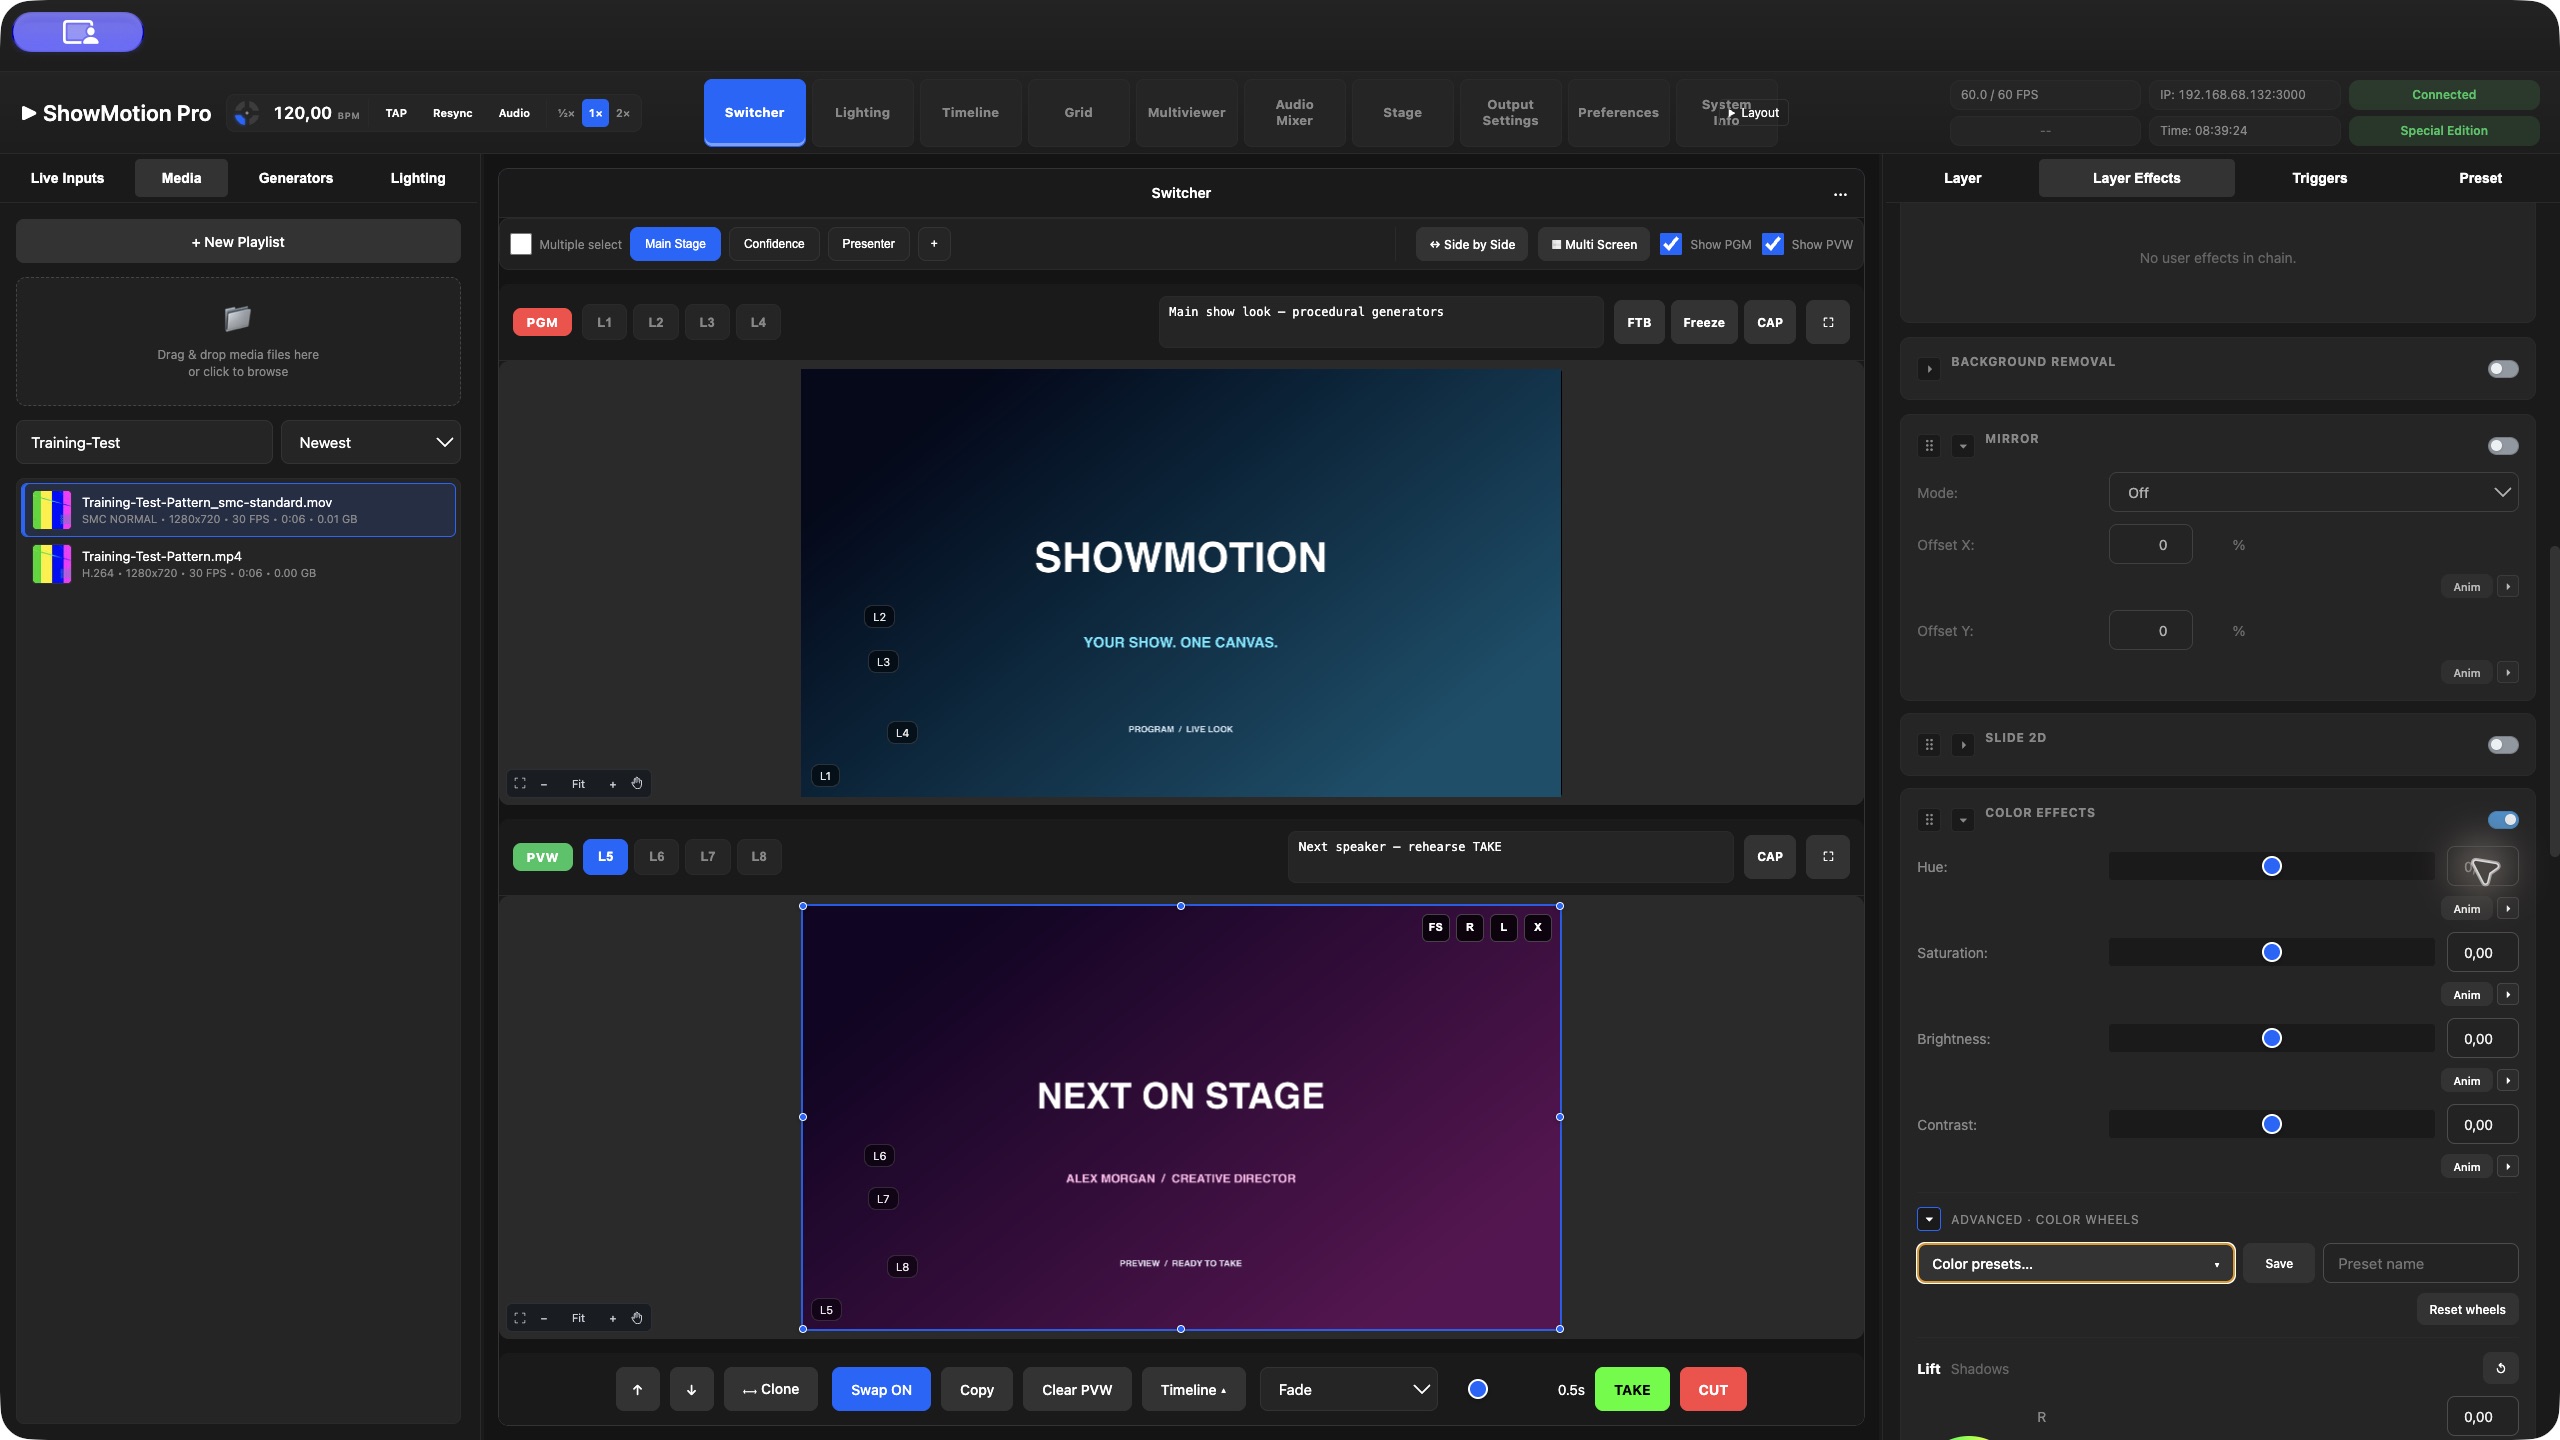
Hue, Saturation, Brightness and Contrast provide fast global changes. Neutral values are zero. Use small adjustments and inspect both dark and bright areas; making an image brighter can conceal clipping in a small preview.
Expand Advanced · Color wheels for Lift, Gamma and Gain, described in the interface as Shadows, Midtones and Highlights. Each has a color wheel, R/G/B numerical fields and a Master control. Lift and Gamma are neutral at zero; Gain is neutral at one. Use a wheel for a color bias, and its Master control for an overall tonal adjustment. Reset wheels resets the three wheels, while the reset control beside an individual wheel affects that wheel. It does not mean every effect on the layer has been cleared.
Colorize is a separate subsection inside Color Effects. Enable it, select a target with the color picker, wheel or RGB fields, then adjust Strength and Brightness. Strength blends the colorization amount; Brightness scales the result. Reset colorize restores this subsection. Colorize is useful for bringing several unrelated clips toward a shared visual palette.
For a reusable color treatment, enter a Preset name in the advanced color controls and choose Save. Recall it with Color presets…. These presets include the basic color adjustments, wheels and Colorize, rather than the entire layer or effects chain. They are stored in the local interface's settings; do not assume a preset saved in Electron will appear automatically in another browser's Web Remote.
Exercise — a consistent background look: Place a colorful background in PVW. Reduce Saturation modestly, enable Colorize, choose your event color, and increase Strength until the image supports the title without losing useful detail. Adjust Colorize Brightness if necessary. Save the color preset, apply it to a second background, and inspect both before taking them live. The same settings can produce different results on different footage.
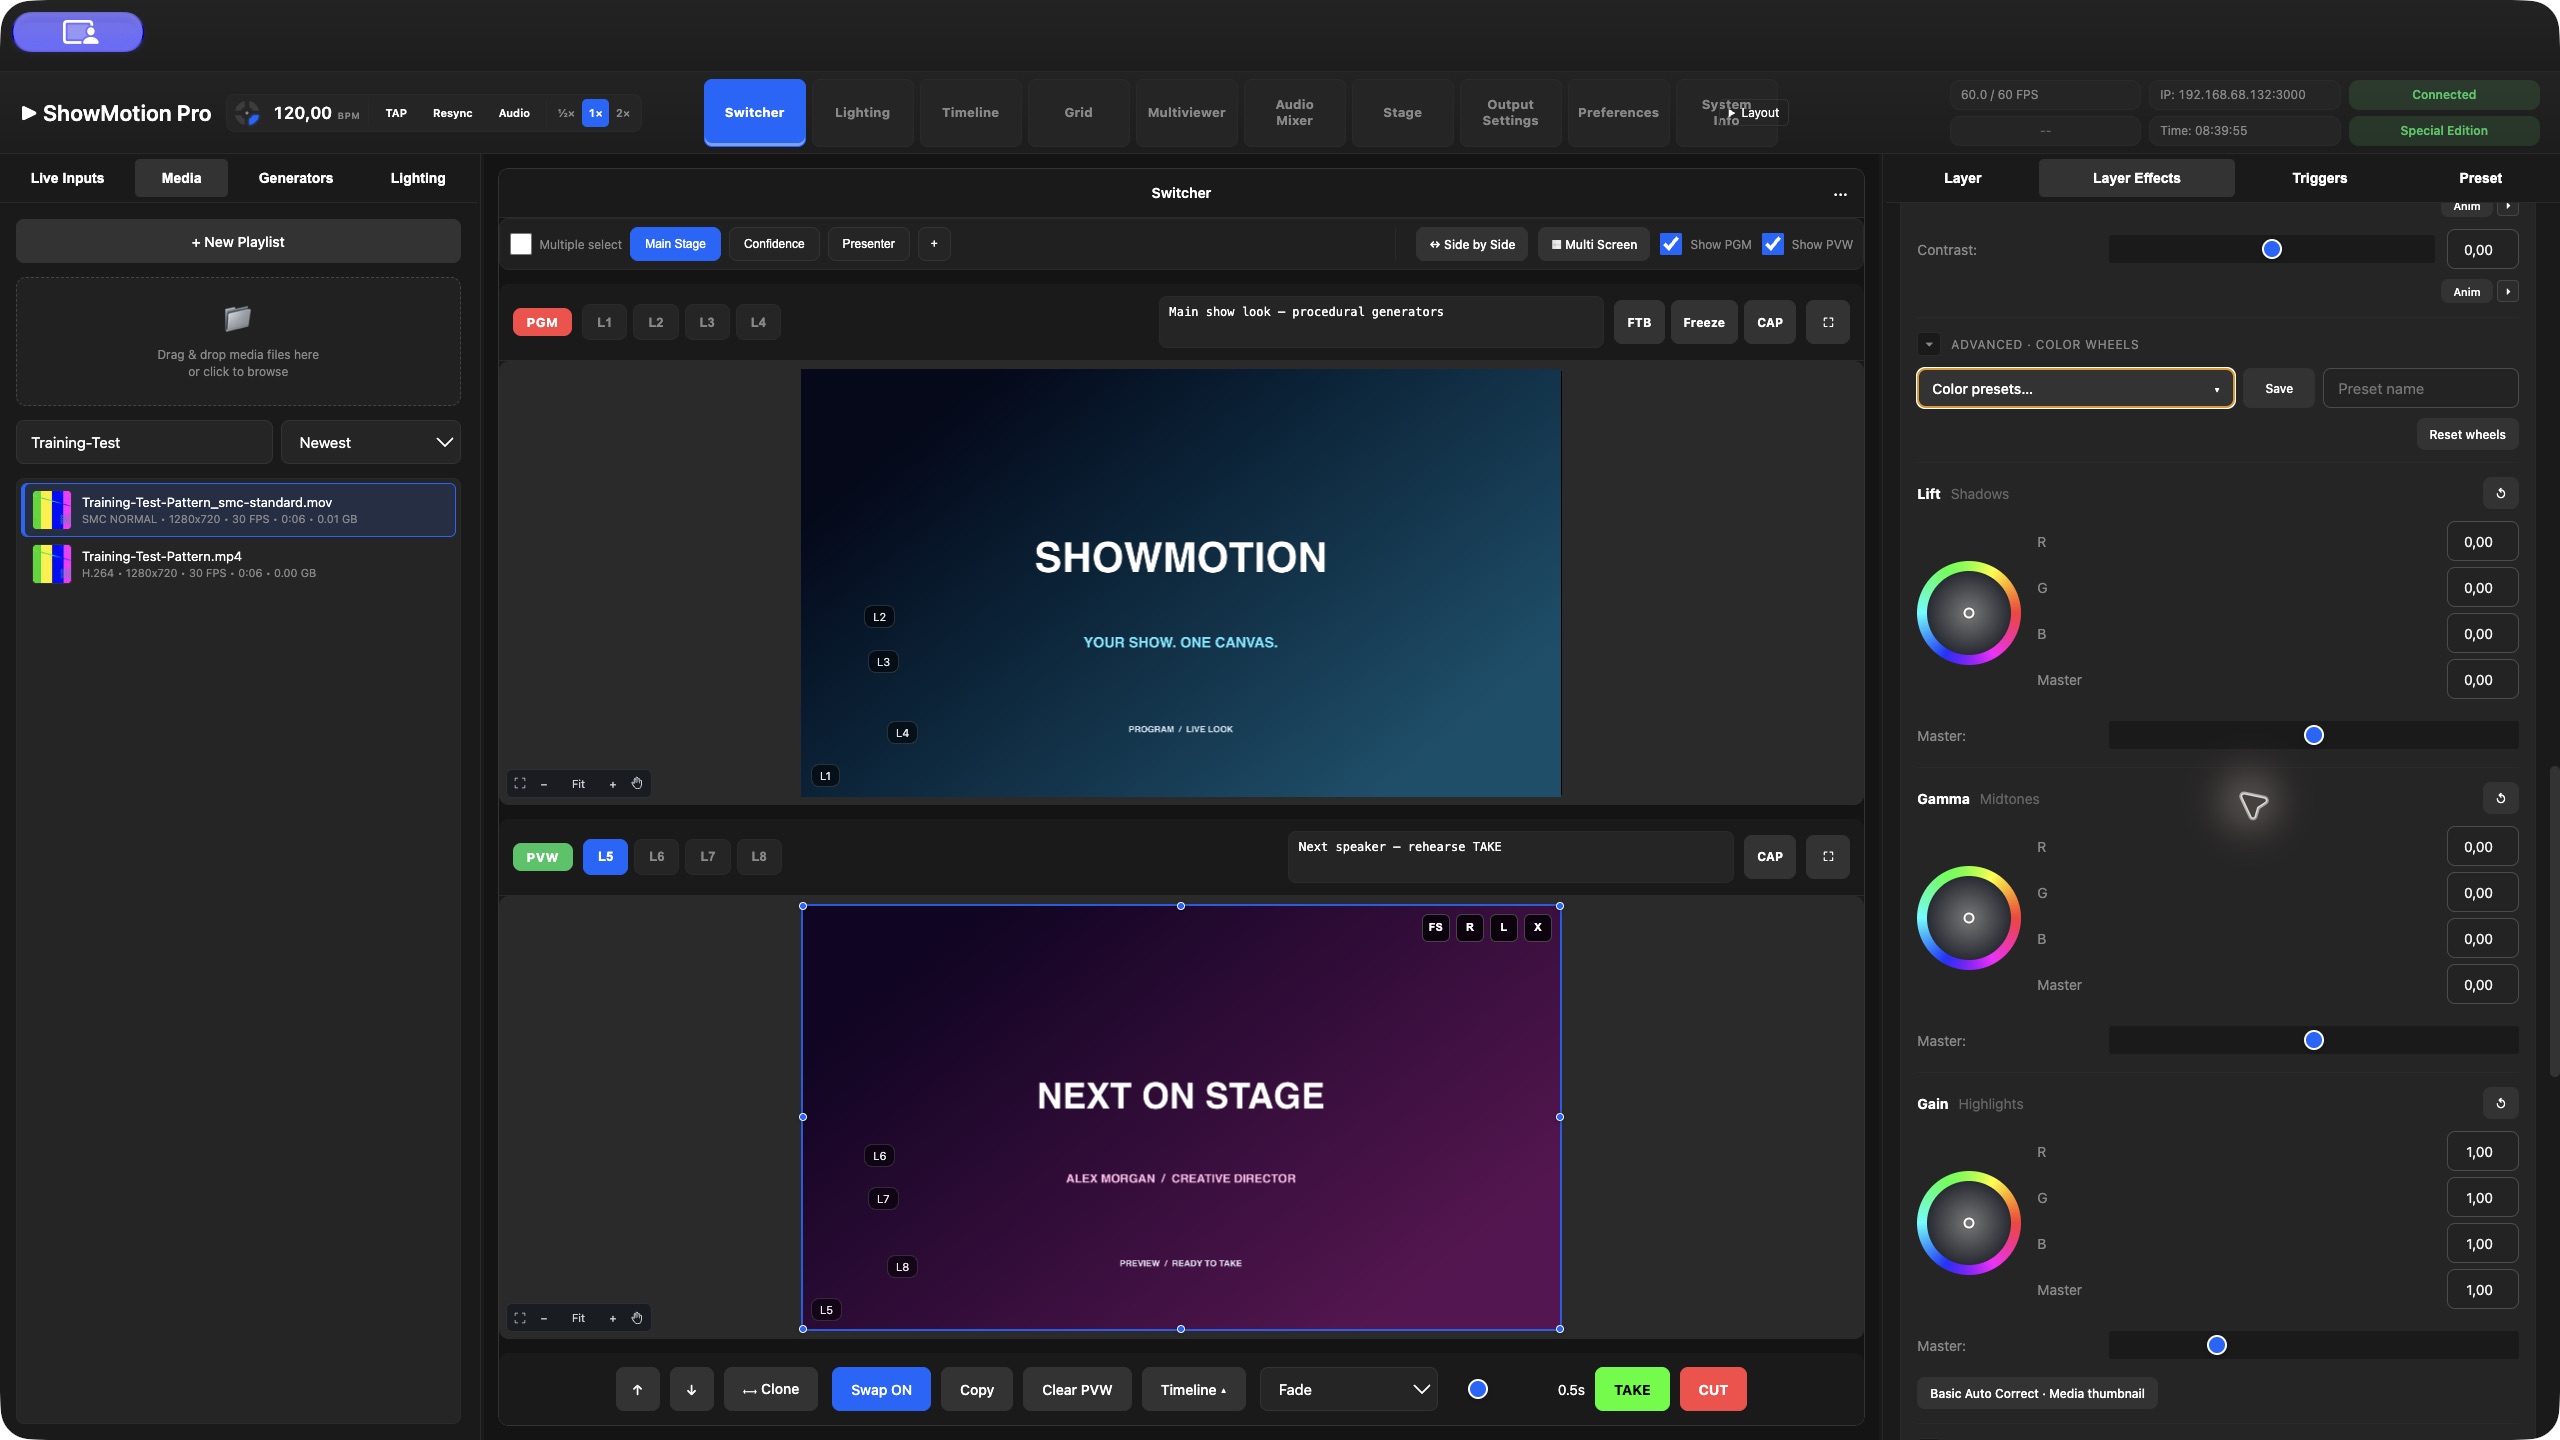
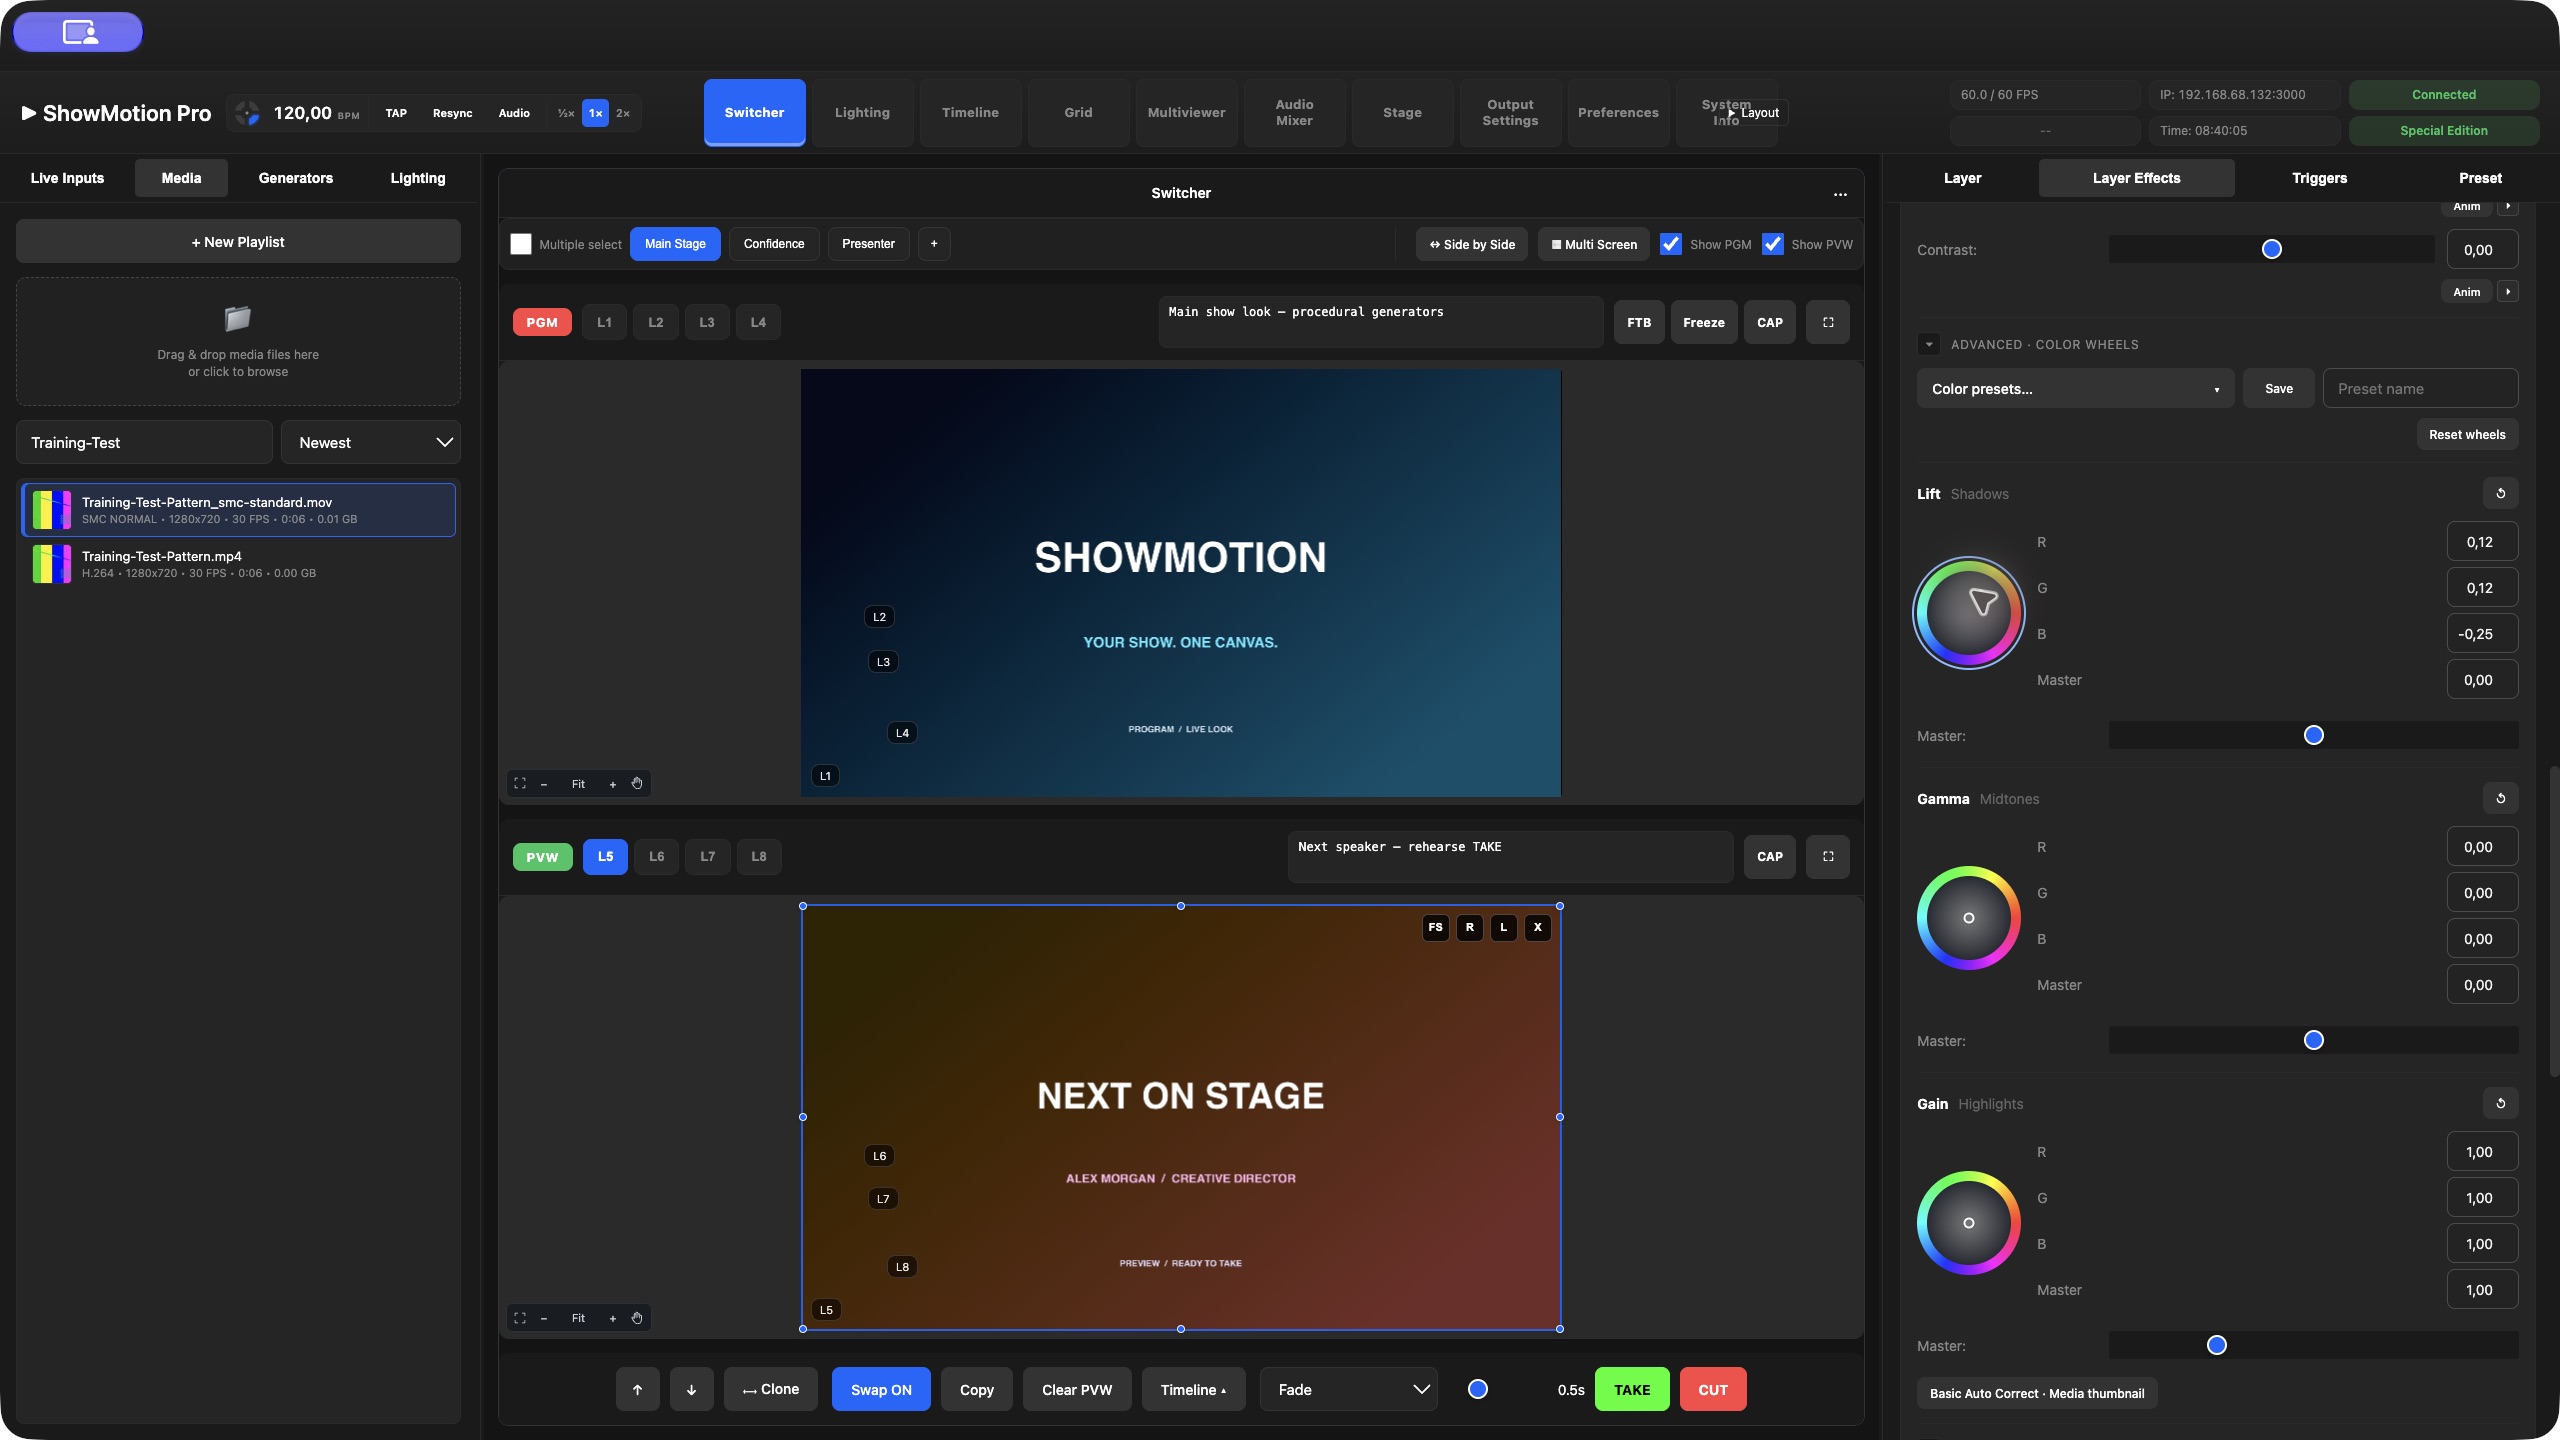
Remove a background: choose the appropriate method
AutoMask (Luma Key) uses image brightness. Increase Strength to remove dark material; Invert changes the black-key operation to white-key operation. Adjust Contrast to change the separation. This works well for bright graphic elements rendered over black. It also removes dark detail inside the subject, so it is not equivalent to a supplied alpha channel.
Chroma Key removes a selected color. Set Key Color to the backdrop color. Increase Tolerance until the backdrop is removed without eating into the subject. Adjust Softness for the transition, then Spill to reduce unwanted backdrop color near the subject. Put a contrasting layer underneath while evaluating the edges. A single tolerance value cannot compensate for every unevenly lit background.
Background Removal creates an AI mask. Choose Subject > People for people, or Foreground subjects for a broader foreground selection. Begin with Quality > Balanced; compare Fast and Accurate on the real source and playback system. Use Show mask to inspect the separation, then turn it off for normal viewing. Invert mask reverses the retained area.
Use Intensity to control the removal amount, Edge softness to adjust the edge, Inset to move the mask inward, and Inner feather to soften its inner transition. Increase these gradually while checking hair, clothing edges and motion. Blur / Bokeh softens the background; the separate Blur effect described below blurs the whole image. AI frame rate offers Auto, 25 fps and 30 fps; the Auto label describes 50→25 and 60→30. This controls mask analysis cadence, not the project's output frame rate.
Exercise — a presenter over a branded background: Put a background below a presenter video. Select the presenter, enable Background Removal, choose People and Balanced, then inspect Show mask during head and hand movement. Apply a small Inset only if an unwanted edge remains; add Inner feather conservatively. Turn Show mask off and review the actual composite on light and dark backgrounds. For a softer original environment, compare a Blur / Bokeh treatment instead of assuming full removal is always the best result.
Spatial effects, outlines and depth
Mirror offers Off, X, Y and XY, with Offset X/Y controls. Slide 2D has Offset X/Y controls for moving image content within its processing stage. These are different from positioning the layer on a Screen. For a layout change, use the layer's transform controls; for an image treatment, use the spatial effects.
Cropping belongs to layer framing. Adjust the crop edges to hide unwanted areas within the layer without stretching the image. Recheck the selected layer's position and size after framing, especially when a crop is used alongside a border. Cropping is not background removal: its boundary is geometric rather than subject-aware.
The standalone Blur > Amount softens the image as a whole. Border Effects adds a finish using Size, Color, Radius, Feather and Feather Opacity. With Visible contour, the border follows the visible shape rather than simply presenting a rectangular frame. Radius is relevant to rectangular framing; do not expect it to behave like a silhouette-shaping control.
The same section provides Shadow Color, Shadow Distance, Shadow Angle, Shadow Spread, Shadow Strength, Shadow Blur and Shadow Opacity. Set Distance and Angle to place the shadow, then use Blur and Opacity to soften its appearance. Inspect enough surrounding space to ensure the result is not cut off by the composition edge.
Exercise — a readable graphic over video: Place a transparent logo above moving footage. Enable Border Effects, choose Visible contour, then add a small contrasting Size. Add a short, soft shadow if the logo still merges into bright areas. Compare with the section bypassed and watch a full movement cycle. A heavier outline is not always more readable; prioritize the actual audience viewing size.
Processing order, user effects and animation
Order matters: a color adjustment before Chroma Key changes the colors the keyer receives. The draggable processing group contains Mirror, Slide 2D, Color Effects, AutoMask and Chroma Key. Drag its handles to reorder these stages, or focus a handle and press Alt + Up/Down. Background Removal is a fixed earlier stage. This is not a promise that every built-in section can be freely reordered.
Under USER EFFECTS, choose User Effect and Add. Each inserted effect has its own enable checkbox, expandable controls, up/down ordering buttons and removal button. Parameters depend on the chosen effect or plugin. Bypass an entry to compare it without deleting its settings. The user-effect chain has its own ordering controls, separate from the five-stage built-in group.
Where a user-effect parameter offers Anim, use it to enable continuous modulation. Expand Animation details for Enable, Shape, Mode, Speed Hz, Amount and Phase; Draw edits a custom shape. Mode offers Forward or PingPong. Start with a slow speed and small amount so that the result remains within a useful visual range. Tempo controls are available where provided by the effect's animation panel.
Continuous modulation and Timeline keyframes serve different purposes. Modulation creates a repeating or evolving treatment. Timeline keyframes place changes at authored times. Follow the detailed animation guide below for keyframe editing and shared Anim controls. The presence of an Anim button on one effect does not imply every control exposes identical animation options.
Finally, review the full composition rather than the isolated layer. Check edges, transparency, text legibility and motion at the intended output size. Save the project after the look is approved, and rehearse it together with the scene transitions that will reveal it.
Curves and parameter animation: choose the right clock
An animation changes a parameter over time: a title moves into position, an image fades, a color effect evolves, or a generator pulses. ShowMotion provides two complementary controls. Decide whether the movement must happen at a specific point in a clip or should repeat continuously.
| Your intention | Control to use | Timing |
|---|---|---|
| Fade a title in during its first second and out before it ends | Curve on a Timeline clip | Position within that clip |
| Move an object through several exact positions during a sequence | Keyframe Record, then inspect its Curve | Timeline playhead, expressed relative to the selected clip |
| Keep a layer breathing, pulsing, or moving rhythmically | Anim beside a supported parameter | Repeating time or BPM cycle |
| Reuse a drawn motion shape in Switcher, Grid, and Timeline | Save Curve or Draw, then choose the saved shape | Clip duration in Timeline Curve; repeating cycle in Anim |
A source's own playback is another clock. A video can loop inside a clip while that clip's opacity completes a single fade envelope. In/Out in the Anim panel describe the animation's value range; they are not video trim points.
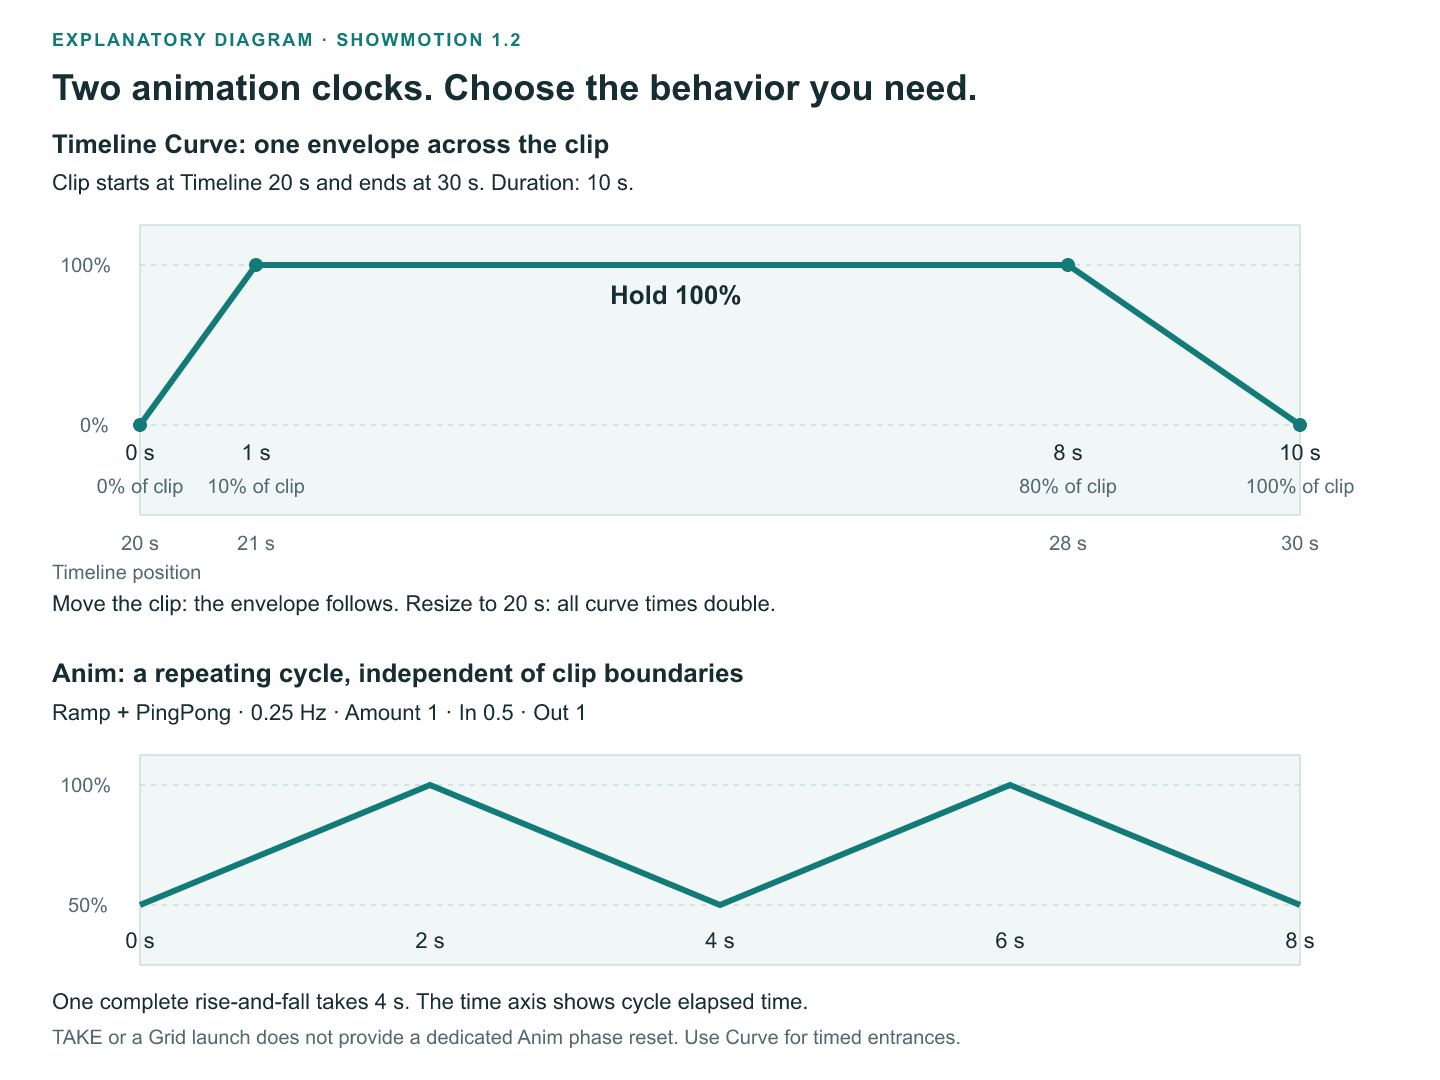
The upper graph shows a ten-second clip starting at Timeline time 20 seconds. The lower graph shows two independent four-second animation cycles.
Read a Timeline curve
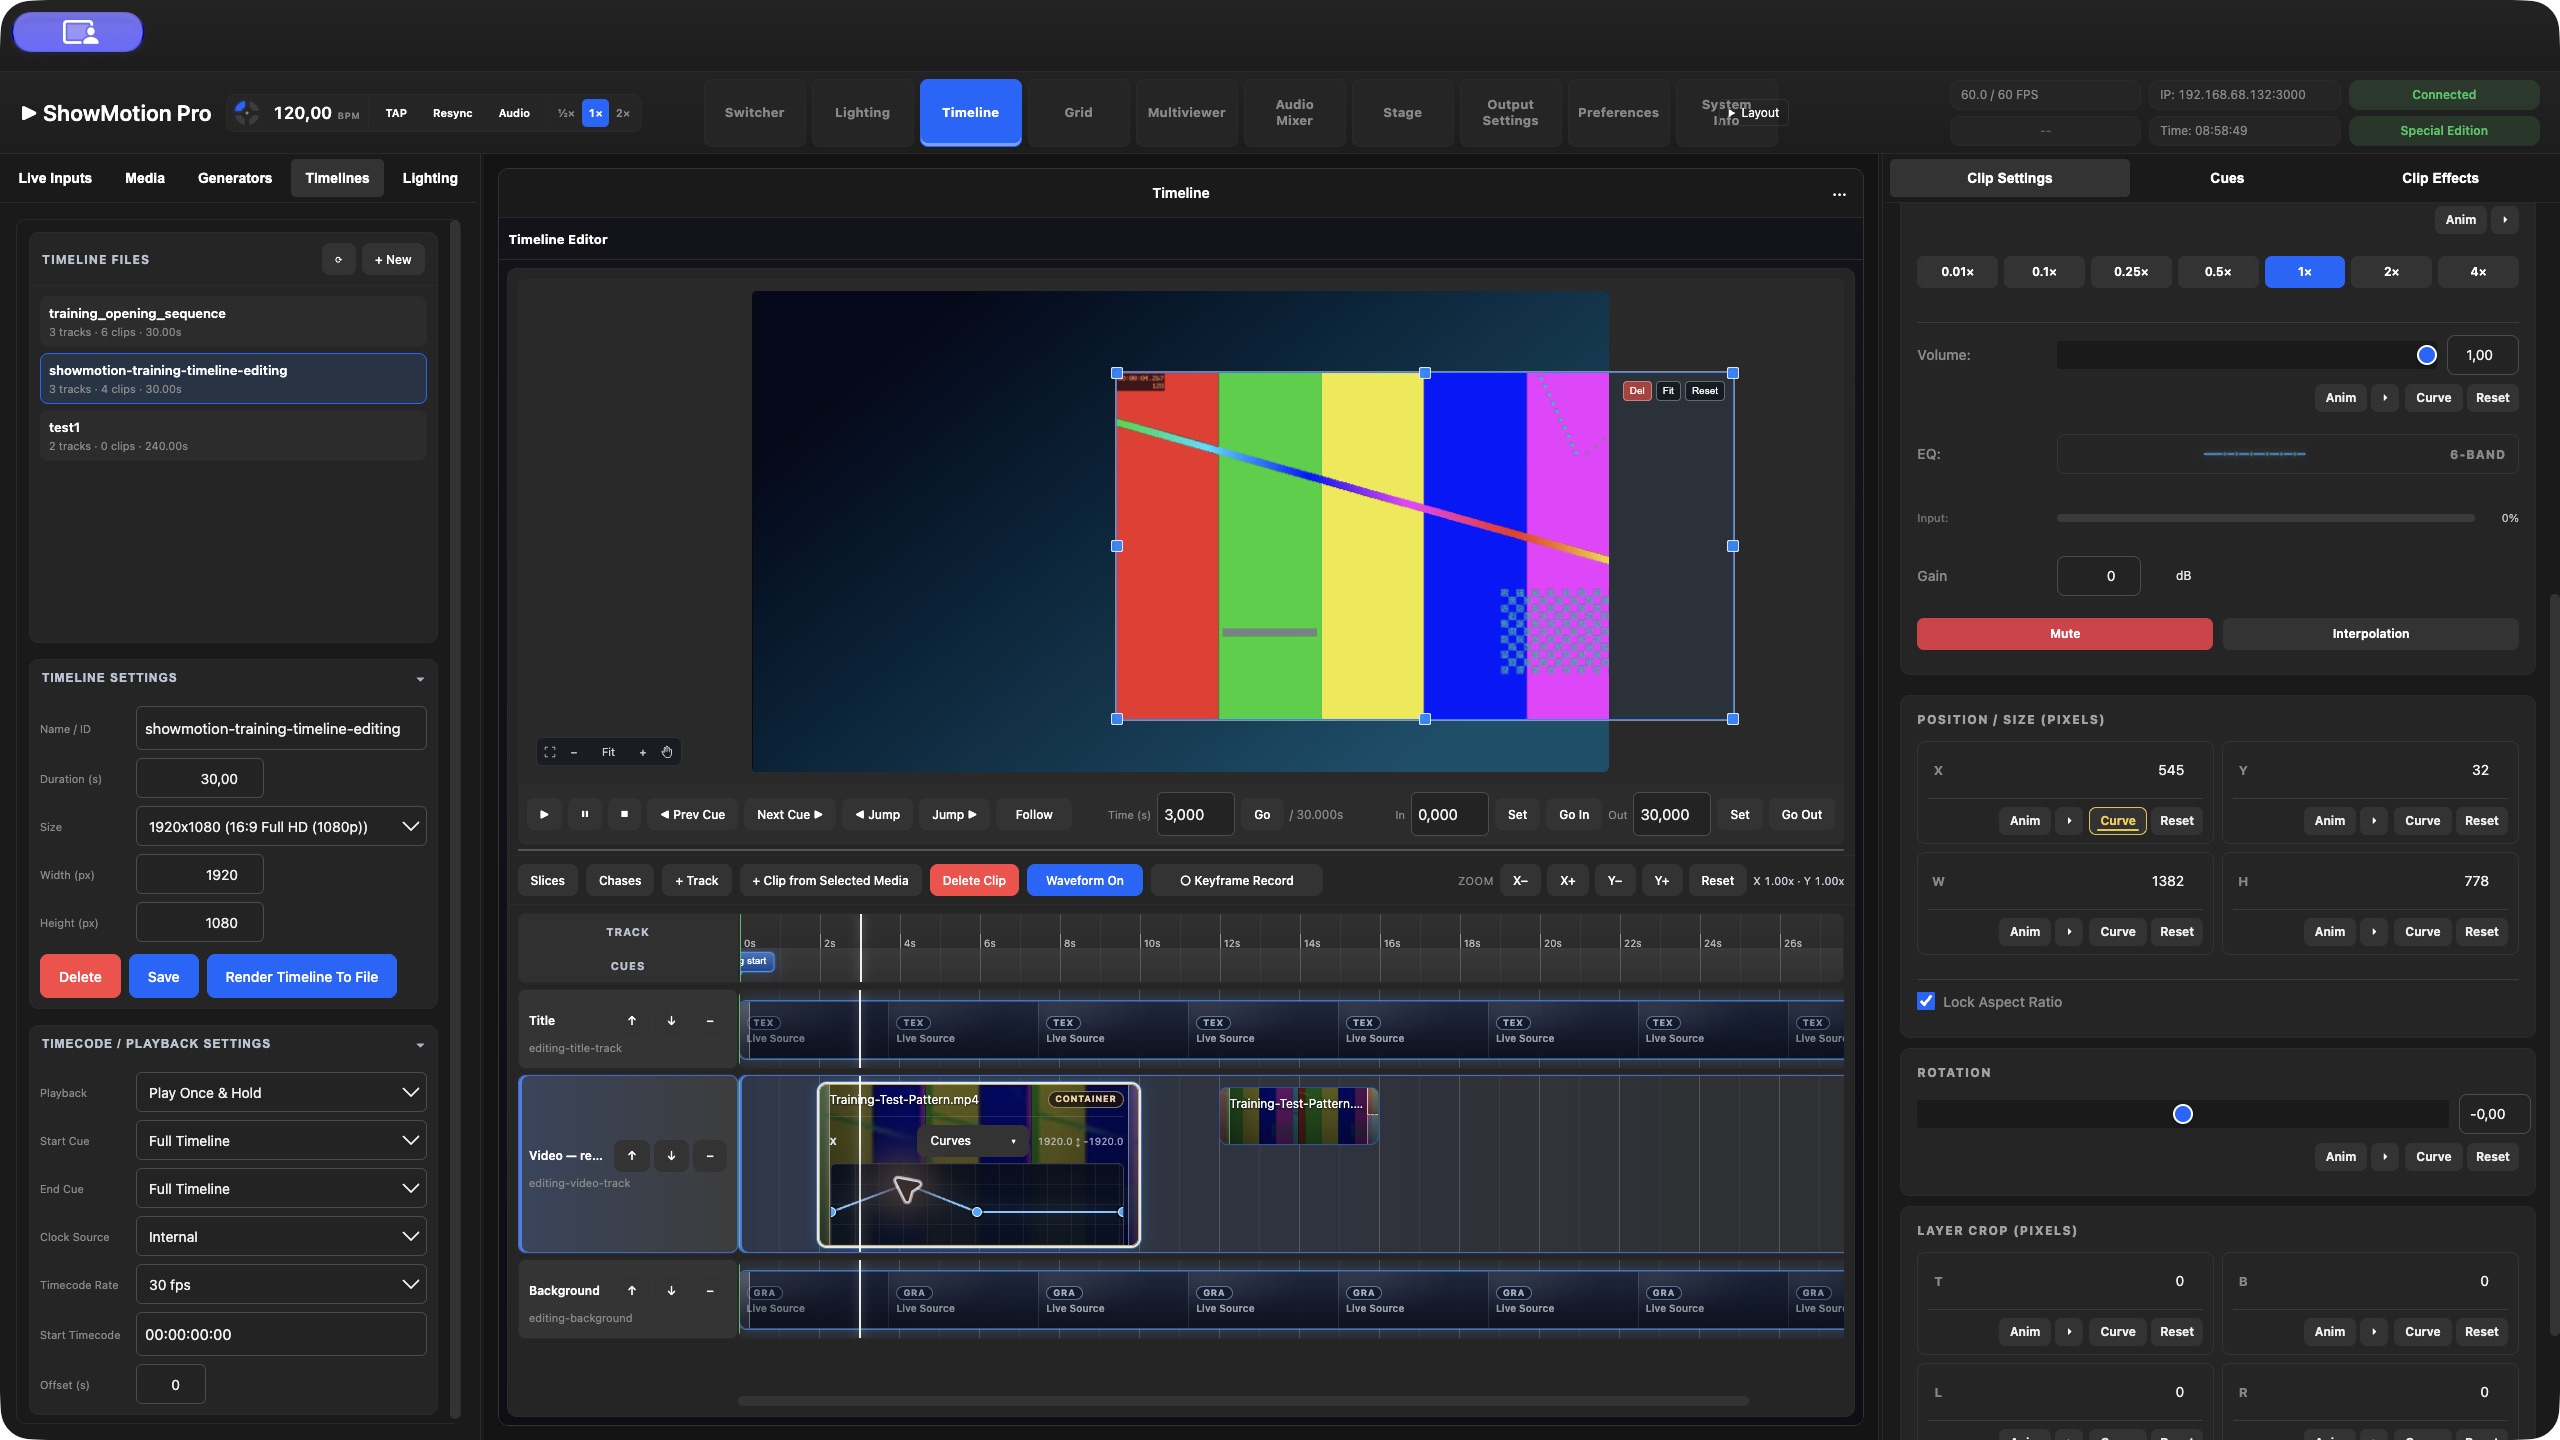
Select a clip, find the parameter in the Layer or Effects inspector, and click Curve. The graph appears on the clip's track. The horizontal axis covers the selected clip from start to finish. The vertical axis covers the parameter range shown in the graph header. Higher points mean higher values. The current curve is one parameter channel; opening another parameter's Curve changes the channel on display without deleting the first.
For a ten-second clip starting at Timeline time 20 seconds:
| Graph position | Time inside clip | Timeline time |
|---|---|---|
| Left edge, 0% | 0 seconds | 20 seconds |
| One tenth across, 10% | 1 second | 21 seconds |
| Middle, 50% | 5 seconds | 25 seconds |
| Right edge, 100% | 10 seconds | 30 seconds |
Points are joined with linear interpolation: between two points, the value changes at a constant rate. Several short segments can create a gentler acceleration or deceleration. There is no separate Bézier-handle or interpolation-mode selector in this editor. A flat segment holds a value; a steep segment changes it quickly.
Moving the entire clip moves its automation with it. Resizing its overall duration stretches or compresses the normalized curve across the new duration. A point halfway through a ten-second clip is at five seconds; halfway through a twenty-second clip is at ten seconds. Recheck fades after changing duration if they must remain exactly one second long. Source trim and playback speed determine which source frames are visible; the curve's horizontal axis still follows the clip's own duration.
Edit points directly
1. Select the intended clip and click Curve beside the parameter.
2. Click an empty part of the curve graph to add a point.
3. Drag a point horizontally to change its timing and vertically to change its value. The end points stay at the clip boundaries; change their heights to set the starting and ending values.
4. Double-click an interior point to remove it. The boundary points cannot be removed this way.
5. Hold Shift and drag a selection rectangle across the graph to select several points. Drag selected points together to reshape a section.
6. Use Cmd/Ctrl+C to copy selected curve points. With a curve open, move the playhead and use Cmd/Ctrl+V to paste relative to that position. Keep the destination parameter's range in mind; copied points represent normalized values.
7. Scrub across the clip and play Preview to inspect the result. Use Cmd/Ctrl+Z to undo an accidental edit.
Reset beside a parameter clears that channel's edited automation and returns it to an unedited flat curve. It does not delete the other parameter curves on the clip. Closing or switching the displayed Curve does not disable it.
Exercise: fade a title in, hold it, and fade it out
Use a ten-second Text clip over a background. Keep its normal opacity at full strength and disable its opacity Anim while constructing this example.
For the quickest starting point, right-click the clip and choose Create Fade In + Out. Create Fade In and Create Fade Out are also available. These commands generate editable opacity curves with a short shaped fade. The initial fade is approximately 0.66 seconds on a typical clip; very short or long clips apply proportional limits. If the clip has audio, the command also creates a volume fade. Inspect both channels when only the picture should fade.
For a precisely designed ten-second envelope, open Opacity → Curve and shape it to these targets:
| Time inside clip | Opacity | Appearance |
|---|---|---|
| 0 seconds | 0% | Invisible |
| 1 second | 100% | Fully visible |
| 8 seconds | 100% | Still fully visible |
| 10 seconds | 0% | Invisible at the end |
Place the first and last points at the bottom of the graph. Place the two interior points at 10% and 80% of its width, at the top. Between one and eight seconds the line is horizontal, so the title holds steady. The first ramp is one second; the last is two seconds. Scrub through the start, middle, and end, then play the complete clip. Where the inspector shows opacity from 0 to 1, these targets are 0 and 1 rather than 0 and 100.
The fade context commands create a shaped, segmented curve rather than a single straight ramp. Remove unwanted interior points before building the four-point example. Use the existing graph as a starting point when its softer transition suits the show.
Exercise: record a movement with exact values
Keyframe Record writes supported numeric parameter changes at the current playhead. It works with inspector changes and supported direct manipulation in Preview. It records values; it does not record a movie.
1. Create a ten-second title clip starting at zero. Place the playhead at the clip start and select that clip.
2. Enable Keyframe Record in the Timeline toolbar. Its label becomes Keyframe Record On.
3. In the position controls, set X to −600 pixels and Y to 0. On a 1920-pixel-wide composition this starts the title 600 pixels left of its centered position. Make an actual value change: entering an unchanged value may not create a point.
4. Move the playhead to 2 seconds and set X to 0.
5. Move to 8 seconds and set X briefly to another value, then back to 0 if necessary to record an explicit hold point.
6. Disable Keyframe Record before making unrelated adjustments.
7. Open the X-position Curve. Verify that the title moves to the center between zero and two seconds and stays there afterward. Inspect its final boundary point and keep it at the center value too.
8. Scrub and play Preview. Add intermediate points near the beginning and end of the move if you want acceleration and settling rather than a constant-speed slide.
For a clip beginning at 20 seconds, use playhead times 20, 22, and 28 seconds for the same local animation. Keep the playhead inside the selected clip while recording. Times before or after it clamp to the clip's beginning or end. Turn recording off as soon as the animation is complete to avoid recording later corrections unintentionally.
Record while stopped first: this gives deliberate, easy-to-check points. Continuous gestures during playback can overwrite the traversed section and create additional samples. Inspect the graph afterward rather than assuming every recorded gesture is a clean two-point move.
Anim: repeating motion in Switcher, Grid, and Timeline
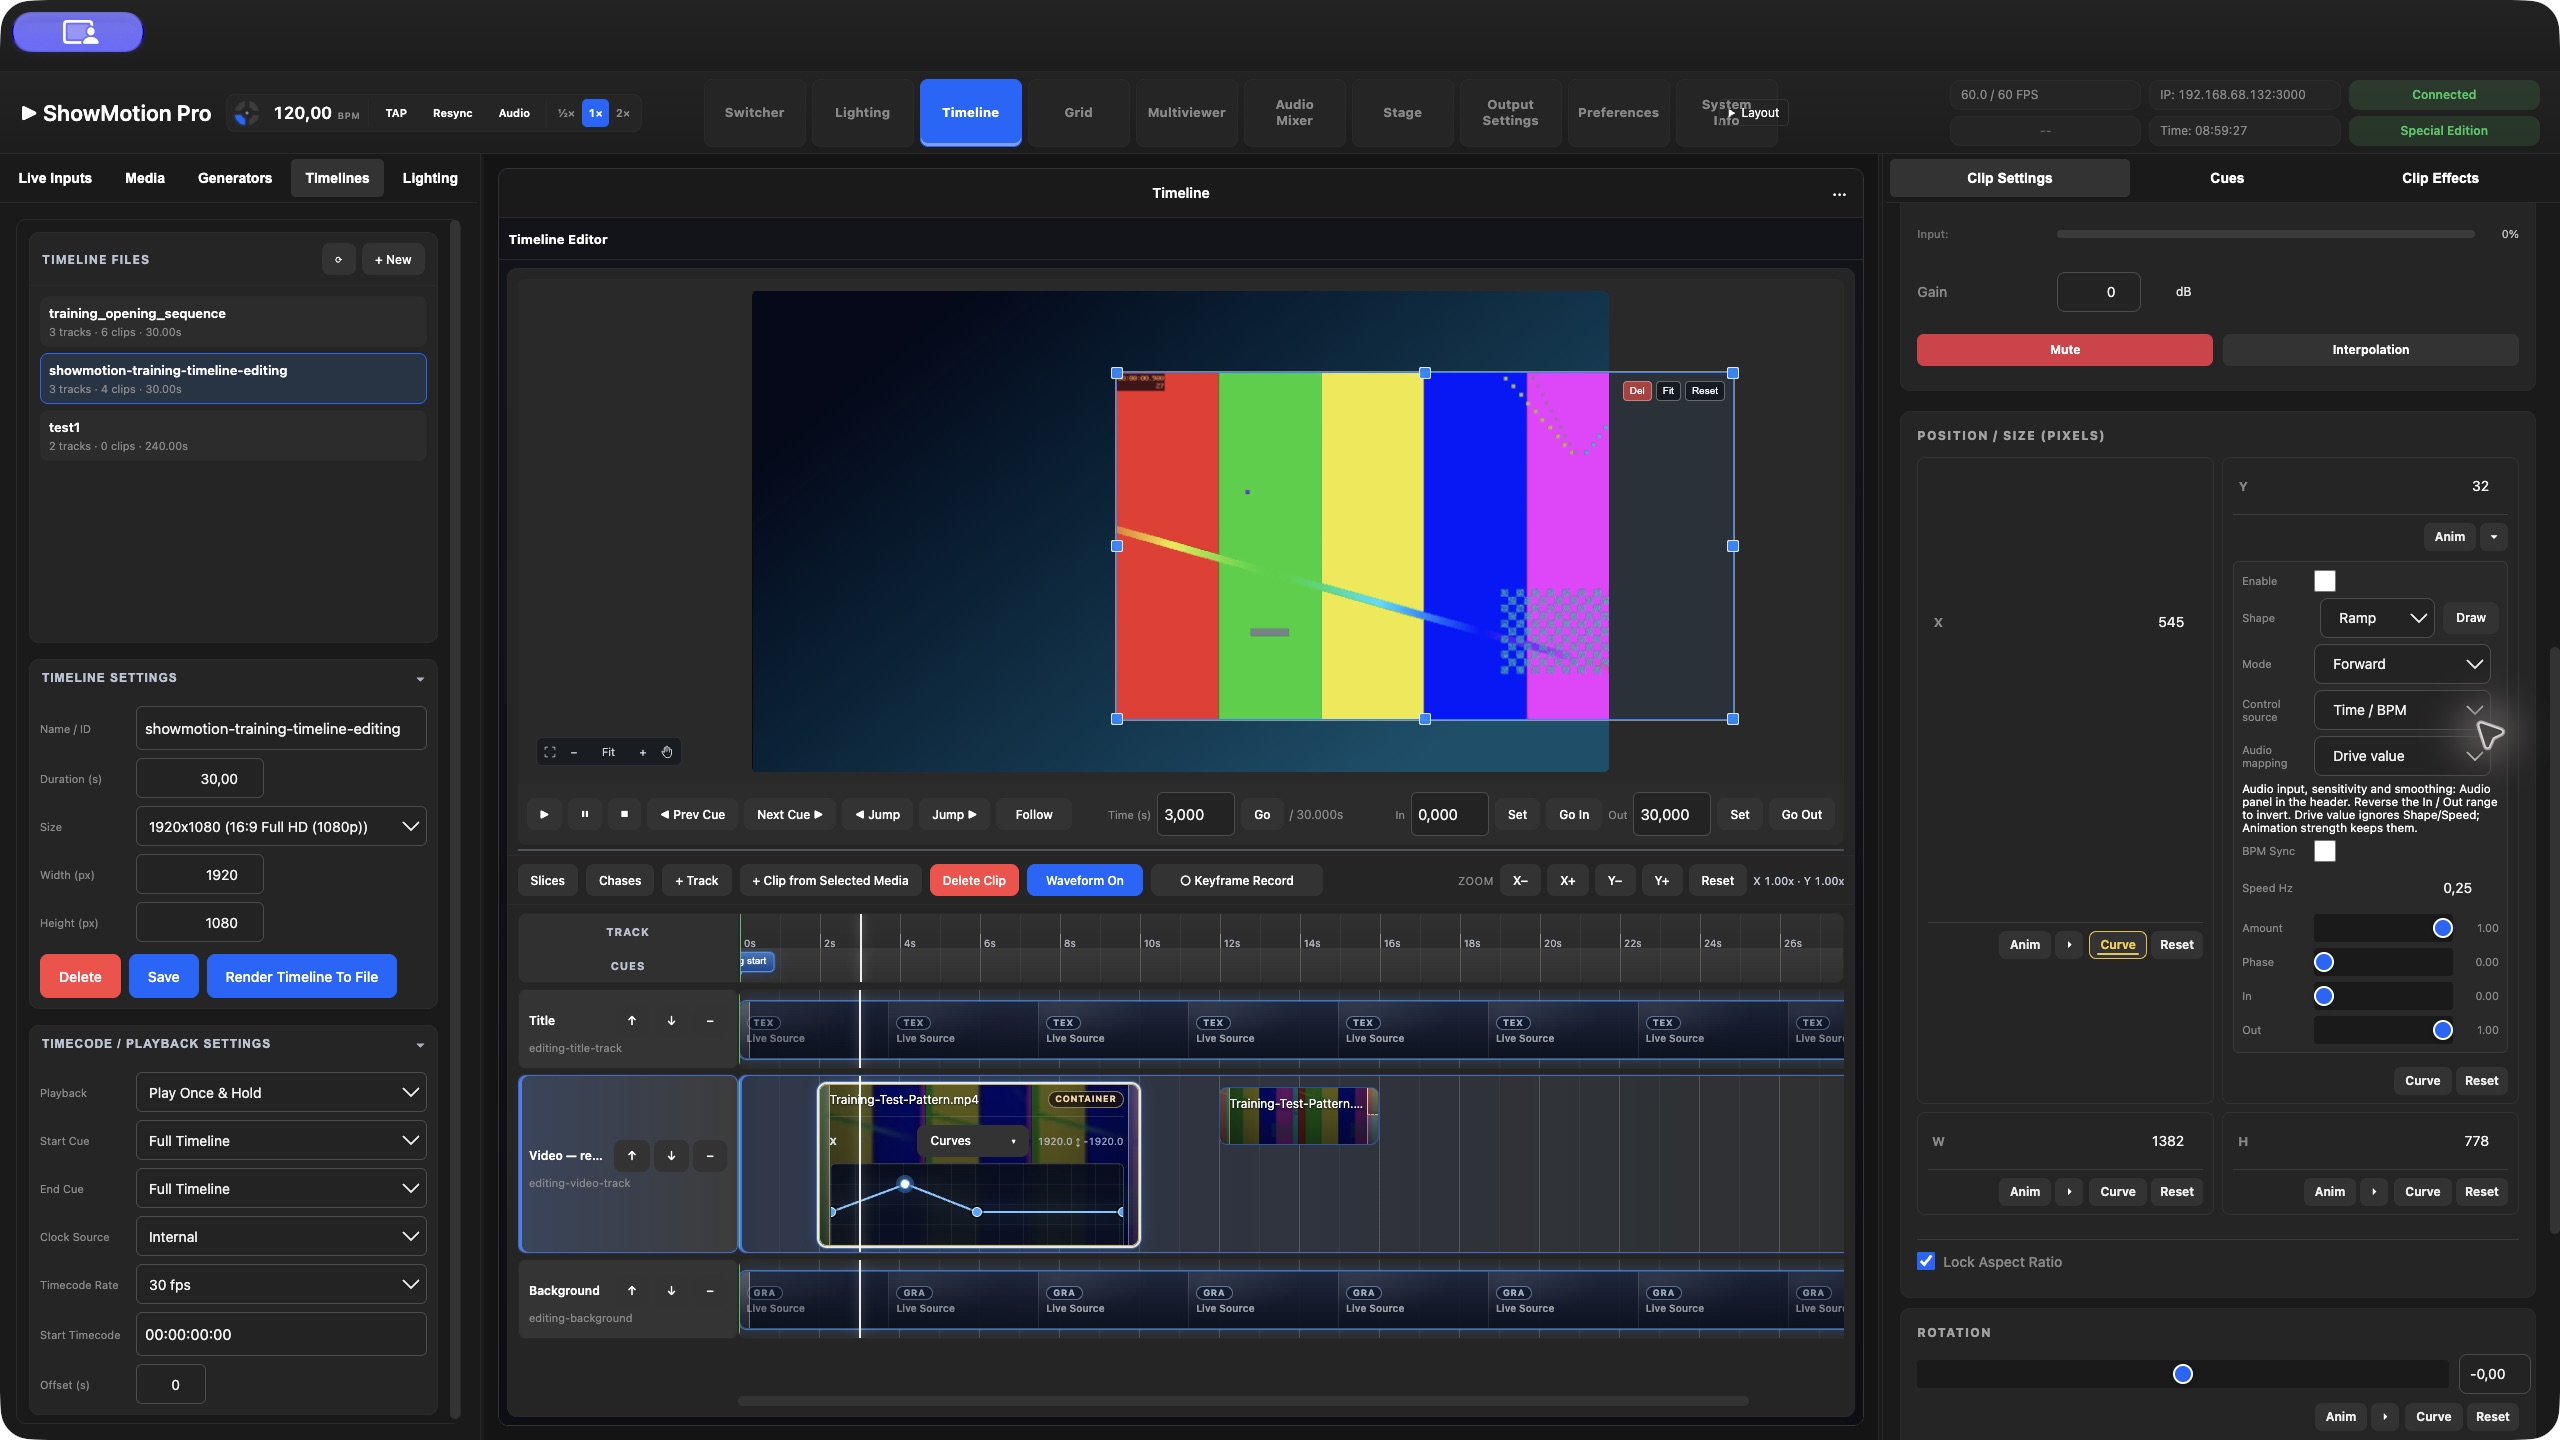
Anim appears beside supported numeric parameters, including many layer, generator, and effect controls. The small arrow beside it opens Animation details. Clicking Anim, or changing Enable in the panel, enables or disables that animation. Expanding the panel alone does not enable it.
In Switcher, select the intended PVW or PGM layer before editing. In Grid, select the intended slot to edit that slot's parameters. A Grid layer also has its own opacity animation in layer settings: this affects the active content in that layer rather than only one slot. In Timeline, select a clip to work on its parameter controls.
| Control | What it means |
|---|---|
| Shape | The value pattern during one cycle: Ramp, Triangle, Sine, Square, Random, or a saved custom shape |
| Mode — Forward | Traverse the shape from beginning to end, then repeat |
| Mode — PingPong | Traverse the shape forward and back during one cycle |
| Speed Hz | Cycles per second when BPM Sync is off. 1 Hz takes one second; 0.25 Hz takes four seconds |
| BPM Sync / Beats / cycle | Derive cycle duration from the shared tempo instead of Speed Hz |
| Amount | Blend between the parameter's normal value and the animated value. 0 keeps the normal value; 1 applies the full animated range |
| Phase | Offset the starting position within the repeating cycle, from 0 to 1 |
| In / Out | Lower and upper traversal targets expressed as fractions of the parameter's available range. Reverse them to invert the motion |
| Draw | Create or edit a reusable custom shape |
Ramp rises from In to Out and jumps back at the cycle boundary. Triangle rises and falls. Sine changes smoothly and begins at its midpoint at zero phase. Square switches between the two ends. Random holds a randomly chosen value during each cycle and chooses another on the next one. Applying PingPong to Triangle folds a shape that already rises and falls; use Ramp with PingPong for a simple outward-and-return movement.
These are repeating animations. Anim has no one-shot, stop-at-end, or dedicated restart-at-TAKE control. Visual parameter oscillators use the ongoing rendering clock, or shared tempo with BPM Sync. Do not assume that launching a Grid slot, pressing TAKE, or restarting source video resets them to zero phase. Use a Timeline Curve for a repeatable, clip-relative entrance and exit. A Timeline pause holds its clip-relative curve position; a time-driven Anim may continue moving.
If an edited Timeline Curve and ordinary Anim both address the same parameter, the curve supplies that parameter's time-dependent value. They are not two independent motion layers that automatically add together. Reset the Curve when you want the cyclic Anim to control it again. Audio modulation can further affect the result when deliberately enabled.
Exercise: pulse a background between 50% and 100%
1. In Switcher PVW, select a background layer. Set normal opacity to 100%.
2. Expand the opacity Anim details and enable it.
3. Set Shape: Ramp, Mode: PingPong, Speed Hz: 0.25, Amount: 1, Phase: 0, In: 0.5, and Out: 1. Leave BPM Sync off and Control source on Time / BPM.
4. Observe one four-second cycle: opacity travels from 50% to 100% and back to 50%.
5. Reduce Amount to 0.5. With the normal value at 100%, the pulse now spans approximately 75% to 100%.
6. Disable Anim to restore the normal steady opacity.
Repeat the same settings on a selected Grid slot to pulse that item. Use Grid layer opacity animation to apply the pulse across whichever slot is active in that layer. When Grid layer opacity animation is enabled, it takes precedence over the slot's opacity animation; slot opacity and transition fades still contribute to the final opacity. Keep only one animated opacity level active while learning the relationship.
Reuse a curve between workspaces
In a Timeline curve header, click Save Curve, give the shape a descriptive name such as “Title rise and hold,” and save it. User Curves applies saved shapes to other clip channels. A compact layout combines these actions under Curves.
In an Anim panel, choose the saved shape under Shape → Custom Shapes. Its timing now follows the Anim cycle rather than the original clip's duration. A shape saved from a ten-second clip can repeat every four seconds at 0.25 Hz. Its vertical values map into the destination parameter range and the Anim In/Out settings; it does not preserve the original clip's absolute pixel coordinates.
Click Draw to open Animation Shape Draw Tool. Draw freely or double-click to add/select a control point, then drag it. Delete or right-click removes the selected point. Reset Ramp restores a simple rising line, Name identifies the shape, and Save Shape stores it for reuse. These gestures differ from the Timeline graph, where a single click adds a point and double-click removes an interior point.
Saved shapes belong to the personal curve library. When editing a named shared shape, consider its reuse by other Anim controls; save a distinct name for a variation that should remain independent.
Tempo and audio-driven animation
For a beat-based visual pulse, enable BPM Sync, choose 4 under Beats / cycle, and set the shared tempo. At 120 BPM, four beats take two seconds. Changing the tempo changes the pulse rate without rebuilding its shape. Use Phase to offset related layers within the same cycle.
Control source also offers audio Energy, Bass, Mid, High, Transient, and Bass activity. Configure the audio input, sensitivity, and smoothing in the header's Audio panel. Audio mapping → Drive value maps the detected signal directly to the value and ignores Shape/Speed. Animation strength retains the timed shape and uses audio to vary its strength. Reverse In and Out for an inverted response. Check that the input meter responds before diagnosing the animation itself.
Check an animation before a show
If nothing moves, check Enable, Amount, a nonzero In/Out span, and the correct selected layer or clip. If only one parameter ignores Anim, inspect its Timeline Curve. If a fade or move runs at the wrong moment after resizing, check its position within the new clip duration. If a copied shape moves too far, check the destination parameter's range. If a pulse looks doubled, check for PingPong applied to Triangle and for multiple opacity levels being animated. Finally, rehearse both the editor Preview and the actual routed scene: source playback, Timeline playback, and cyclic parameter motion are related controls with different clocks.
12. Build a stage and LED layout
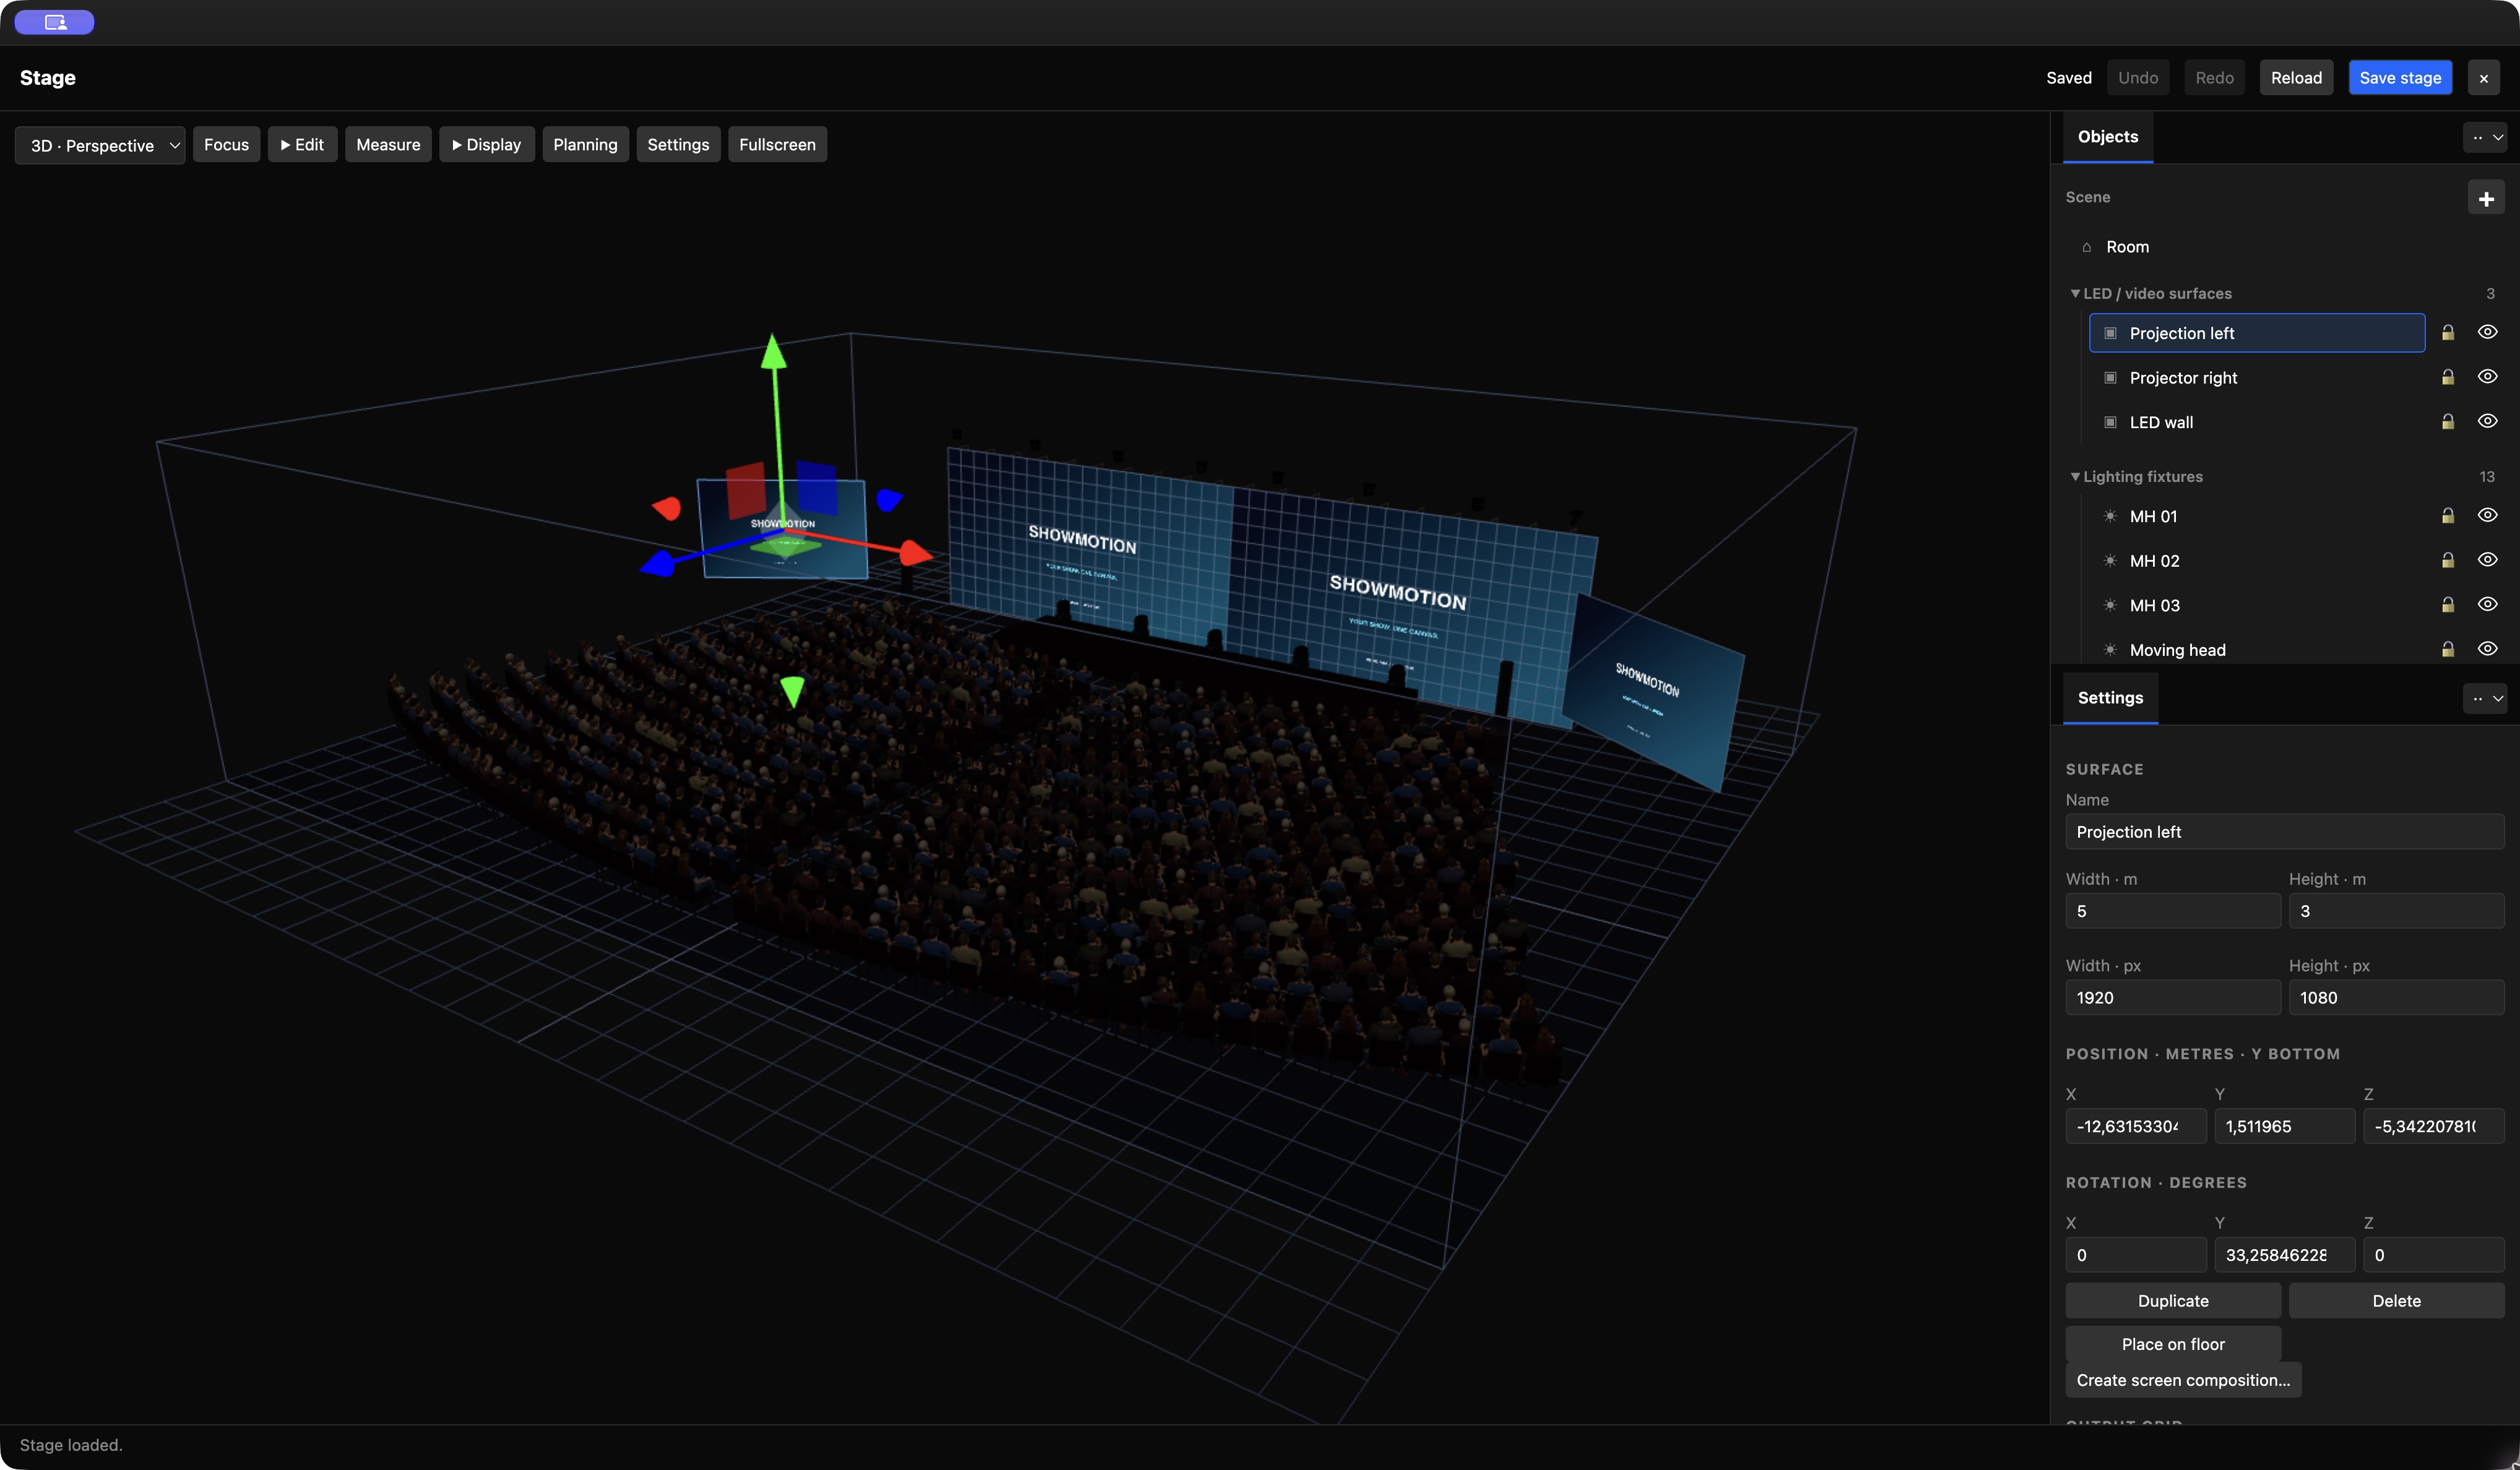
Stage Designer connects physical visualization with the pixel layout used by the show.
Model the space
Set room dimensions in metres. Add and position stage elements, screens and fixtures as required. Use numerical transforms for repeatable dimensions; use the 3D view to check sightlines and placement. Optional audience layouts help communicate scale.
Build an LED wall
1. Create or select the LED surface.
2. Enter panel width and height in millimetres and panel pixel width and height.
3. Set Panels across and Panels high.
4. Set curvature and mounting when needed.
5. Choose Apply panel layout.
6. Check the total physical size and pixel dimensions.
Physical panel size and pixel resolution are separate inputs. A 500 mm panel is not necessarily 500 pixels wide. Use the specifications for the actual panel and receiving configuration.
Map processor areas
Choose the content Screen and define processor areas. The interface can preview virtual outputs or create an output for a selected area. Review canvas sizes, content crop coordinates and wall areas before choosing Create outputs and assign. For an existing output, Assign 1:1 uses the specified pixel offsets.
If the content canvas is too small, a proposed resize changes the live content canvas. Review that change during setup. Use a numbered pixel grid or test pattern to verify orientation, seams and region boundaries at the physical wall.
Test on real outputs replaces live content on the selected outputs until stopped. Use it during setup and stop the test before returning to show playback.
13. Integrate lighting
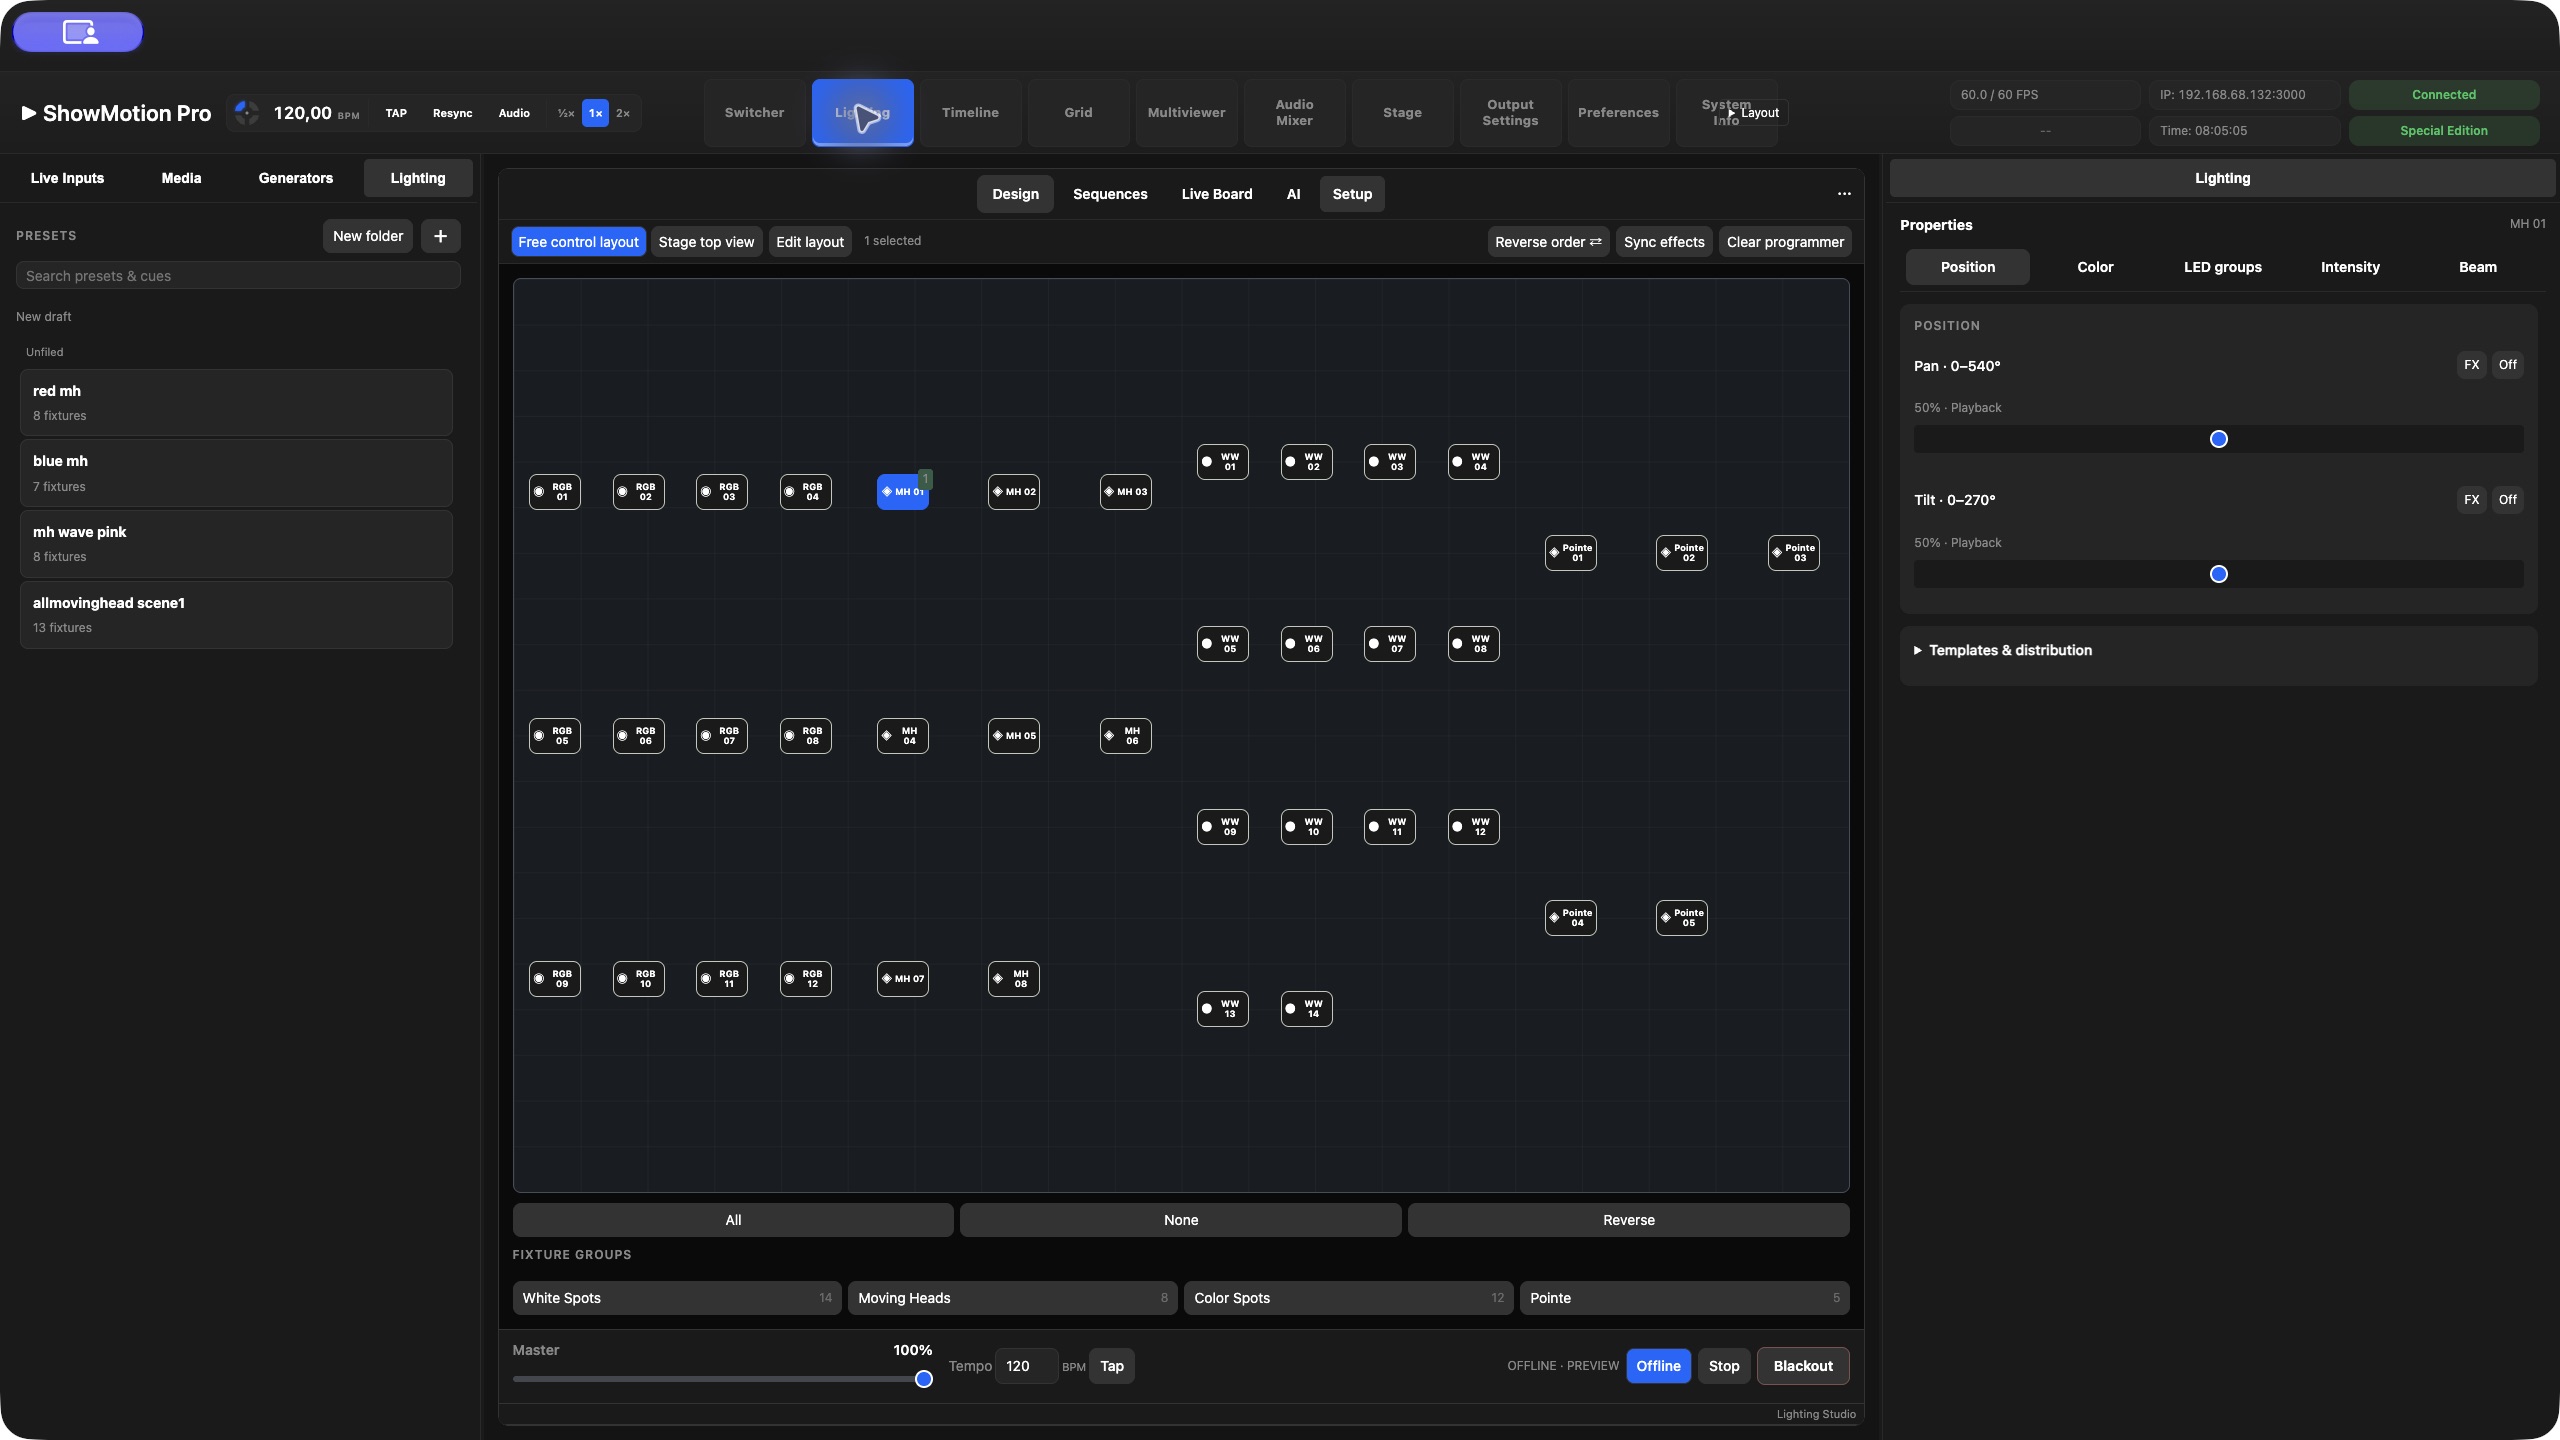
Lighting Studio provides fixture patching, groups, presets, effects, cues, sequences and a live board. The workspace exposes areas such as Fixtures & Patch, Fixture groups, Presets & effects, Cues & sequences and Live Board.
Prepare fixtures and looks
1. Select the correct fixture profiles and modes in Fixtures & Patch.
2. Assign fixture addresses and universes to match the physical rig.
3. Organize fixtures into named groups.
4. Place fixtures in Stage Designer and verify their orientation.
5. Build a simple preset and inspect the visualization.
6. Test its output against the actual fixtures before building complex cues.
The visualizer helps with programming and review. Real optics, calibration and fixture modes still determine the physical result.
Integrate with video
Place lighting presets and cues into Switcher, Timeline and Grid workflows so video and light can be recalled together. Check the target preset/cue, triggering point and behavior when a scene is recalled, a Grid slot restarts or a Timeline seeks.
Start with one lighting action and one visible video change. Once their relationship is correct, expand the sequence. Rehearse both the transition into a look and the transition out of it.
14. Mix and route audio
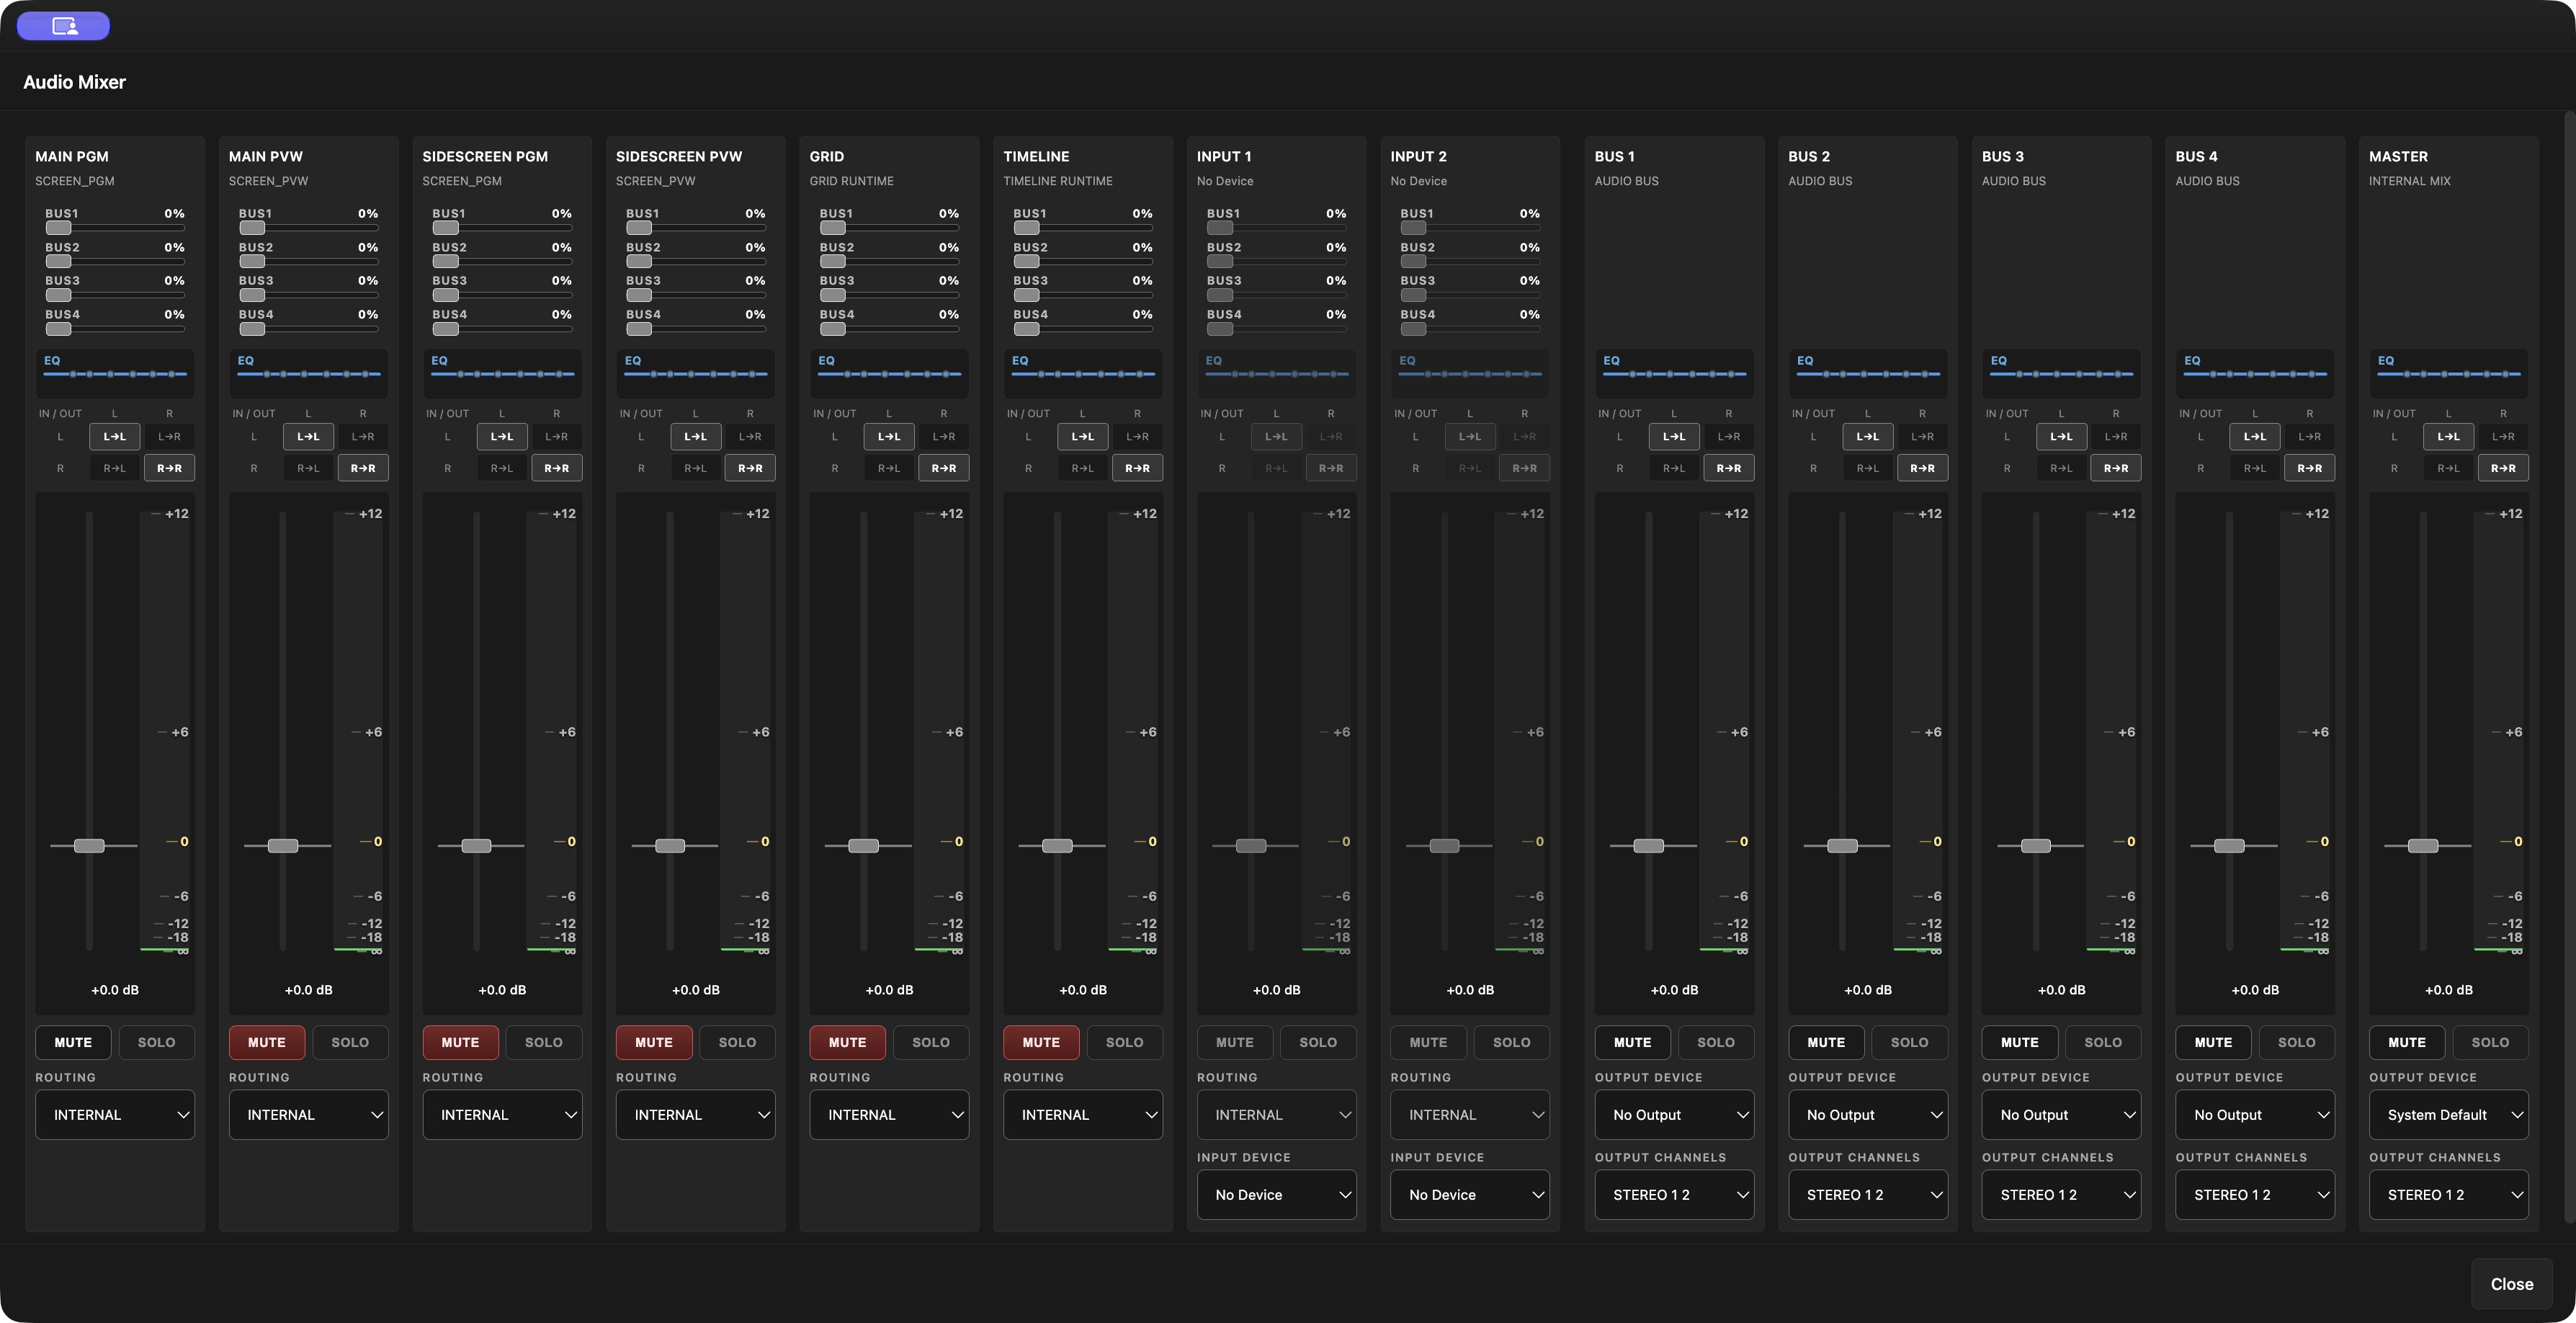
Open Audio Mixer or its dedicated window. The mixer provides source and composition channels, level controls, mute, EQ, buses and routing. Audio files can be used directly in Grid and Switcher.
1. Play a source and confirm its channel meter moves.
2. Check its fader and mute state.
3. Use the routing matrix or channel routing to choose the intended bus.
4. Check bus level, output device and channel assignment.
5. Confirm the audio selection on streaming and recording outputs.
6. Listen at the final destination and check synchronization.
Separate preview monitoring from the audience mix where the routing allows it. A visible video layer does not prove its audio reaches the intended device. After changing hardware, check that output-device assignments still point to the correct device.
Understand channels, buses and destinations
A source channel is where you adjust an individual signal. A bus combines signals for a purpose. An output device/channel assignment sends a bus to physical audio channels; a streaming or recording output can select an audio mix separately.
The mixer provides Internal/Master and Bus 1–4 options, with send controls. A send adds a contribution to a bus; inspect both the main routing and sends if a signal seems duplicated. Do not assume that lowering one channel or changing the selected Screen silences every route carrying that source.
Exercise: program sound with separate preview monitoring
1. Choose the intended physical output device and channel pair for the audience mix.
2. Play a test audio file on a rehearsal source and find its mixer channel.
3. Route it to the intended mix, begin at a low listening level and raise the source fader deliberately.
4. Create the preview-monitoring route using a separate bus/device assignment where supported.
5. Start a Preview source and confirm it is audible only where intended.
6. Take the source live and confirm its program behavior.
7. Select the same intended program mix for a test recording and listen to the resulting file.
The expected result is explicit control over what the audience, operator and recording receive. If Preview audio leaks into the audience feed, inspect routing and sends before using mute as a temporary fix. If a recording is silent while the room sound works, inspect the recording's selected audio source.
Faders, mute and EQ
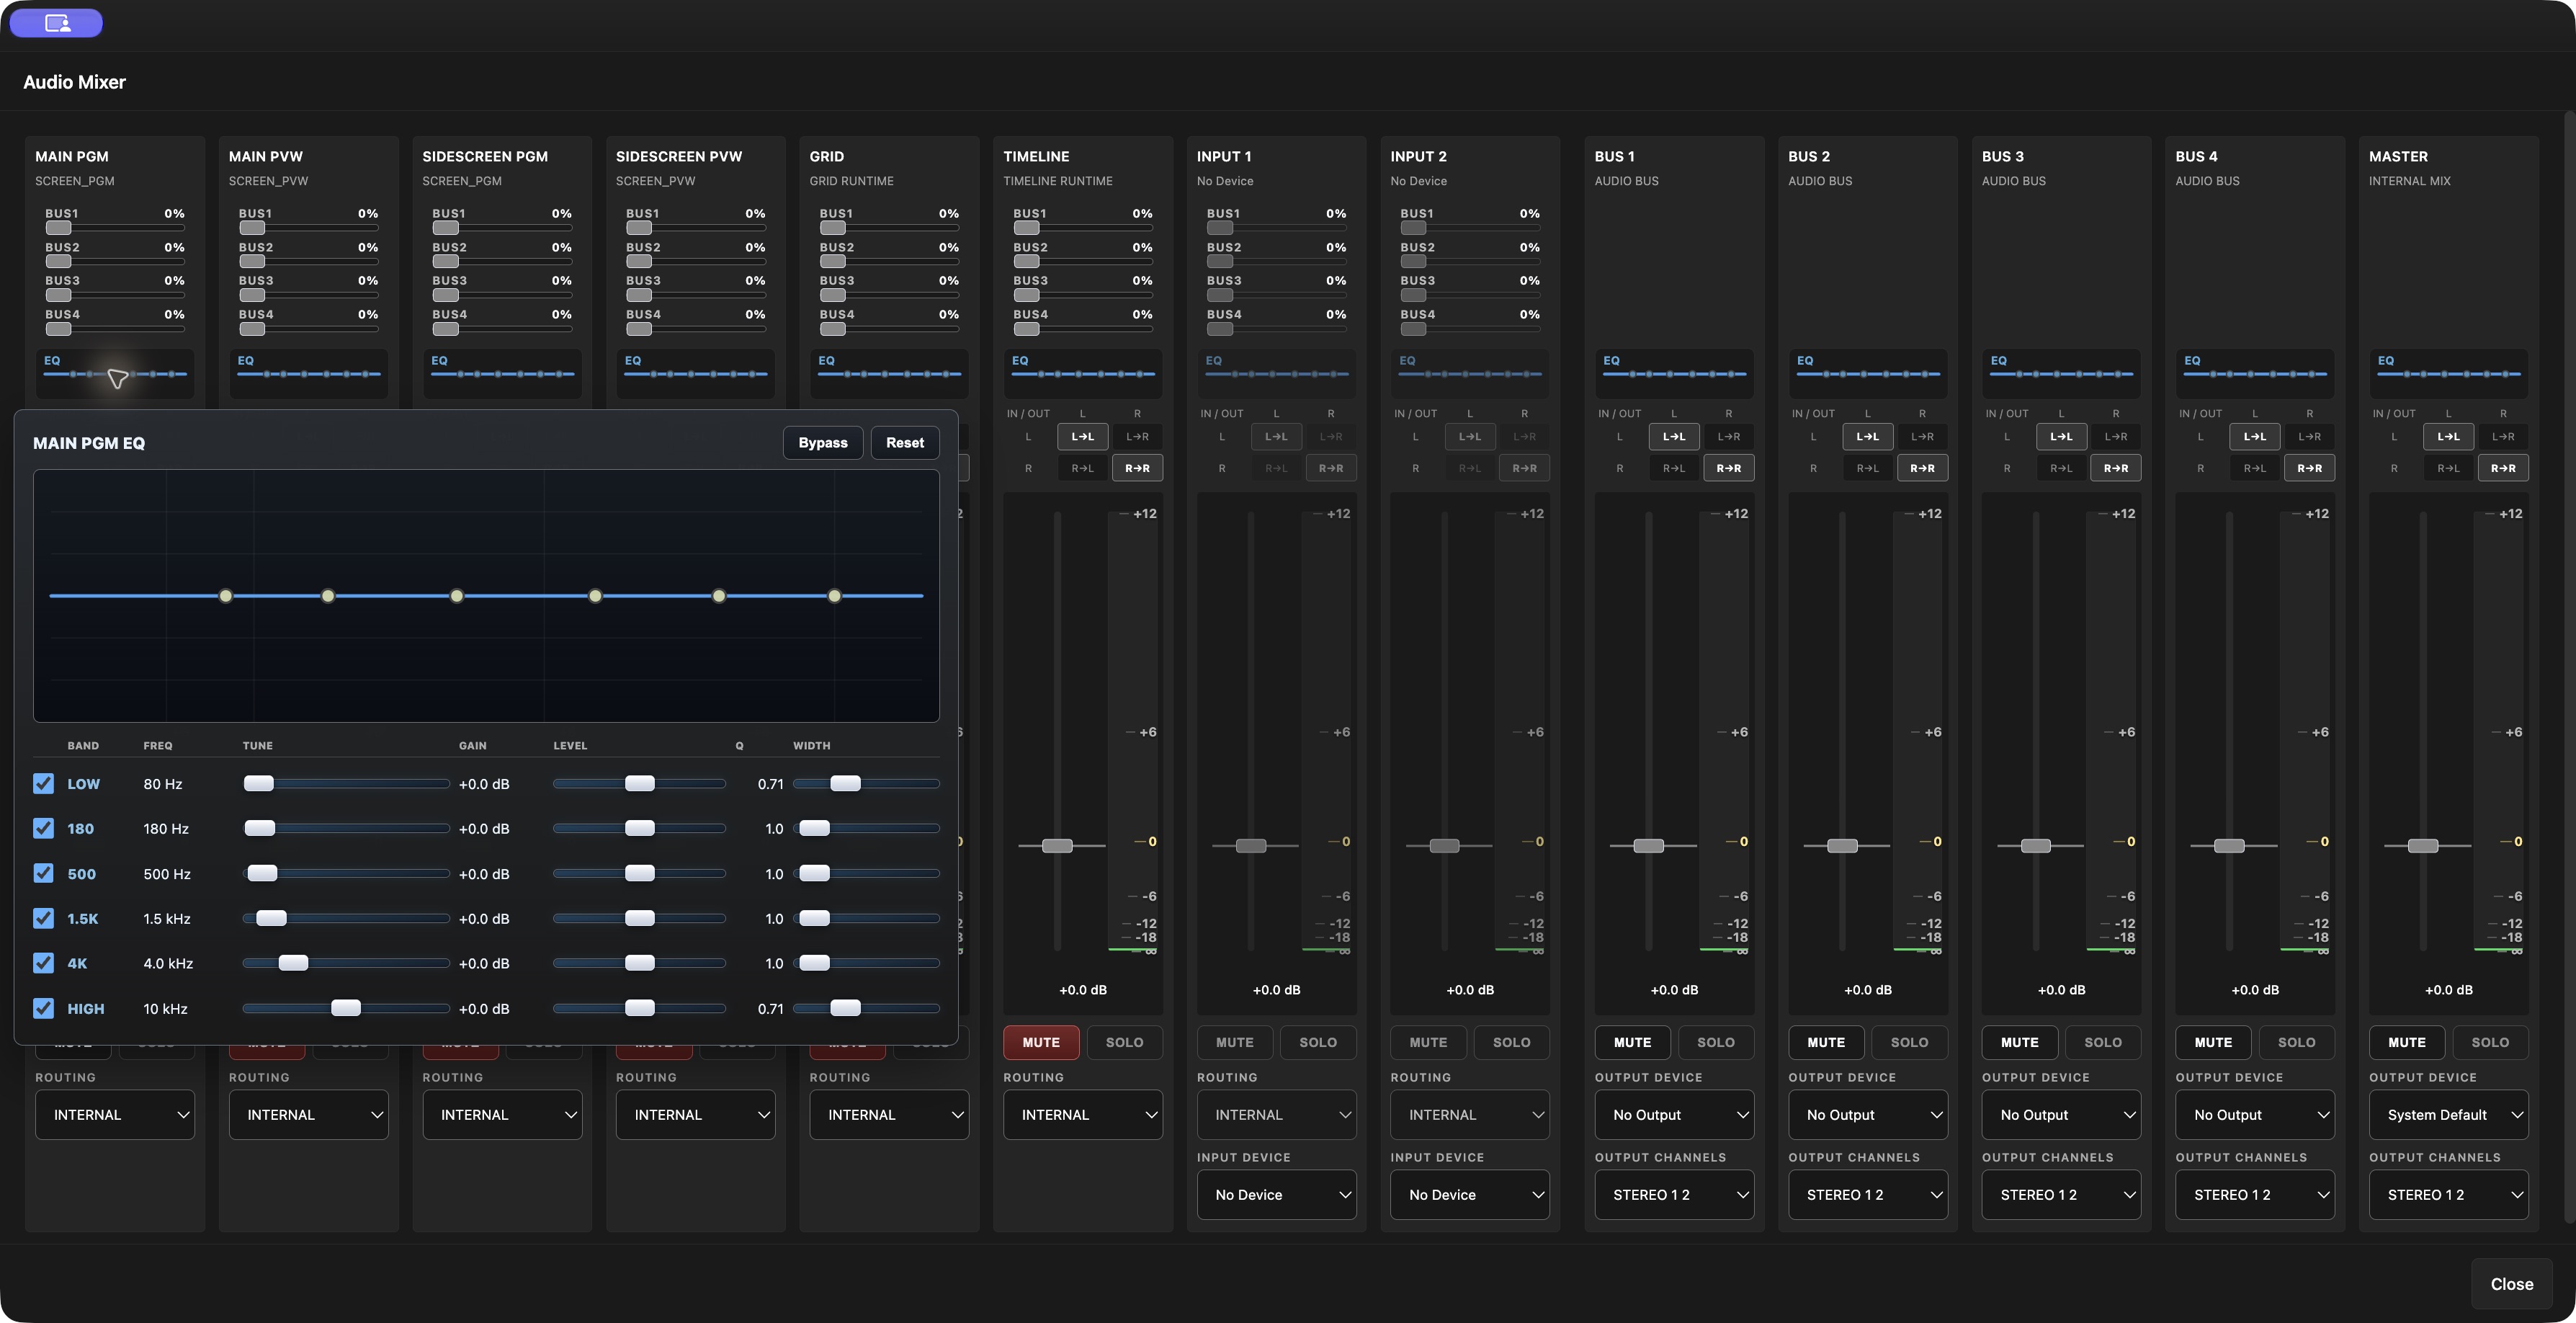
Faders are measured in dB. Make level changes while watching the meter and listening at the destination. Use mute to remove a signal from the intended channel path and verify downstream meters. EQ shapes tone; it is not a substitute for correcting a wrong output device or missing route.
For high-resolution media, audio continuity and synchronization must be checked under representative load. Test a spoken section or an obvious picture/sound event. A moving meter proves signal presence, not that picture and sound reach the destination at the same time.
15. Connect live sources
An input brings a picture into the Engine. A layer places that picture inside a Screen, Grid or Timeline. An output sends a mapped composition to a display, network receiver or file. Connecting an input does not automatically put it on air; enabling an output does not automatically choose the right composition.
For a presenter camera, the complete path is: camera → capture input → Preview layer → TAKE → Program Screen → output region → audience display. If the camera is visible in Preview but missing from the audience display, work forward along this path. Do not repeatedly change the camera settings when the output is accidentally reading a different Screen.
All capture devices, local displays and network interfaces belong to the Engine computer, including when you operate through Web Remote. A webcam connected to the remote laptop is not automatically an Engine input.
Choose an input
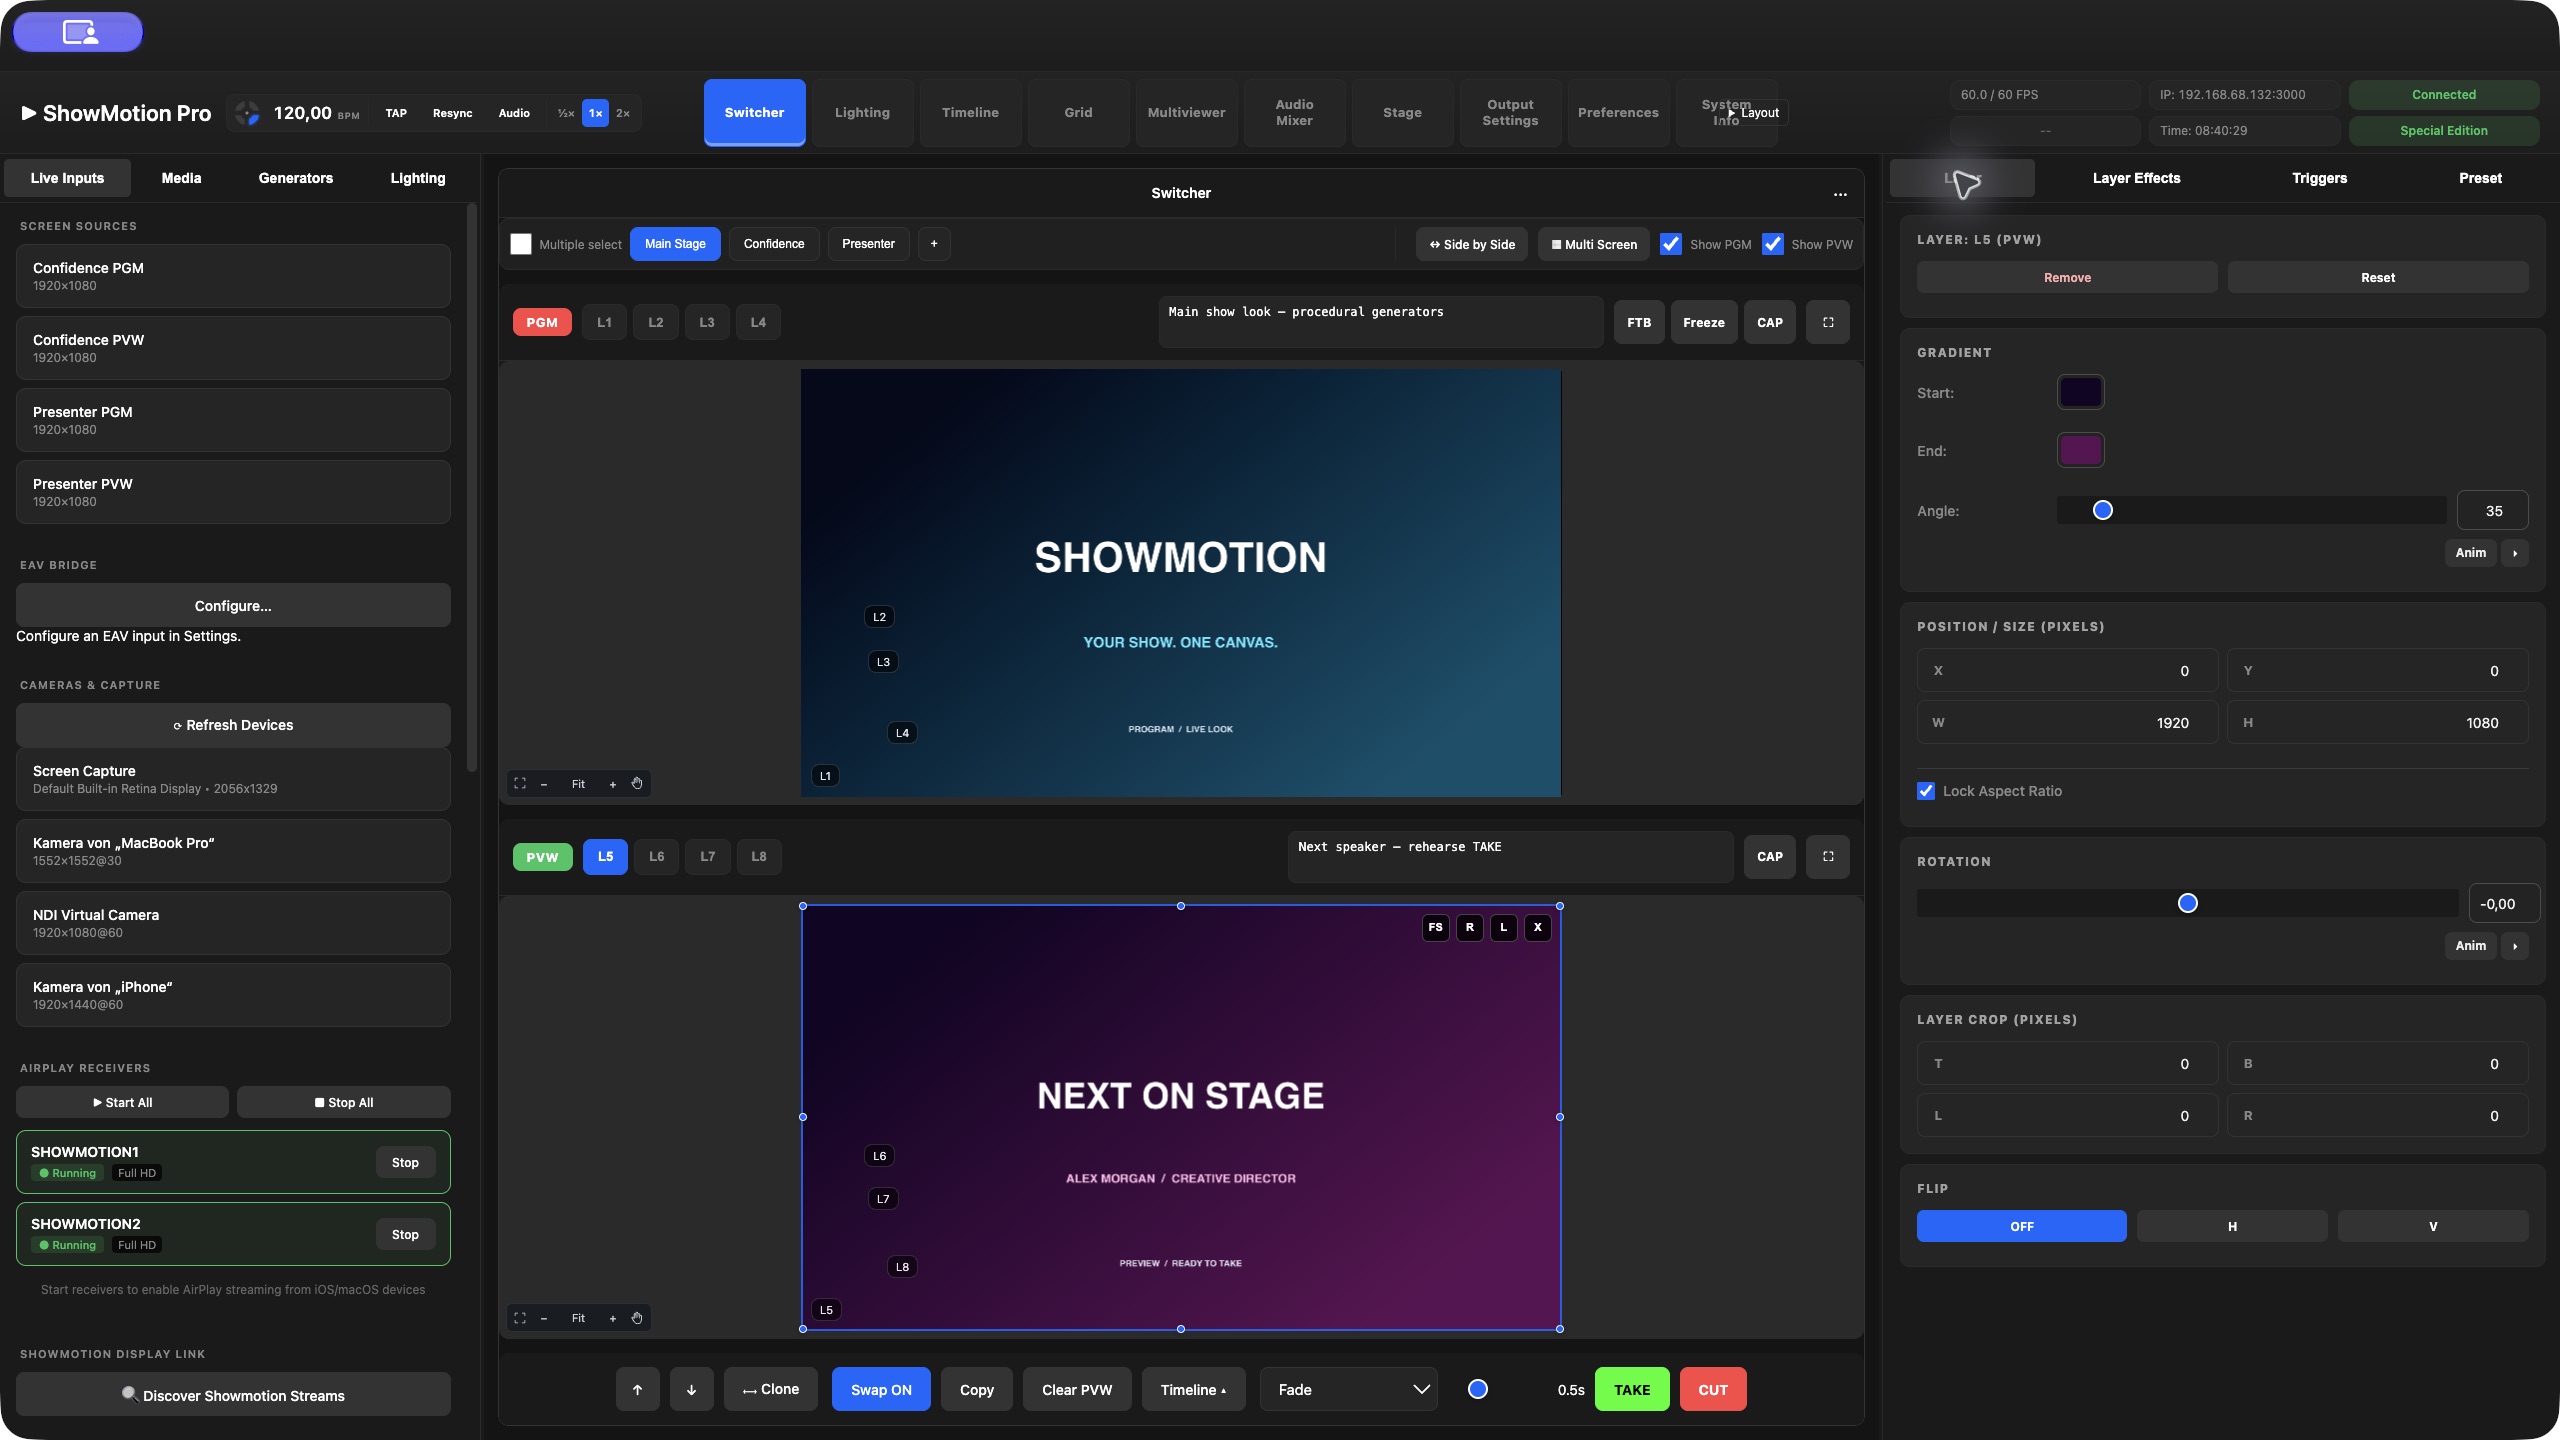
| Your source | Use | What must exist first |
|---|---|---|
| USB camera or HDMI/SDI capture | Cameras & Capture | A detected camera or capture device, its required driver and a supported incoming signal |
| A presentation application on the Engine Mac | Screen Capture | macOS capture permission and the intended display, application or window |
| Another Apple device presenting wirelessly | AirPlay Receivers | A running ShowMotion receiver reachable from the sending device |
| A camera or application sending NDI/OMT | OMT & NDI Sources | The source already transmitting on a reachable network |
| Another Syphon application on the Mac | Syphon Sources | The application running and publishing its Syphon server |
| A remote SRT encoder | SRT Receiver | Matching URL, connection mode and encoder configuration |
| Existing ShowMotion display stream | ShowMotion Display Link discovery | A compatible discoverable ShowMotion sender |
| UniFi EAV device | EAV Bridge → Configure… | Supported bridge hardware, device access and a known stream channel |
| Macnica or Blackmagic professional IP video | ST2110 / IPMX Inputs | Detected supported hardware and a commissioned IP video system |
| An existing ShowMotion composition | Screen Sources, or a Grid/Timeline route | The source composition and a deliberate whole-composition or layer selection |
The input list describes available connections. It is not a guarantee that every camera, IP device or stream format works. Hardware sections appear only when the associated devices are available.
Add a camera or presentation capture
1. Connect the camera or capture adapter to the Engine Mac and start the external video source.
2. Open Live Inputs → Cameras & Capture → Refresh Devices. Identify the device by name, not just its position in the list.
3. Drag its source card into the intended PVW scene. Select the new layer to inspect its source settings and transform.
4. Check motion, aspect ratio, crop and input format. Blackmagic capture cards show signal auto-detection; IP devices expose additional Input Settings.
5. Arrange the picture in Preview, then use TAKE when ready. Verify the audience output independently.
For a presentation running on the Engine Mac, drag Screen Capture instead. In Layer Parameters, choose display, application or window and the intended target. Capturing a whole display includes everything visible on it; selecting the presentation window is usually easier to control. Move the presentation, reopen it and rehearse target restoration before show day. Avoid capturing the ShowMotion preview that is itself showing the capture: that produces a repeating picture.
If a capture is black, first confirm macOS permissions on the Engine Mac, then the chosen target and the external device's signal. A source name in the list proves discovery, not valid video. Check audio separately in the mixer; a video capture layer alone does not establish its audience audio route.
Receive NDI, OMT, Syphon or AirPlay
For NDI/OMT, start the sending device or application, choose Discover OMT & NDI Sources, then drag the correct source into Preview. Use the host and source names to distinguish similarly named cameras. Confirm motion before adding effects. If discovery is empty, check that both endpoints are on the intended network and that the network permits the discovery and media traffic; changing the Screen resolution cannot fix discovery.
An NDI camera can expose PTZ controls in the selected layer's inspector when the camera reports support. Rehearse pan, tilt, zoom and preset recall off air. The preset controls include Store: storing overwrites the camera preset rather than merely recalling it. Program/Preview tally is also dependent on source support; verify at the camera.
For Syphon, open the sending application on the same Mac and publish its server, then choose Discover Syphon Sources and drag the server into a layer. Syphon shares a picture between local applications; it is not a network destination. Plan audio separately.
For AirPlay, start the required receiver in AirPlay Receivers. On the sending iOS/macOS device, select that receiver as the mirroring destination. Place the receiver source in Preview and check orientation and presentation transitions. Receiver availability and a successful wireless connection should be rehearsed on the actual venue network. Stop All affects every ShowMotion AirPlay receiver, so use it deliberately.
Configure SRT reception
In SRT Receiver, enter the URL and choose Listener, Caller or Rendezvous. A listener waits on the Engine host; a caller connects to the remote endpoint. Enter matching Latency, Stream ID and Passphrase where required, choose + Add SRT Receiver, then drag the resulting source card into Preview. A saved card is only the connection configuration: check that frames actually arrive after placing it in the composition.
For a local rehearsal, a listener can use srt://0.0.0.0:9000; configure the sender to call the Engine Mac's actual address and port 9000. 0.0.0.0 is a local listening address, not a remote destination. Across routed networks, the network administrator must arrange the appropriate UDP reachability. Prefer the separate credential fields over embedding secrets in a visible URL. This chapter demonstrates video reception; do not infer an audio route from the picture.
EAV and professional IP inputs
An EAV Bridge connects an HDMI device to your show network. A bridge beside a presentation laptop sends video into ShowMotion; a bridge beside a display receives a ShowMotion output. Inputs and Outputs are named from ShowMotion's perspective.
EAV setup: prepare the hardware and UniFi site
1. Connect the bridge's Ethernet/PoE+ port to a suitable powered network port. Connect the Engine Mac by wired Ethernet to the intended media network. The bridge supports HDMI 2.0 up to 4K60 and has a Gigabit Ethernet connection; plan switch capacity for the number of simultaneous streams. See the Ubiquiti installation guide and hardware specifications.
2. Open the UniFi management application for the site that owns the bridge, using your site's console/server address or UniFi Site Manager. Complete adoption and any required provisioning before show setup. If a bridge already belongs to another site, ask its administrator to arrange the transfer; resetting it erases its existing configuration.
3. Select the bridge in the device inventory. Give it a recognizable name, record its IP address and configure its physical role: sender for an HDMI source going into ShowMotion, receiver for a display taking a ShowMotion output. UniFi's exact EAV labels depend on the installed version. ShowMotion's current device controls cannot switch the physical bridge's role; do that in UniFi first.
4. Arrange stable addresses with the network administrator, for example DHCP reservations. Record the bridge's address, the Engine Mac's media-adapter address, the role and intended Stream-Channel. A browser connected from another computer does not make that computer's adapter the media interface.
5. Connect the laptop to HDMI IN on a sender, or the display to HDMI OUT on a receiver. Finish provisioning and verify the device is online before opening ShowMotion's connection editor.
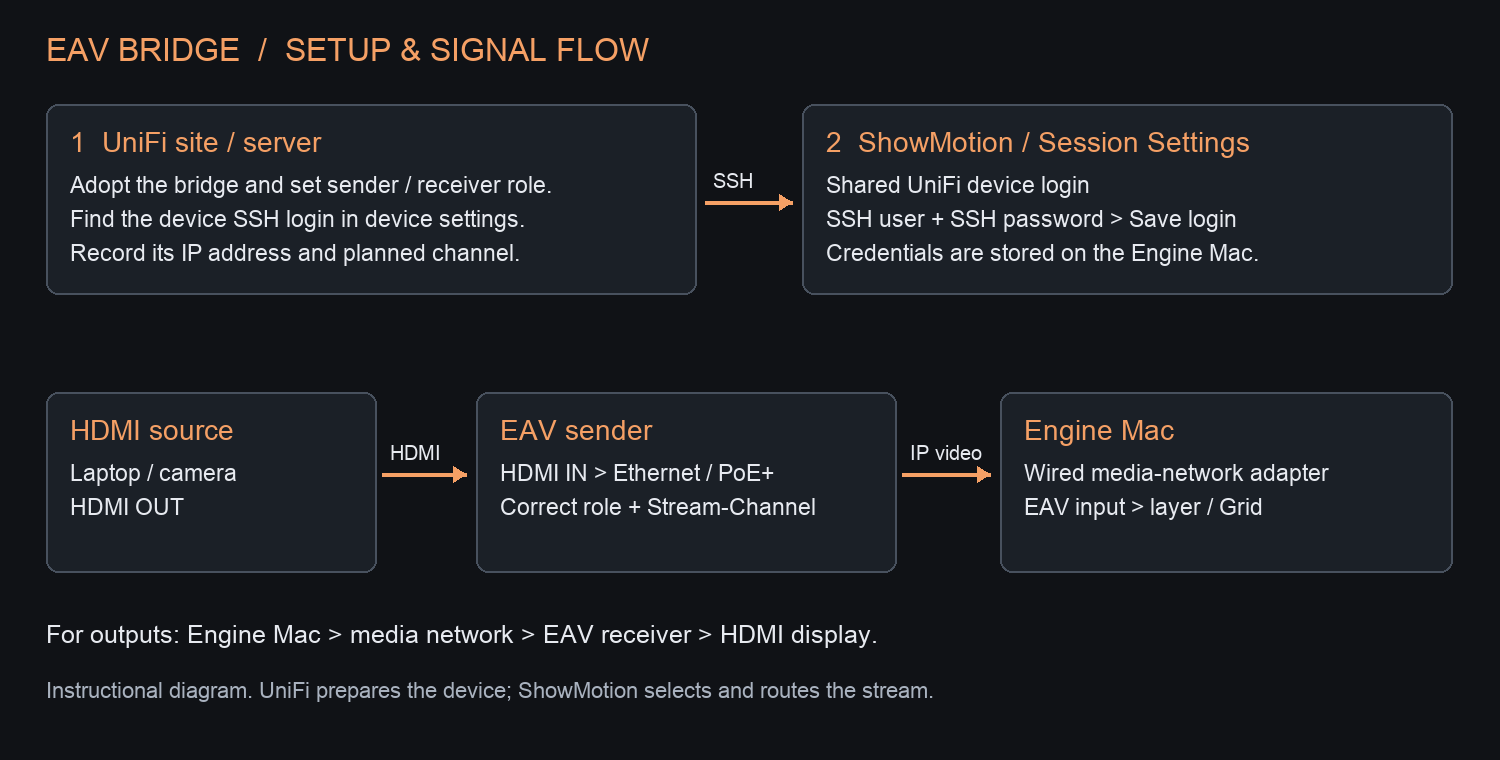
Find the device SSH credentials
Use the device SSH login managed for the bridge's UniFi site. It is separate from both your UI account and the UniFi console's own SSH login.
In the current UniFi Network interface, open UniFi Devices → Device Updates and Settings → Device SSH Settings → Device SSH Authentication to view the device username and password. Device Updates and Settings is at the bottom left of the Devices page. Ask the site administrator for these credentials if your account cannot access them. Menu placement can differ between UniFi versions; verify that the credentials apply to the adopted EAV device. See Ubiquiti's device SSH instructions.
Do not copy the console password from Control Plane → Console → SSH, or use an account's email address as the bridge username. You do not need to reset the bridge or run shell commands to enter its existing device login in ShowMotion.
Save the shared login in ShowMotion
1. In Live Inputs, open EAV Bridge → Configure…, then select Session Settings.
2. Under Shared UniFi device login, enter SSH user and SSH password, then choose Save login. ShowMotion stores the password in macOS Keychain on the Engine Mac. New input and output connections use this shared login automatically.
3. When a password is already saved, leaving the password field blank keeps it. Forget login removes the stored shared login; it is not a disconnect button for one bridge.
4. If a bridge needs different credentials, open its Config → Device access, disable Use shared, and enter that device's SSH address, port and login. The normal SSH port is 22. Save its password with the device's Save password control. SSH key/agent authentication requires a separately prepared Engine host.
5. Use Verify host key… when device identity needs confirmation. Compare the fingerprint with a trusted record from the administrator before accepting it. Investigate an unexpected changed key, especially after an address has been reused.
A remote browser controls this setup, but the Engine Mac performs the device connection and owns the Keychain entry. Moving to another Engine requires configuring access on that Engine too. Keep credentials out of screenshots and shared project notes.
Bring an HDMI source into ShowMotion
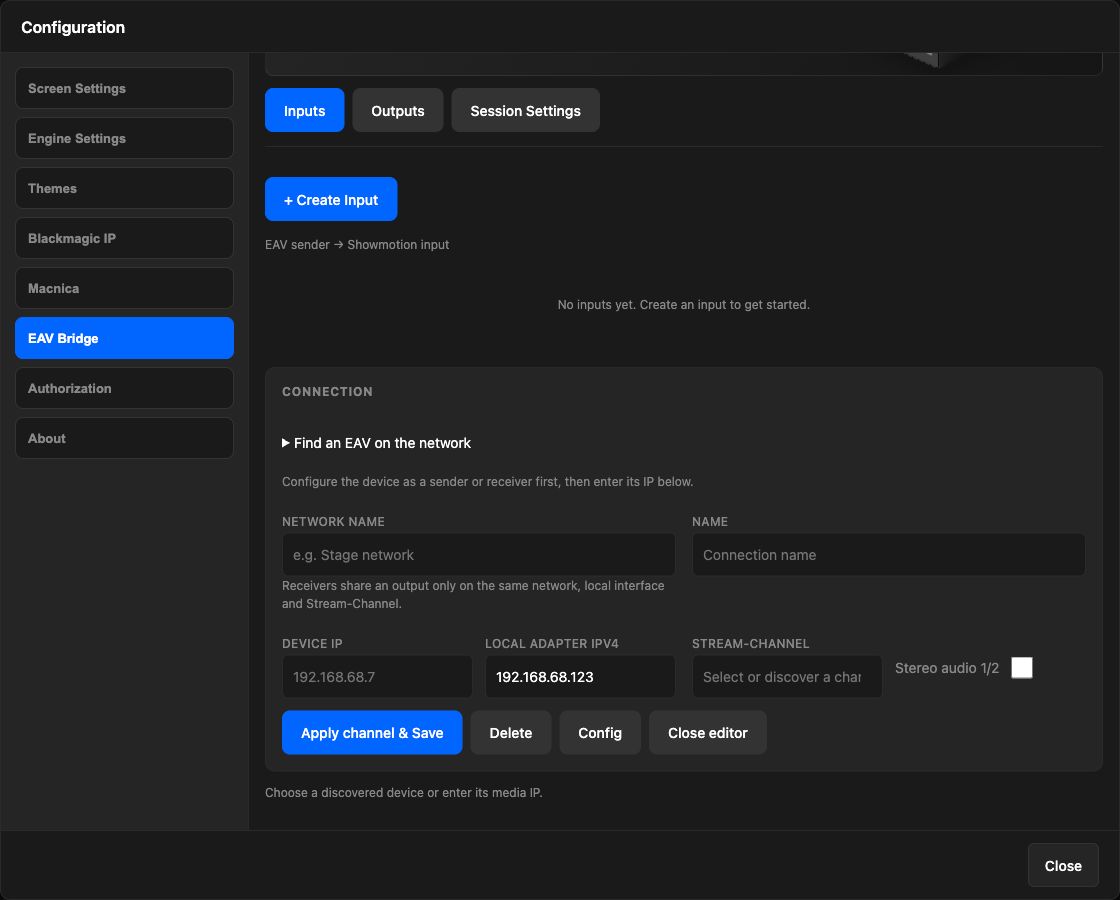
1. Select Inputs → + Create Input. Expand Find an EAV on the network, select the intended Network interface, then choose Find devices. Alternatively enter the known Device IP manually.
2. Enter a useful Name, such as Presentation laptop, and a Network name for your setup. Local adapter IPv4 must be the Engine Mac's address on the media network. It is not the bridge address or the UniFi server address.
3. Enter the intended Stream-Channel. Use a different channel for each independent sender on the same network. Enable Stereo audio 1/2 only when you want that source's audio as well as its picture.
4. Open Config, then Connect / read status. Check that the active role is sender and inspect the active/saved channel values. Reading status does not change the device role or prove that video is arriving.
5. Choose Apply channel & Save and read the confirmation. A sender channel change applies video and audio settings and may briefly interrupt connected services. UniFi provisioning can overwrite device changes later, so recheck after provisioning or a restart.
6. Close the editor, find the source card in Live Inputs, and drag it into Preview or a Grid cell. Check moving content, text legibility, the expected aspect ratio and audio before taking it live.
For example, keep Presentation and Presenter Notes as separately named sources when two HDMI feeds are available. A bridge transports the HDMI feed connected to it; it does not create a second desktop or speaker-notes output by itself.
Send ShowMotion to an EAV receiver
1. Prepare the physical bridge as a receiver in UniFi and connect its HDMI OUT to the display.
2. In ShowMotion, choose Outputs → + Create Output. Select the receiver, Engine adapter and Stream-Channel; use the same login process as for inputs.
3. Read the device status in Config and confirm the receiver role. Apply the intended channel. A video-only assignment leaves the device's received audio settings unchanged.
4. Inspect Output receiver groups. Receivers share a ShowMotion output only when their network, local interface and Stream-Channel match. Use separate channels/groups for independent pictures.
5. In Output Settings, create a UniFi EAV Bridge output, choose the configured receiver group and map the desired composition/region. Select audio deliberately where offered; a picture route is not automatically the desired audio mix.
6. Verify the actual display and speakers. Output assignment saved; media reception not verified or Hardware reception unverified means that configuration was saved, not that the receiver has displayed frames.
EAV checks before the show
| Symptom | What to check |
|---|---|
| Device is missing from discovery | Power, adoption status, address and the selected Engine network interface. Try its known Device IP; discovery and media reachability are separate checks. |
| SSH login fails | Device SSH credentials, shared versus custom login, SSH address/port and reachability from the Engine Mac. A UniFi account or console password is not the device password. |
| Role or channel does not match | Read status again; compare active and saved values. Change the physical role in UniFi. Check whether provisioning has overwritten the channel. |
| SSH works but no picture arrives | HDMI source/cable, sender/receiver role, stream channel, selected adapter and network media traffic. Then check the ShowMotion layer or output mapping. |
| Picture works but audio is wrong | HDMI source audio, Stereo audio 1/2, device audio configuration and the selected ShowMotion audio route. Video-only receiver changes preserve existing device audio. |
| Quality changes disappear | Encoder target bitrate changes are runtime settings and may be reset by reboot or UniFi. Read quality again; the target is a budget, not measured network traffic. |
Rehearse with every intended source and receiver active together. Label the bridges and retain a channel/address list. Complete any provisioning, channel changes or encoder-quality adjustments before the live show.
Other professional IP inputs
For Macnica RX Setup, use the sender's stream parameters or SDP, a source address, destination address/port, resolution and frame rate. The current input setup requires YUV422 10-bit. Inputs in a sync group must use the same frame rate, and the capacity display must remain within its available slots. For Blackmagic IP inputs, Input Settings supports loading SDP and choosing video/audio flows. These paths need supported hardware and a commissioned network. Selecting a menu item does not turn a normal Ethernet adapter into ST 2110 hardware.
16. Configure outputs and streaming
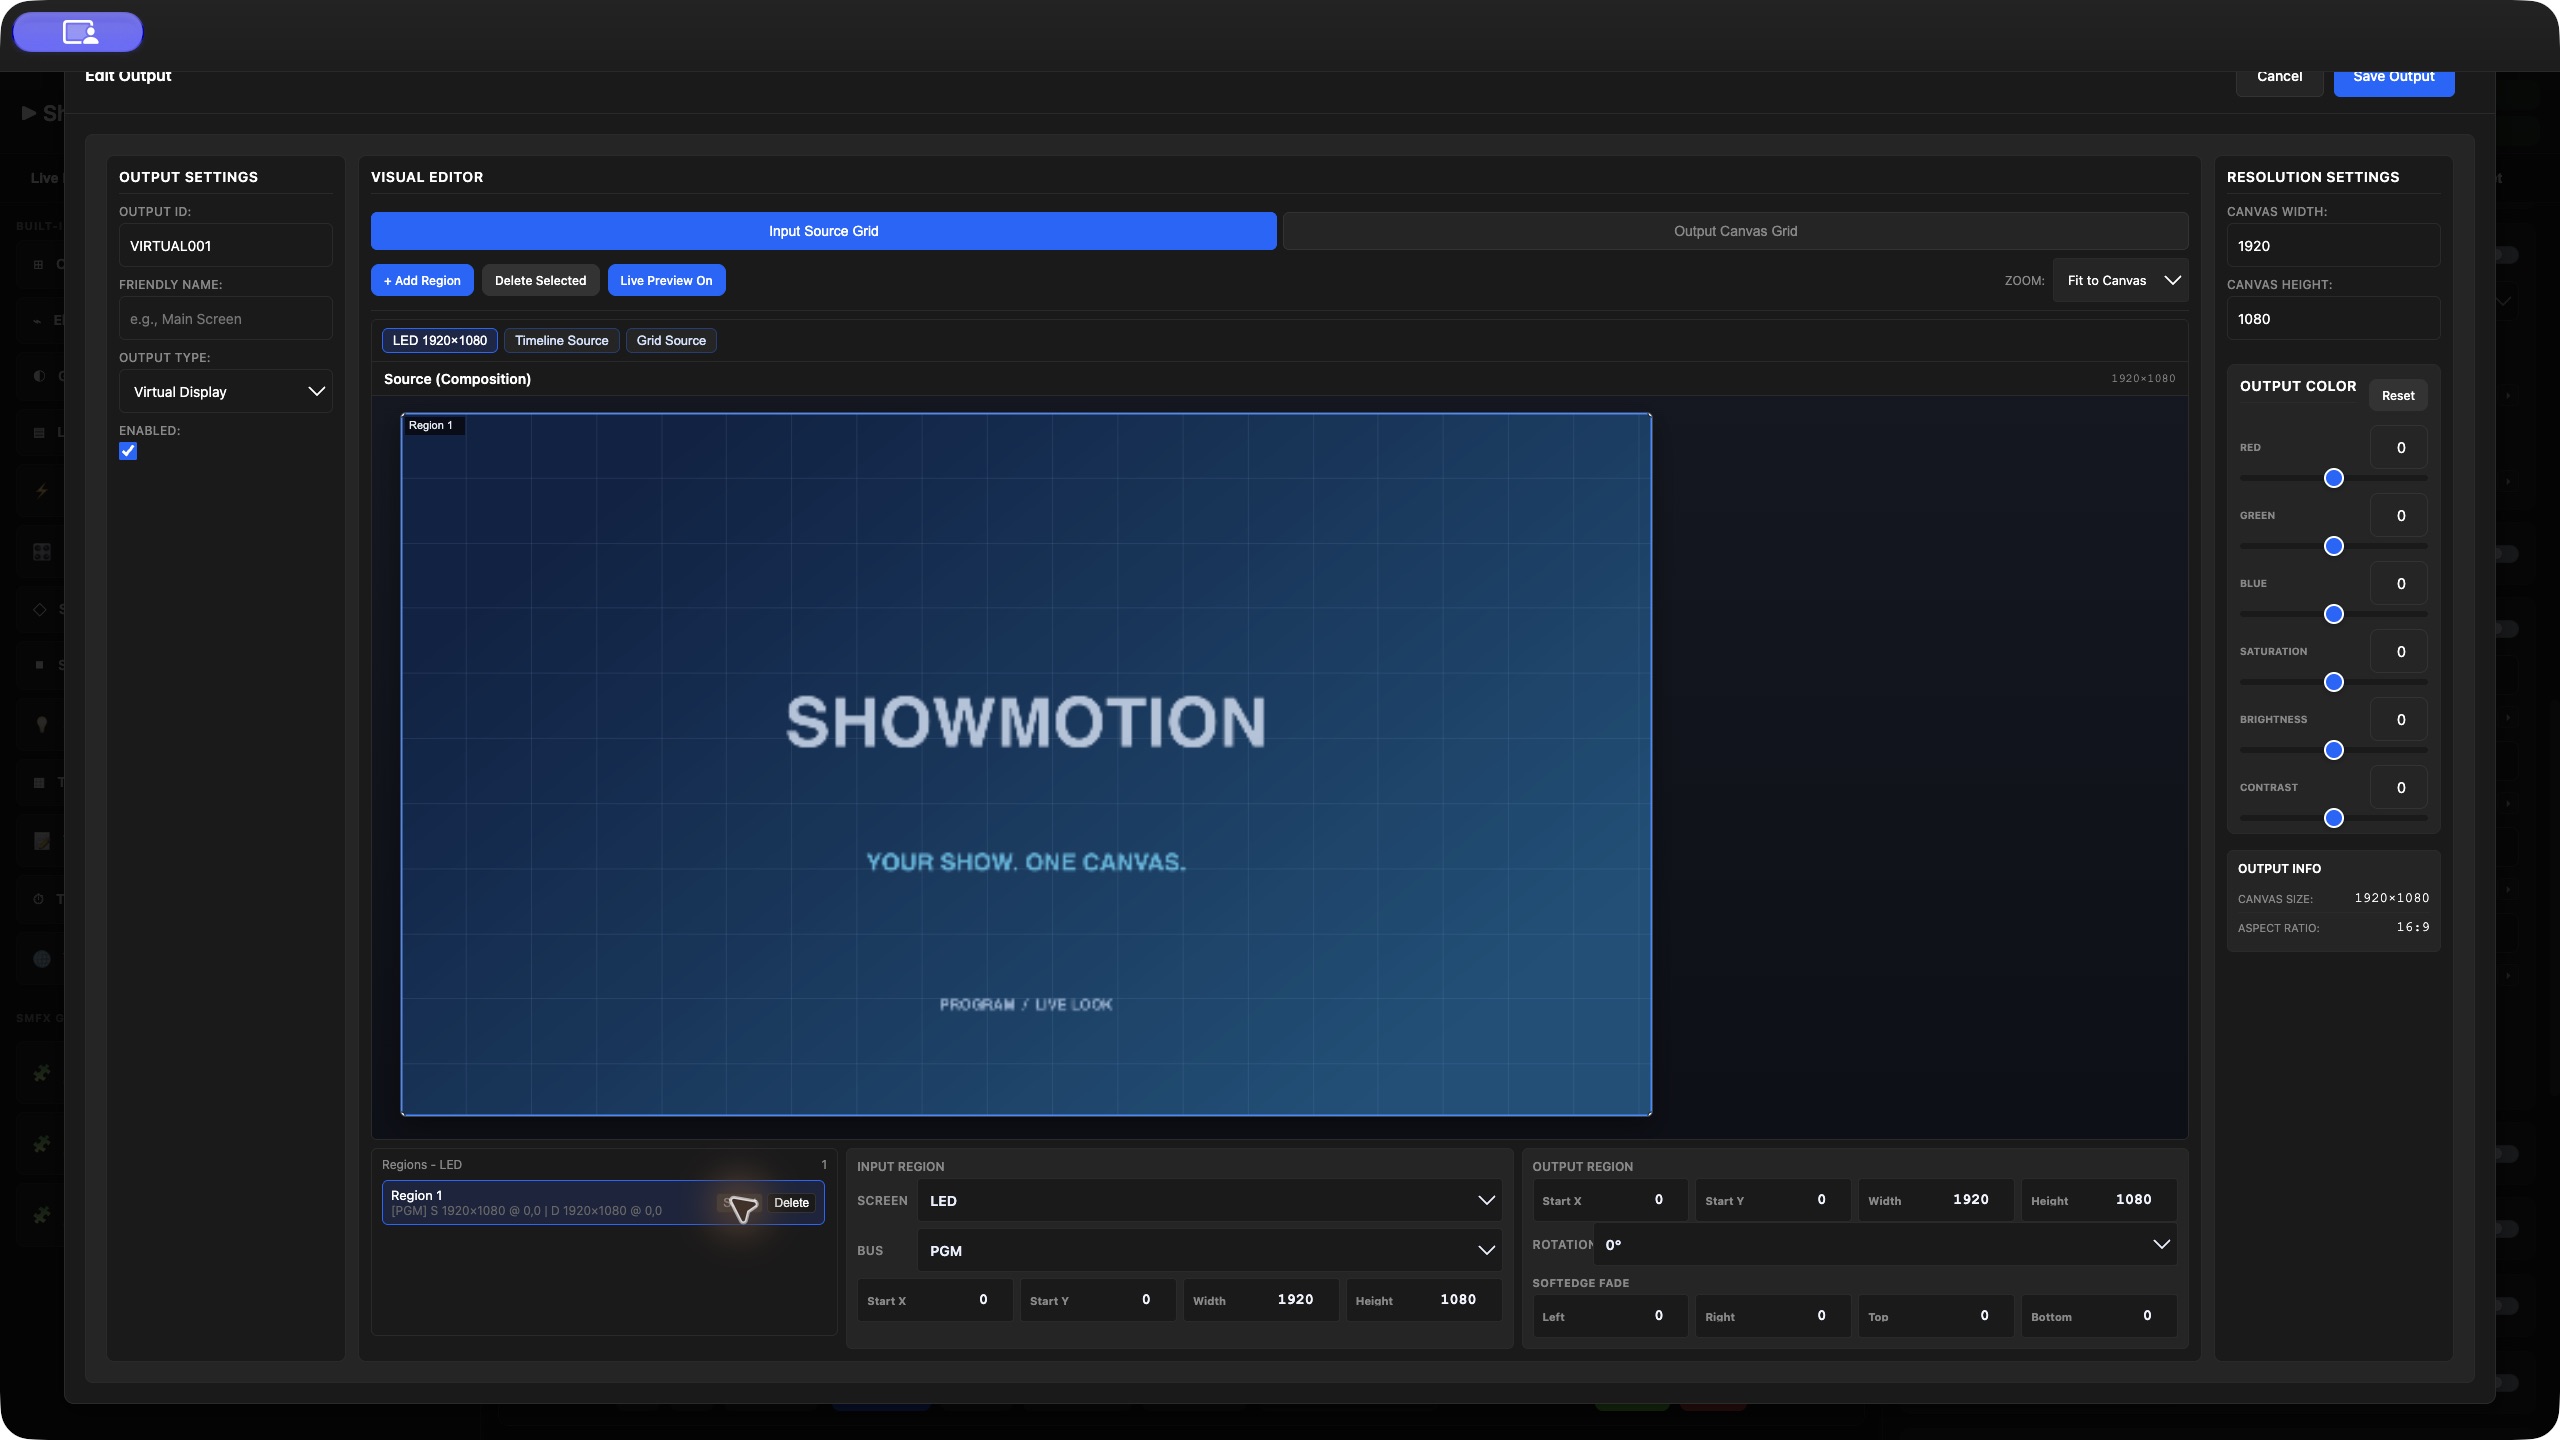
Understand regions
Each output has a canvas and one or more region mappings:
• Source region: the rectangle sampled from the source.
• Output region: where that rectangle lands on the output canvas.
• Bus: the source's Program or Preview state where applicable.
For a large canvas spanning several processors, create one output per destination and select the corresponding source rectangle. Check numeric coordinates, not just the visual preview. Softedge can blend overlaps, but geometry, color and brightness still need adjustment at the real projectors.
Exercise: split one 3840 × 1080 canvas across two displays
This example uses two adjacent 1920 × 1080 destinations without overlap.
1. Set the source Screen to 3840 × 1080.
2. Place content across that complete canvas.
3. Create a Left output with a 1920 × 1080 canvas.
4. Set its source region to X=0, Y=0, W=1920, H=1080.
5. Set its destination region to X=0, Y=0, W=1920, H=1080.
6. Create a Right output with the same destination canvas.
7. Set the Right source region to X=1920, Y=0, W=1920, H=1080; keep its destination region at 0,0 with size 1920 × 1080.
8. Select the intended physical device for each output and enable them.
9. Display a grid with a visible center seam and verify that each half reaches the correct device.
Both outputs sample different parts of the same composition. Setting both source X values to zero repeats the left half on both displays. Setting a destination X of 1920 on a 1920-wide output canvas can place the image outside that output. Source coordinates and destination coordinates belong to different canvases.
Cropping versus scaling
A source rectangle chooses which pixels are read. A destination rectangle chooses where and at what size they are drawn. If their dimensions differ, the image is scaled. For 1:1 mapping, match source and destination dimensions. For intentional scale-to-fit, preserve the intended aspect ratio or accept the designed distortion explicitly.
In the Visual Region Editor, use the input/source and output/destination views to inspect both rectangles. Fit and zoom help you see the mapping; numeric X/Y/W/H values make it reproducible. For multiple regions, label them by destination purpose and check overlap order.
Choose an output
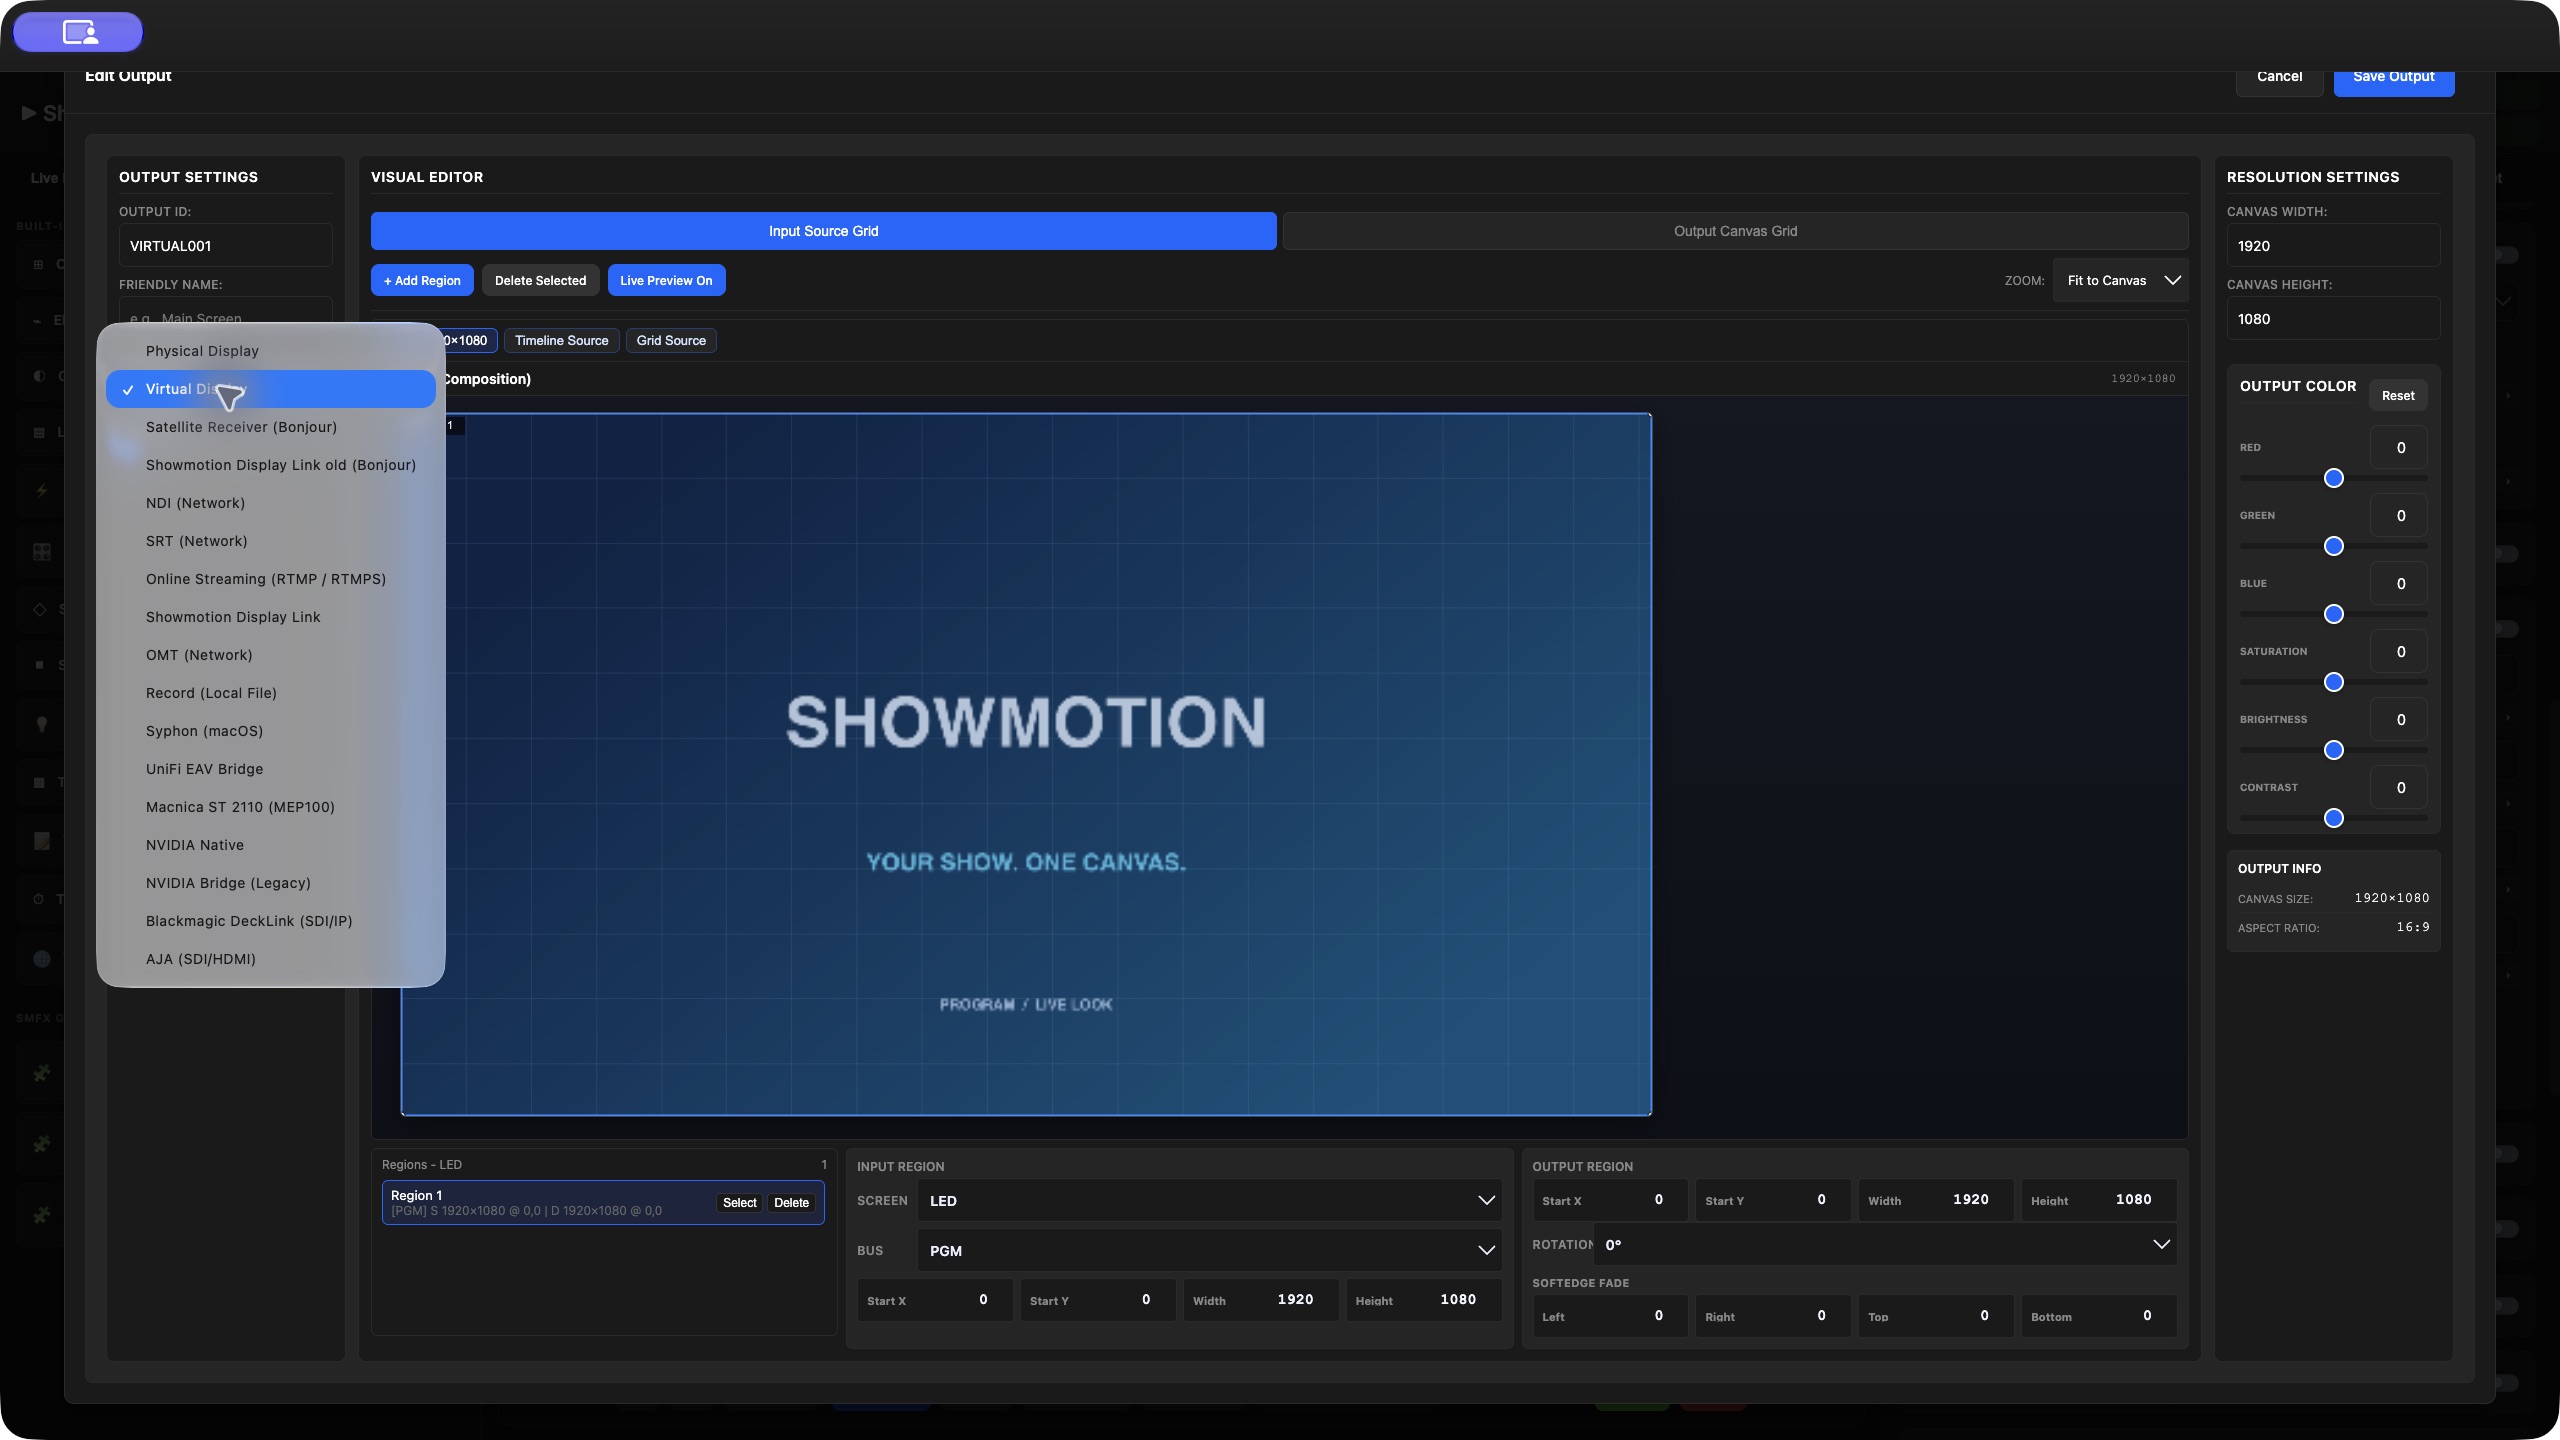
Open Output Settings, create an output, give it a meaningful Friendly Name, and select Output Type. Configure the destination and mapping before enabling it. Some edits to an existing output can update the live mapping, so rehearse on a disabled test output.
| Output Type | Best use | Essential configuration and boundary |
|---|---|---|
| Physical Display | Direct projector, display or LED processor connection | Select the actual display and supported resolution; verify the physical port and display |
| Virtual Display | Internal canvas or Stage processor-area planning | Canvas and regions; this alone sends no picture to a physical display |
| Satellite Receiver (Bonjour) | Compatible ShowMotion satellite | Select discovered receiver; verify its display and any configured audio |
| Showmotion Display Link old (Bonjour) | An installation using the legacy receiver | Use the matching discovered legacy stream; keep distinct from the new transport |
| NDI (Network) | A production mixer or another NDI application | Source name, mode and audio source; HX (request) currently uses Full NDI |
| SRT (Network) | A configured point-to-point video contribution | H.264/H.265, bitrate, connection settings; current output has no embedded audio |
| Online Streaming (RTMP / RTMPS) | Streaming service ingest | Service, URL, stream key, bitrate, FPS and AAC audio source |
| Showmotion Display Link | Compatible Wavelet/Raw UDP receiver | Receiver IP/port and format; no audio or retransmission |
| OMT (Network) | Compatible OMT receiver | Source name, quality and embedded-audio selection; check the receiver |
| Record (Local File) | A saved copy of the mapped composition | Codec, Record FPS and audio source; play back the resulting file |
| Syphon (macOS) | Another application on the Engine Mac | Server name and receiving application; route audio separately |
| UniFi EAV Bridge | Supported EAV receiver group | Configured connection/channel, quantizer and optional bus; current UI specifies SDR at 60 transport Hz |
| Macnica ST 2110 (MEP100) | Professional IP video installation | Supported hardware, mode, network parameters/SDP and capacity |
| NVIDIA Native | Dedicated supported NVIDIA display outputs from the Apple Silicon Engine | Native macOS Receiver and Quadro driver; supported card, compatible output modes and phase-locked FrameSync |
| NVIDIA Bridge (Legacy) | Existing older bridge-based installation | Matching bridge/card and framepool; retain only where that setup requires it |
| Blackmagic DeckLink (SDI/IP) | SDI or supported Blackmagic IP destination | Detected device, transport, video mode and embedded sound source |
| AJA (SDI/HDMI) | Supported AJA output device | Device and supported video mode; verify at its connected destination |
NVIDIA Native: Apple Silicon rendering, dedicated NVIDIA outputs
NVIDIA Native combines ShowMotion's Apple Silicon rendering engine with supported NVIDIA hardware for physical display output. The Mac builds the composition: media playback, layers, effects and Output Mapper regions. The native sender transfers the completed output to NVIDIA Receiver, which manages the attached card, receives and decodes the image, and presents it through the card's display connectors.
The current path runs natively on macOS. It does not require the older Linux backend or a Linux virtual machine during playback. The NVIDIA card is a dedicated output device in this workflow; it does not replace the Apple GPU as ShowMotion's composition engine, and it does not need to appear as a normal macOS desktop GPU.
The key capability is FrameSync with Phase Lock across the supported NVIDIA card’s outputs: the physical display timing is synchronized so the outputs scan in step. This is useful for LED walls and multi-projector shows, alongside persistent output names and EDIDs. It also keeps the show composition and the physical connector configuration as separate, understandable tasks.
The current receiver identifies the NVIDIA RTX A4000 and NVIDIA T600. Use a supported card, enclosure, connection and driver package as a complete configuration. The name “NVIDIA Native” does not imply support for every Quadro, RTX or GeForce board. Available connectors, modes and readiness come from the detected hardware. A Windows Web Remote can operate the ShowMotion engine, but NVIDIA Receiver and the native hardware connection remain on the engine Mac.
Portable output example: a MacBook Pro with a T600 in an OWC Mercury Helios 5S illustrates ShowMotion's compact native-output workflow. Treat the Mac, Thunderbolt connection, enclosure, card and ShowMotion driver as one validated configuration. OWC's standard Helios 5S compatibility information excludes GPU cards; this ShowMotion-specific output path is not a claim of general macOS eGPU support or OWC GPU certification. Verify the complete rig and required output modes with ShowMotion before deployment.
What NVIDIA Receiver does
NVIDIA Receiver is the companion application on the show computer. Its menu-bar controls open the status window and the Configure outputs… window. Receiver owns physical output names, display resolutions, EDIDs and permission to operate without a connected monitor. ShowMotion reads the outputs that Receiver has confirmed and enabled; Output Mapper then decides which show content reaches each one.
In the status window, Start receiver starts the service, Stop safely releases the active hardware session in an orderly way, and Restart NVIDIA rebuilds it. Closing the window hides the window; it does not stop the service. Use Quit receiver app in the menu bar when you intend to shut the receiver down. Stopping or restarting the receiver affects active output, so do this during setup or a planned break.
The Displays window includes a graphics-card selector when several supported cards are present. Select the intended card before editing its outputs. Names and settings belong to that card and connector. Restart receiver in this window addresses the selected card; the main restart operates across the receiver's cards. Several cards add output choices; their presence does not establish physical synchronization between cards.
Configure an output, then map content
1. Start the installed NVIDIA Receiver on the engine Mac and wait for its ready status. Check the actual card and connector rather than relying only on the enclosure's connection light.
2. Open Configure outputs… from the receiver menu. Select the graphics card and the output to configure.
3. Give the output a useful name, such as “LED wall left” or “Confidence display.” Enable Use this output in Showmotion.
4. Start with the monitor's EDID and inspect the effective resolution. EDID describes the timings reported by the connected display, processor or adapter. If a fixed timing is required, enable Lock custom EDID, enter Width (px), Height (px) and Refresh (Hz), then choose Save & Apply.
5. Wait for confirmation. A saved request and an effective hardware mode are different states. If Receiver requests a restart to apply changed timing, schedule that interruption and use its restart control.
6. In ShowMotion's NVIDIA settings, select Refresh Status. Configure in NVIDIA Receiver opens the receiver on the engine Mac, including when the command is issued from a remote browser; it does not install or open a receiver on the remote Windows computer.
7. Add the confirmed NVIDIA Native destination in Output Mapper. Match the canvas to its confirmed dimensions, route the required screens or layers, and enable the output.
8. Test with a moving image and a visible frame counter, followed by the actual show content. Confirm the correct connector, resolution, orientation and refresh rate on the downstream processor or display.
After changing a receiver resolution, refresh discovery and update the corresponding Output Mapper canvas. A mapping created for the old size is not automatically a correct layout for the new size. Keep the receiver mode, output canvas and downstream processor settings consistent.
DisplayPort and HDMI/TMDS connections can expose different effective timings. An adapter's limits remain relevant even when a custom EDID requests a larger mode. Use the effective confirmed mode shown by the receiver, rather than treating an EDID override as extra link bandwidth.
Fixed EDIDs and operation without a monitor
A locked custom EDID provides a deliberate display configuration instead of depending entirely on whichever monitor happens to be connected during setup. It can help keep a known production resolution consistent when preparing an output chain.
Allow output without a connected monitor is a separate setting. Use it only when that workflow is intended and the receiver confirms the hardware can support it with the chosen custom EDID. An assigned EDID alone is not permission to run headless. Likewise, a headless output being ready does not prove that a downstream LED processor is receiving a physical signal.
For ordinary commissioning, connect the real destination and verify the entire chain first. Record the output name, card, connector, effective mode and any custom EDID choice with the show's setup notes.
Frame synchronization: what is kept together
FrameSync with Phase Lock synchronizes the physical display timing across the supported NVIDIA Quadro card’s outputs. In AV operation, this is the FrameSync capability that matters when one picture spans several LED processors, projectors or displays: the outputs scan in step, keeping motion aligned across screen boundaries.
ShowMotion renders the composition on Apple Silicon. NVIDIA Receiver and the ShowMotion Native NVIDIA Quadro Driver provide the synchronized physical outputs. Source-frame coordination also keeps related outputs on matching content, but matching content alone does not describe the phase-locked output capability.
For example, a moving line crossing an LED wall split across four outputs should remain aligned at each join. Configure compatible resolutions and refresh timings for the synchronized outputs, then verify the downstream processors and displays. Different processing delays in those devices can still affect the visible alignment.
There is no separate FrameSync checkbox in the current Receiver Displays window. Use the supported card and driver configuration, confirm the effective output modes, and verify the complete output chain during commissioning.
| Term | What it controls |
|---|---|
| FrameSync / Phase Lock | Synchronizes physical display timing across the supported NVIDIA card’s outputs so their scanout runs in step |
| Source-frame coordination | Keeps related outputs on matching image content |
| External genlock | Locks output timing to an external reference in a configuration that supports that reference |
| Timeline timecode | Aligns the playback position of show content to a time reference |
Phase Lock across a card’s outputs does not automatically establish synchronization between separate cards or a lock to an external reference. For those configurations, use the synchronization hardware and driver setup supported by the installed system. Record the card, output modes and synchronization arrangement with the show setup.
Performance and practical verification
The output path includes composition, image transfer, receiver processing and display presentation. The screen or LED processor adds its own delay. Therefore, receiver timing, Web Remote preview latency and audience-visible end-to-end latency are different measurements.
Do not infer output latency from a browser preview or a receive counter. Measure the complete path with the actual input, show processing and destination when a production has a timing requirement. Higher resolution, transport format, buffering and receiver configuration can change the result.
During commissioning, watch moving content across output boundaries, verify that expected frames remain together, and run the actual combination of effects, media and outputs for a meaningful rehearsal. A static test image can confirm routing but cannot expose cadence problems. The receiver's Frames received counter confirms reception activity; it is not by itself a measurement of delivered display FPS, output phase or picture quality.
If an output is missing, check Use this output in Showmotion, receiver readiness and effective timing, then refresh ShowMotion's status. If it reports Waiting for Receiver, restore the receiver's availability and check that the same output and mode are still present. A changed mode or ambiguous replacement should be corrected explicitly rather than routed to a different connector by guesswork. Use Copy Support Data in ShowMotion's NVIDIA settings when reporting a problem, together with the card, connection, effective mode and a description of the visible symptom.
Example: send Program to a projector
Choose Physical Display, select the connected destination, then set Canvas Width/Height to the intended output raster. In the mapping, select the show Screen and Bus: PGM. Set the Input Region to the Screen's full dimensions and the Output Region to the output canvas. Enable the output and check the projector. If the Screen and canvas have different proportions, decide deliberately whether to scale, crop or letterbox. Do not stretch a presentation by accident.
Example: send a named NDI feed
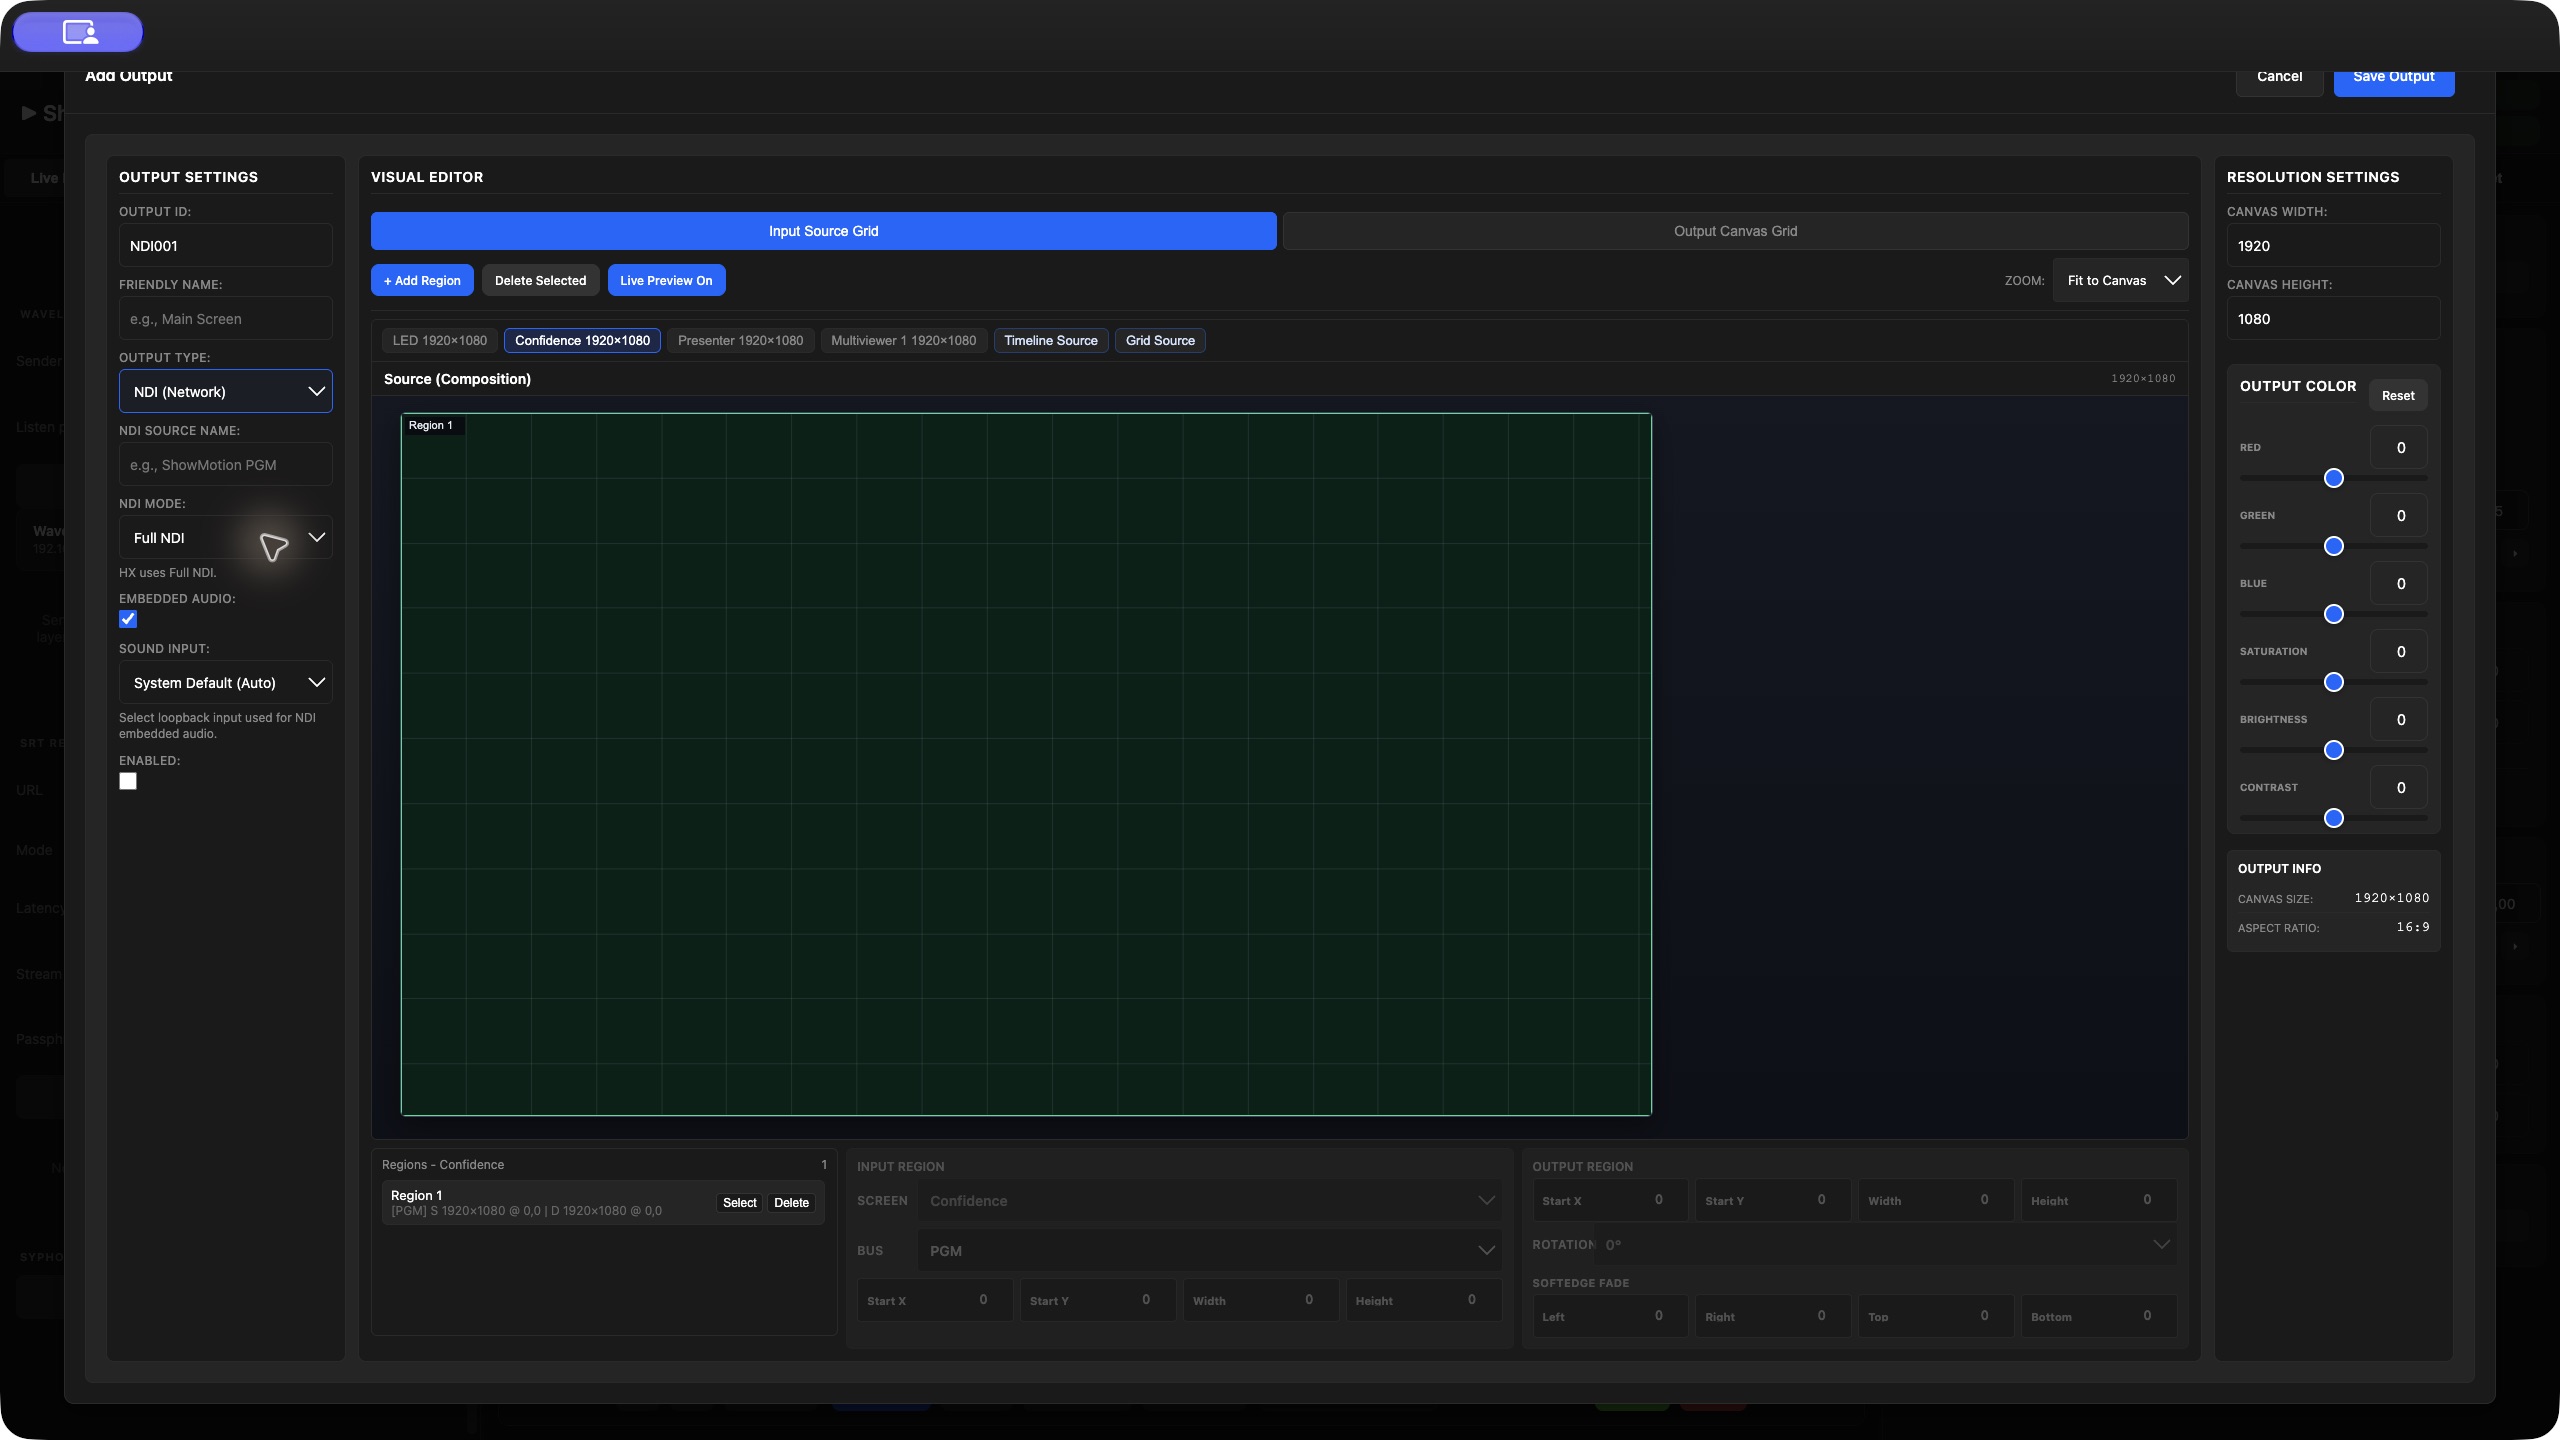
Choose NDI (Network) and enter an unambiguous NDI Source Name, such as “ShowMotion Main Program.” Select Full NDI, map the intended PGM Screen, then choose Embedded Audio and Sound Input as needed. Enable the output and select that named source in the receiving mixer. Check picture, sound and synchronization there. An active sender indicator is not a receiving-picture check. The HX request is not a promise of an HX-encoded low-bandwidth feed.
Example: send SRT video
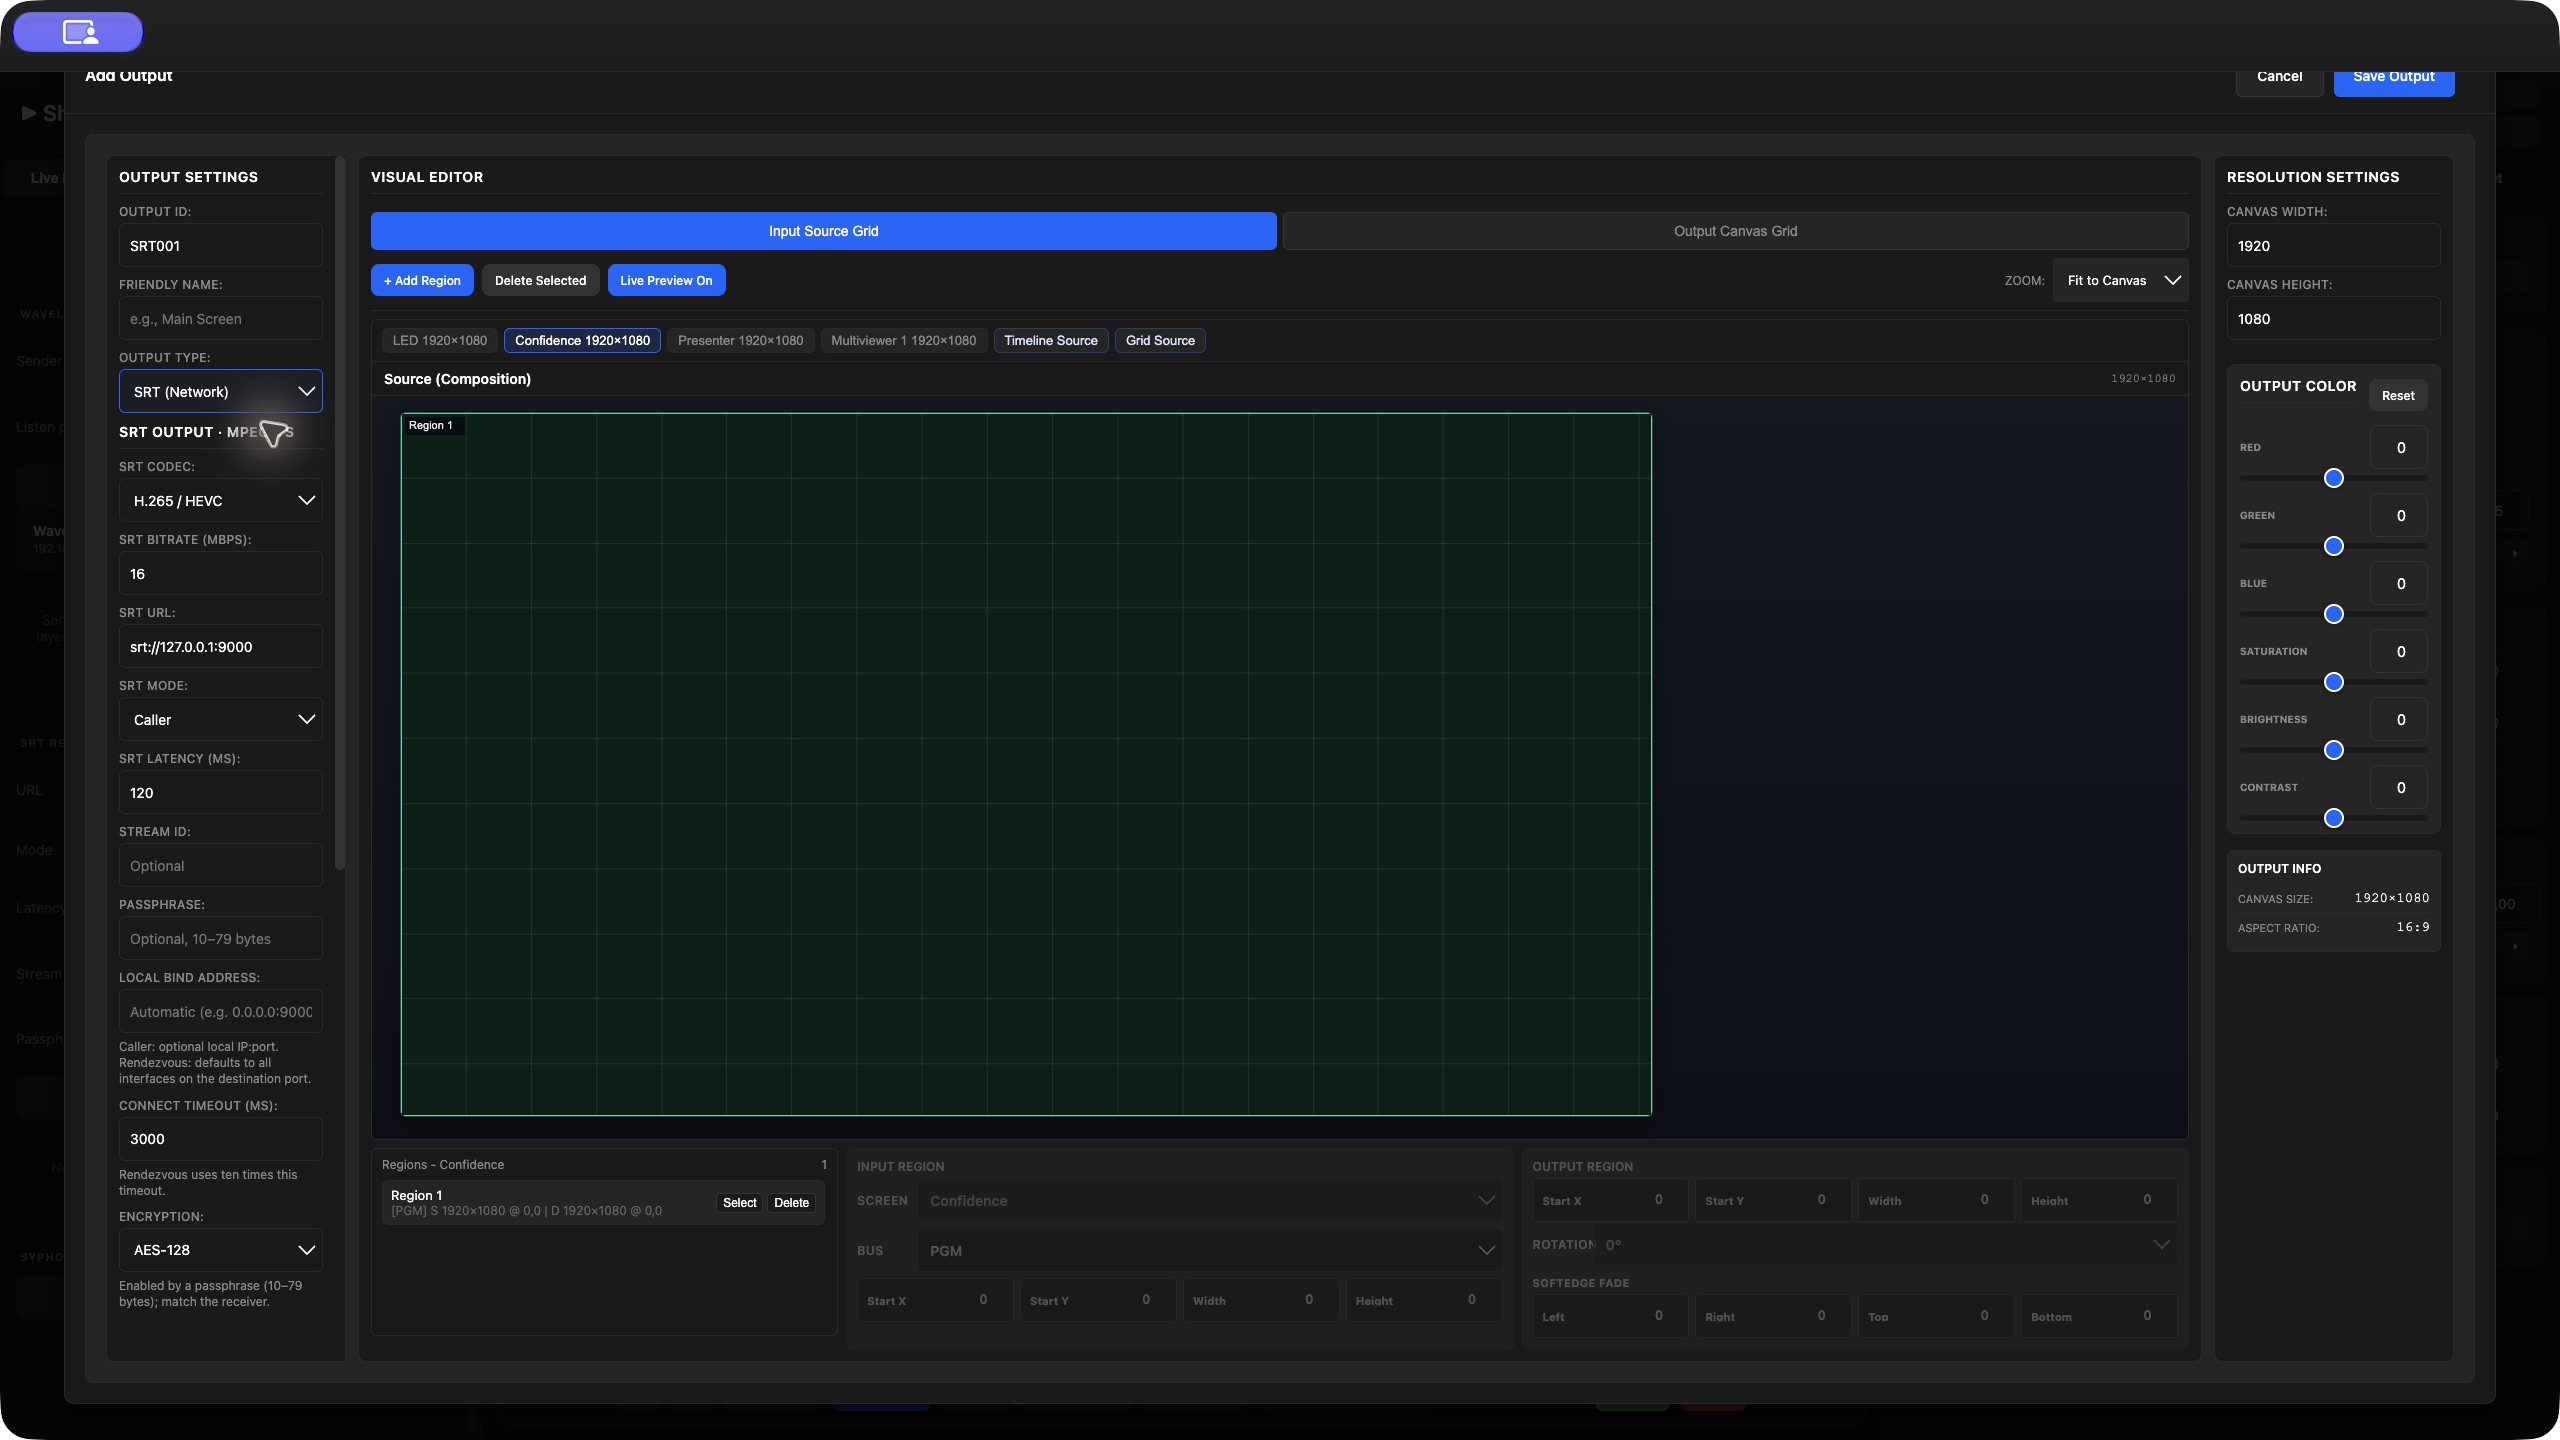
Choose SRT (Network), select SRT Codec H.264 or H.265 to match the receiver, and set SRT Bitrate (Mbps). Enter the receiver's srt://host:port URL and use Caller when connecting to its listener. Match latency, Stream ID, passphrase and encryption when used. Leave Local Bind Address automatic unless the network design requires otherwise. Map the composition and verify video at the receiver. Current SRT output follows the Engine frame rate, requires even canvas dimensions and does not embed audio. Plan the sound path separately before choosing this output for a production.
Example: stream online or record locally
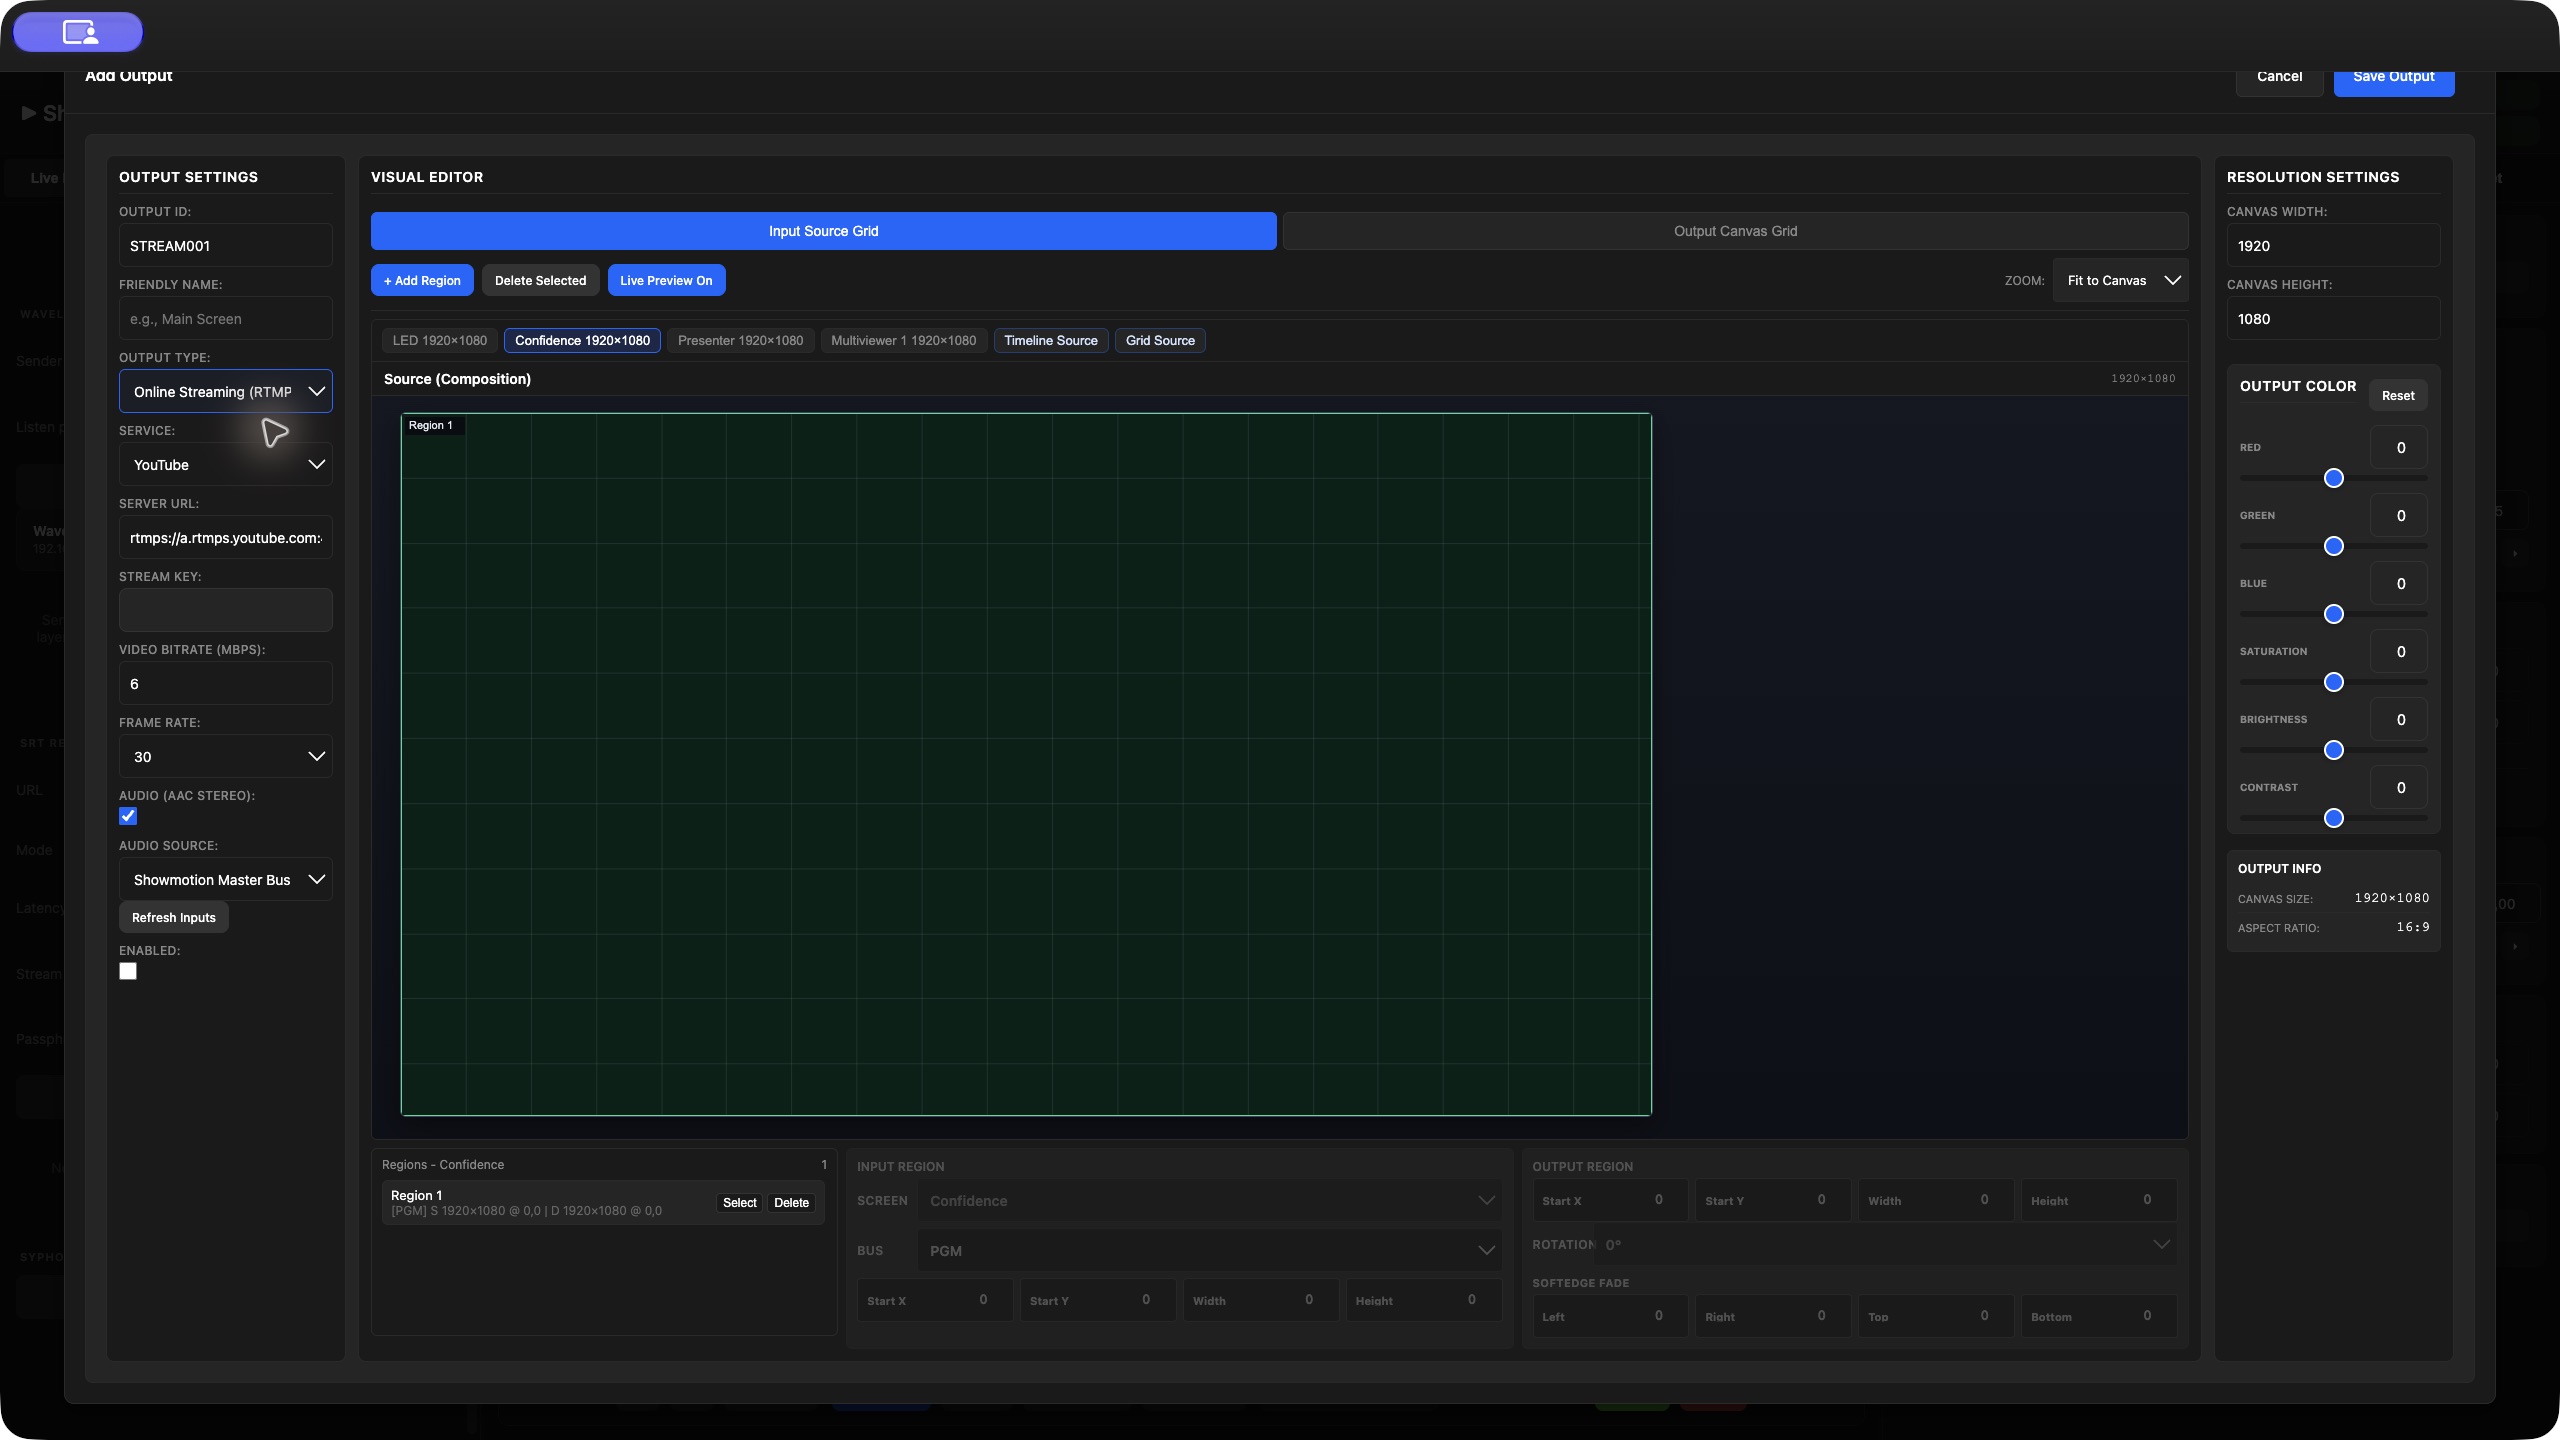
For streaming, select Online Streaming (RTMP / RTMPS) and the service, then use the provider's Server URL and Stream Key. Set bitrate and frame rate, enable Audio (AAC Stereo) if required, and select Master Mix or the intended Audio Source. Map the correct Screen. Confirm the picture and sound in the service's preview before making the event public. Keep the stream key out of screenshots and shared project documentation.
For recording, choose Record (Local File). Select H.264/H.265 for a delivery-oriented file or ProRes for a post-production workflow, then set Record FPS, Embedded Audio and Sound Input. Make a short recording of motion and speech. Stop it, locate the resulting file and play it back to verify the actual codec, picture and audio. The recording's frame rate and audio source are explicit choices, not assumptions inherited from a visible mixer meter.
Map two LED processor feeds pixel for pixel
Assume one logical Screen is 3840 × 1080 and two processors each expect 1920 × 1080. Create a left and a right output, each with a 1920 × 1080 canvas. Select the same Screen and PGM bus for both.
| Region setting | Left output | Right output |
|---|---|---|
| Input Region Start X / Start Y | 0 / 0 | 1920 / 0 |
| Input Region Width / Height | 1920 / 1080 | 1920 / 1080 |
| Output Region Start X / Start Y | 0 / 0 | 0 / 0 |
| Output Region Width / Height | 1920 / 1080 | 1920 / 1080 |
Equal source and destination sizes preserve pixel-for-pixel mapping. Changing the destination size scales the selected pixels. + Add Region adds further rectangles when a processor packs several wall sections into one raster. Rotation and Softedge Fade are separate operations; a butt-joined LED wall normally does not need projector-style edge blending.
In Stage, reconcile panel pixel counts, the logical Screen and each processor raster before using Assign 1:1 or creating outputs from processor areas. Use a numbered test pattern to check left/right order, first/last pixels and seams on the physical wall. Stop output test patterns before returning to show content. A correct Stage visualization is useful evidence of your plan; the wall is the final check.
17. Monitor and operate the show
Multiviewer combines Screens and sources in a monitoring layout. It can itself feed an output. Use it for a visual overview of the signals that matter to the operator.
Operator Window provides a dedicated overview of Program and Preview layers, media progress, trigger activity, recording, audio levels and system information. Arrange it so the next action and any approaching media ending are easy to see.
System Info helps distinguish rendering, decoding, encoding and transport problems. Compare Render FPS with Target FPS and watch drop counters under the complete show load.
Stream Deck and Companion
Companion runs between your control surface and ShowMotion Engine. The ShowMotion connection module supplies actions, feedback and ready-made button presets. A Stream Deck is optional: Companion's browser Emulator lets you prepare and rehearse the same buttons without hardware. Companion can run on the show computer or on another networked computer; ShowMotion Engine continues rendering on its Apple Silicon host.
Connect Companion to ShowMotion
1. Start ShowMotion Engine and note the address you use to open its Web Remote.
2. Install and open Bitfocus Companion. Download the ShowMotion Companion module package linked below. In Companion's Modules page, use Import module package to import its .tgz file. Select version 0.2.3 for your ShowMotion connection.
3. In Connections, add/configure the ShowMotion connection. Set ShowMotion host to the Engine computer's IP address and Webserver port to 3000, unless you changed the Engine port. Use 127.0.0.1 only when Companion and Engine run on the same computer. Enable Use HTTPS/WSS only when your Engine address uses TLS. The module's default HTTP timeout is 4000 ms.
4. Verify that the connection reports a connected state and that Screen/Grid choices populate. If necessary, use Refresh ShowMotion State. To make a Grid available for control, open it in ShowMotion's Grid Editor or use it in a composition; the module does not activate a Grid simply to discover it.
5. In Companion, connect and enable your Stream Deck under Surfaces, or open the Emulator. If a Stream Deck is missing, check its surface integration, close a competing Elgato Stream Deck application when using direct Companion control, and rescan.
6. Drag ShowMotion presets onto Companion buttons. Rehearse their targets and feedback before operating the live show.
Download ShowMotion Companion module 0.2.3 · Module license
For Companion itself, see the official module installation, connections, surfaces and Emulator guides.
Start with fixed Grid buttons
Open Presets and find Grid · [Grid name]. The Columns category launches complete columns; each named layer category contains its cells, including empty cells. Controls provides layer-stop and whole-Grid-stop buttons. Drag the presets you need onto the button page.
A new cell button follows a position in the Grid, identified by Grid, layer and column. Replacing or renaming the clip in that cell updates the button's content. It does not follow that clip when you move it somewhere else. An empty cell is an Empty / STOP button: pressing it stops its layer. A missing target cannot launch content.
Column triggers respect Ignore Column Header Trigger. Ignored or disabled layers are excluded from the column launch and aggregate status. Empty cells stop the other participating layers. If a participating cell contains a disabled clip, the complete column launch is rejected before sending commands; inspect the Companion log. Column launch sends several layer commands, as in the editor, and is not an atomic frame-accurate multi-layer trigger.
Operate a larger Grid with a dynamic view
1. Place the desired Grid's selection button from Grid View · Select 8×4 and press it.
2. Place the matching Grid View · 8×4 · Row 1 through Row 4 presets in their intended rows. Add matching Headers to launch the visible columns.
3. Add LEFT, RIGHT, UP, DOWN, HOME, row stops and GRID / POSITION from Grid View · Controls as needed.
4. Navigate and verify that each button's thumbnail, name and action now address the displayed cell.
8×4 means 32 clip buttons. This fills a Stream Deck XL page before adding headers or navigation: put these controls on another page or choose a smaller custom view. The Grid view selection action supports 1–8 columns and 1–8 rows. For a custom arrangement, set the same row, column and View ID in each button's action and feedback.
All supplied presets start with View ID main. Sharing that ID makes selection and navigation common to those buttons, even on different Stream Decks. Use different IDs, such as operator-left and operator-right, for independent views; keep the ID consistent across each view's selection, navigation, actions and feedback. Selection and viewport position are stored with the Companion connection. Navigation advances by one viewport and stops at the Grid boundary; cells outside the Grid do nothing.
Read the buttons correctly
| Button display | Meaning |
|---|---|
| Green / ACTIVE | selected clip in its Grid layer. |
| Orange / FADE | clip is fading out. |
| Dark | clip exists but is not selected. |
| Green / FULL column | all participating layers match that column and transitions have finished. |
| Yellow / PARTIAL column | only some participating layers match. |
| Grey / OFFLINE | Engine connection or Grid runtime unavailable. |
| DISABLED / BYPASS | a clip/layer is disabled or visually bypassed. |
| MISSING | the target no longer exists or lies outside the view. |
Grid feedback describes the shared Grid runtime. A green clip does not prove it is visible on a physical Program output, and does not prove its video is playing rather than paused. Keep output monitoring visible during operation.
Thumbnails are static button previews, not live video. The module uses saved Grid snapshots first, then existing video/image/shader thumbnails. A live input or generator without a saved snapshot can show a labelled placeholder. Capture and save its thumbnail in the Grid Editor. The module does not start sources to generate a picture. Changed image references update immediately; images at an unchanged URL refresh after approximately a minute.
Switcher, Timeline and audio controls
Switcher actions include TAKE and CUT for the active Screen, a specific Screen or all Screens, preset load/save on PGM or PVW, active Screen selection and output visibility. Choose a specific Screen when a button must keep a fixed destination; active-Screen actions follow the Engine's selection. Check Swap buses and transition settings when configuring a TAKE/CUT action. Preset save writes show content, so keep it distinct from recall buttons.
Timeline actions include play/pause, named cue activation, cue play, and next/previous cue jump or play. Auto PGM Layer actions resolve the Timeline in the chosen Screen's Program composition; they fail when no Timeline is active there. Specific Timeline ID actions target the selected document. Use explicit Timeline targets when controlling several sequences. Choose Jump/Activate to position at a cue and Play to start from a cue; verify the chosen cue in ShowMotion during rehearsal.
Audio mixer actions set or adjust channel volume and mute. Dynamic channel presets include mute buttons and rotary controls. Select the intended channel and verify the corresponding mixer response. Other supplied actions cover video playback, PDF navigation, ShowMotion Display navigation and global timer controls.
Practical rehearsal
Create a small Grid with two layers and three columns, including an empty cell. Place a clip button, an empty-cell button, a column button and a layer-stop button in Companion. Confirm that each targets the expected content and that empty-cell stop affects only its layer. Change a clip in an existing cell and verify that its button follows the new content. Try a dynamic view, then change its View ID to demonstrate independent navigation. Finally, test one explicitly targeted Switcher recall and Timeline cue with physical outputs monitored. Disconnect and reconnect the Companion connection: stale active feedback should clear and recover from Engine state.
Troubleshooting and update notes
A saved Grid can be discovered before its runtime is loaded; OFFLINE in that case is not necessarily a lost network connection. Open the Grid in ShowMotion and recheck. On initial connection, structure is read from the saved Grid. Unsaved edits made before Companion connected may require a new editor change/save to appear. Current playback is queried separately.
Buttons from module versions 0.2.0/0.2.1 may still bind to clip IDs. Replace them with current cell presets, or reselect targets in both action and feedback. For old Grid selection buttons whose background style is wrong, replace the preset or remove/re-add Grid view: Selected grid feedback. Updating a module does not necessarily replace styles already stored inside existing buttons.
18. Save and reopen your work
A .smproj project bundles settings and Switcher presets. Timeline and Grid media documents are saved separately; keep their .smtl and .grid files with the project's media and import them when moving the show to another system. Saving the project alone does not bundle those documents or all external media.
Physical and network output configurations are global. Loading a project preserves the existing output configuration; it does not replace that machine's hardware and network outputs with a portable project setup. Review the active outputs before loading a rehearsal or training project, and stop or disable live outputs when appropriate.
Save the project and its Timeline/Grid documents after meaningful changes. Store reusable scene and effect presets, Chase patterns and workspace layouts with clear names. In 1.2 personal presets and Chase patterns are preserved when creating or loading projects.
Before handover or touring, reopen the saved show and verify media availability, video mode, speed, trim and start policies. Recheck hardware-dependent devices and capture targets. Copying a project does not by itself establish that every external media file, web page or network source is available on another machine.
Keep a known-good show copy before major edits. Name versions by date or rehearsal milestone, and record the intended output resolution and frame rate alongside the show.
19. Troubleshoot
| Symptom | Check in this order |
|---|---|
| Black output | Output enabled; source and bus; FTB; region bounds; source playing; layer opacity |
| Frozen image | Freeze state; media pause/hold; external clock; incoming-source status |
| No audio | Source meter; mute/fader; routing; bus device/channels; output audio source |
| Uneven motion | Source FPS; composition FPS; output mode; then render and decode load |
| Render FPS below target | Effects, concurrent decoders, total canvas size, encoding and storage load |
| Source discovered but no picture | Sender still running; selected mode; permissions/network; source connection state |
| Wrong Grid content changes | Selected Grid/group; column scope; slot source; routing filter |
| Timeline does not advance | Clock source; incoming timecode; pause/stop cue; active playback range |
| LED image shifted | Source-region coordinates; destination coordinates; panel pixel dimensions; processor mapping |
| Lighting differs from visualizer | Fixture profile/mode; patch address/universe; fixture orientation and physical settings |
| Stream or recording has no sound | Output audio enabled; selected audio bus; bus meter and routing |
Change one variable at a time, then observe the result. If reducing preview resolution helps the editor but not the physical output, continue checking the actual output workload.
20. Show checklist and glossary
Before opening doors
• Reopen the saved project and confirm all required media.
• Match composition, media and output frame rates as planned.
• Check every physical and network destination.
• Rehearse the first and last cue, transitions and emergency fallback look.
• Check audio at the final destination.
• Verify lighting patch and video/lighting triggers together.
• Test stream and recording with the complete output load.
• Confirm all test patterns are off and FTB/Freeze states are intentional.
• Keep the Operator overview visible and a known-good show copy available.
Terms
| Term | Meaning |
|---|---|
| Engine | The Apple Silicon process that plays sources, renders compositions and supplies outputs. |
| Electron | The desktop control application, including local dialogs and application commands. |
| Web Remote | A browser control surface on macOS or Windows; media and physical devices remain on the Apple Silicon Engine host. |
| Shared Texture | Local GPU image sharing between the Engine and Electron, avoiding streamed preview encoding and decoding. |
| NVIDIA Receiver | Native macOS companion that manages supported NVIDIA hardware and physical output configuration. |
| FrameSync / Phase Lock | Synchronized physical display timing across the supported NVIDIA Quadro card’s outputs, keeping their scanout in step. |
| Source | The media, generator, capture or composition that supplies content. |
| Layer | A placed source with transform, opacity and processing settings. |
| Screen | A logical composition with its own PGM and PVW buses. |
| PGM / Program | The live composition for a Screen; output mapping must select it deliberately. |
| PVW / Preview | The prepared composition that can be taken live. |
| TAKE / CUT | Apply the selected transition / switch immediately. |
| Swap | Exchange old Program and Preview when switching, where enabled. |
| FTB | Fade to Black; distinguish this output state from missing media. |
| Canvas | The full pixel raster of a composition or output. |
| Input Region | The selected rectangle from the source composition. |
| Output Region | The destination rectangle on the output canvas. |
| Grid | A launch-oriented composition organized into layers, columns and slots. |
| Slot | One media or composition cell on a Grid layer. |
| Column | A vertical set of Grid slots launched together according to group scope. |
| Group | A collection of Grid layers for organization, launch scope or selective routing. |
| Timeline | A timed composition of tracks, clips, cues and parameter animation. |
| Track | A Timeline row containing clips with its own role in the composition. |
| Cue | A Timeline action at a specific time, or a lighting look/action depending on context. |
| Keyframe | A parameter value authored at a specific time; interpolation controls changes between values. |
| Route | A reference to another composition, optionally limited to selected layers or groups. |
| Preset | Saved settings or a reusable look; the scope depends on the workspace. |
| Chase | A reusable pattern that changes slice visibility over time. |
| Slice | A defined subdivision of a picture used for layout and visibility effects. |
| Composition FPS | The Engine rendering cadence; separate from a source file or timecode rate. |
| Timecode | An external or internal time reference used to synchronize playback. |
| Bus | A signal path: PGM/PVW for pictures, or a mixer route for audio. |
| Master Mix | The main audio mix; embedded output sound must still select the desired source. |
| Embedded audio | Audio carried with a video output where the selected output supports it. |
| Alpha | Transparency information in an image or video. |
| Chroma Key | Removal of a selected color from an image. |
| Mask | A visibility selection; white and black usually indicate included and excluded areas. |
| ASTC | Adaptive Scalable Texture Compression, used by the ShowMotion codec. |
| SMC | ShowMotion codec; a custom video stream in a MOV container. |
| NDI / OMT | Network video transports requiring compatible senders and receivers. |
| Syphon | Local image sharing between compatible macOS applications. |
| SRT | A network contribution transport; this version’s SRT output is video-only. |
| RTMP / RTMPS | Streaming ingest protocols; RTMPS adds transport encryption. |
| SDI | A professional physical video connection, commonly through supported I/O hardware. |
| ST 2110 / IPMX | Professional IP video workflows requiring compatible hardware and a configured network. |
| PTZ | Pan, tilt and zoom controls exposed by a compatible camera. |
| Tally | An indication that a source is on Program or Preview, subject to device support. |
| Pixel mapping | Matching source pixels to the intended LED/processor layout. |
| Softedge | Edge blending for overlapping projected pictures; not normally needed at an LED seam. |
21. Keyboard and mouse shortcuts
Shortcuts depend on the focused workspace and control. Click the workspace or select a layer before using an editing shortcut. In most text and numeric fields, typing and native text editing take priority; undo handling also depends on the workspace. Mac: Command = ⌘, Option = ⌥. Windows: use Ctrl where the table gives Command/Ctrl. Windows editing combinations apply when operating the shared interface through Web Remote on a Windows computer. The show still runs on the Apple Silicon Engine. The Windows Electron Remote application is planned; its release-specific desktop commands are not documented as available here.
Desktop application commands
These commands belong to the current macOS Electron application's menu. A Web Remote browser can reserve the same combinations for its own tabs, printing or page controls; use ShowMotion's visible controls there when necessary.
| Action | Mac |
|---|---|
| New Composition | Command+N |
| Open Project | Command+O |
| Save Project | Command+S |
| Save Project As | Shift+Command+S |
| Undo in the active editor | Command+Z |
| Redo, as displayed in the desktop menu | Shift+Command+Z |
| Enlarge the application interface | Command+= |
| Reduce the application interface | Command+− |
| Reset application interface zoom | Command+0 |
| Preferences | Command+, |
| Kiosk Fullscreen, macOS menu binding | Control+Command+F |
| Quit, macOS menu binding | Command+Q |
Interface zoom changes the size of buttons, panels and text. It is separate from viewport zoom and from composition resolution.
Switcher editing
| Shortcut | Result and scope |
|---|---|
| Command/Ctrl+C | Copy the selected layer to ShowMotion's layer clipboard |
| Command/Ctrl+V | Paste a layer into the selected Screen/bus, with a small position offset |
| Delete or Backspace | Remove the selected layer |
| Arrow keys | Move the selected layer 1 composition pixel |
| Shift+arrow keys | Move the selected layer 10 composition pixels |
| Numeric keypad + / − | Multiply the selected layer's scale by 1.05 / 0.95 |
| Shift with the +/= key or −/_ key | Same layer scaling shortcuts on compatible keyboard layouts |
| Shift while moving a layer | Enable alignment snapping during the move |
| Option/Alt while dragging a source over a canvas layer | Replace the highlighted layer's source |
| Command/Ctrl+P | Toggle play/pause separately for manual-start videos and non-Grid Timelines currently in the selected Screen's PGM |
| Escape | Close an expanded/fullscreen viewport |
Command/Ctrl+P is not TAKE. It only affects eligible PGM sources configured for manual start. If one eligible source is playing and another paused, the command toggles each from its own state. Use each source's transport when you need to establish a known state first. The general Switcher handler does not define Space or Enter as TAKE; use the TAKE/CUT buttons or a deliberately configured external control.
The shared Switcher, Timeline and Grid handlers accept Command/Ctrl+Z for undo and Shift+Command/Ctrl+Z or Command/Ctrl+Y for redo. The desktop menu displays the conventional platform-specific variant above. Undo is an editing aid, not an assurance that every external/live operation can be reversed.
Viewport inspection
| Gesture | Result |
|---|---|
| Space + drag over a viewport | Temporarily pan the editing view |
| Middle-button drag, or Option/Alt + pointer drag within the viewport | Pan the editing view |
| Command/Ctrl + scroll, or supported trackpad pinch | Zoom the viewport around the pointer |
| Scroll within a zoomed viewport | Pan the view |
| Escape while viewport navigation is active | Close its zoom menu and leave the Pan tool |
Space is context-sensitive. Over a viewport it can engage pan; in the Timeline editor it can toggle Preview playback. Move the pointer away from the viewport and focus the Timeline editor when using Space for transport. Use the visible Play/Pause button if focus is uncertain.
Timeline and Grid
| Workspace | Shortcut | Result |
|---|---|---|
| Timeline | Space | Toggle Timeline Preview play/pause when the editor handles the key |
| Timeline | Command/Ctrl+C | Copy the selected curve points, cue or clips, according to the active selection |
| Timeline | Command/Ctrl+V | Paste at the current Preview time; the clipboard and editing mode determine whether points, a cue, a snapshot or clips are pasted |
| Timeline | Delete / Backspace | Remove selected clips, or the selected cue if no clips are selected |
| Grid | Command/Ctrl+Delete or Command/Ctrl+Backspace | Clear the selected slot or selected column range within a layer |
| Grid | Command/Ctrl while dragging an internal slot/column | Copy rather than move the dragged content |
| Grid layer-name field | Enter / Escape | Finish renaming / cancel renaming |
| Grid column-settings dialog | Escape | Close column settings |
Plain Delete in Switcher and Command/Ctrl+Delete in Grid are deliberately different bindings. The Grid shortcut clears slot content; it is not a general command to delete a Grid document.
Media browser navigation
Click inside the Media browser before using these keys. They apply to its visible rows; a collapsed folder's hidden children are not part of the navigation sequence.
| Key | Result |
|---|---|
| Up / Down | Move between visible media/folder rows |
| Home / End | Move to the first / last visible row |
| Right on a closed folder | Expand it |
| Left on an open folder | Collapse it |
| Left from a contained item | Move to its parent folder row |
| Enter on a folder | Toggle expansion |
| Enter on a media item | Open Media Preview |
When Media Preview is already open, navigating media items can update that preview. Selecting a file in the browser does not add it to a Screen; drag it into the destination composition for that.
A one-minute shortcut rehearsal
Select a PVW layer, click out of the Inspector field, nudge it with Right and Shift+Right, then undo both edits. Copy/paste the layer and verify that only one additional layer appears; remove the duplicate. Zoom the viewport and use Fit to Canvas. Finally, click a Media row, navigate with Down and open it with Enter. Rehearse Timeline Space and Grid clear separately so that workspace focus becomes familiar before operating a live show.
Video walkthroughs
Silent demonstrations captured from the real application. Captions distinguish continuous recordings from paced walkthroughs assembled from captured steps. Use the playback controls to pause and inspect each action.
Audio Mixer: find the channel EQ panel
Open, close and reopen the channel EQ panel. This clip demonstrates navigation only; it does not change EQ parameters or demonstrate an audible result.
Adjust and reset the Lift color wheel
Paced walkthrough from real captured UI steps: compare neutral Lift, a visible color adjustment and Reset wheels. The applied example changes the picture in Preview; it is a demonstration rather than a recommended color preset.
Add and rename a Screen
Paced walkthrough assembled from real captured UI steps: add a Screen, select its tab and rename it. This is not an uninterrupted real-time recording; use the written procedure for the complete operation.
Switcher: TAKE and CUT with Swap enabled
Prepare the next look in Preview. TAKE uses the chosen transition; CUT switches immediately. With Swap enabled, the old Program becomes Preview. Silent recording of the actual application.
Timeline: extend a clip and convert it to a Container
Step-by-step screen capture: increase Length, then convert the clip to a Container. Paced from actual application captures; this is not a continuous gesture recording and does not demonstrate edge dragging or Container playback during a pause.
Convert a video in the Media browser
Paced walkthrough assembled from real captured UI steps in the integrated conversion workflow. Follow profile selection and inspect the result. This is not an uninterrupted real-time recording and does not demonstrate the standalone Converter.
Training files
The original training project, Grid and opening Timeline use procedural text and gradients. The three master-cue exercise Timelines also need no external media. The Timeline editing and Container exercise requires the included media/Training-Test-Pattern.mp4; follow its separate instructions to import or relink that source. Read the relevant training instructions before importing documents. For the cue exercise, import LED Background and Presentation Titles before Show Master, then verify the target references. Loading a project preserves global output settings; stop or disable existing live outputs before training.